More than 7 million people around the world have received dental implants to restore one, several or all teeth. Dentures on implants are a reliable, safe and well-researched method of restoring the aesthetics and functionality of the dentition: you can smile beautifully again and eat your favorite food without restrictions.
For those planning to install implants, we have prepared answers to the following questions:
Contraindications for installing titanium rods
Does it hurt during implant placement?
Installation stages (step by step with deadlines)
What not to do after installation?
What complications can there be after implantation?
Guarantees for implant installation
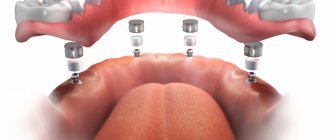
What is the implant installation method?
This means how the implant will be placed in the bone, what processes precede it and what processes complete it. And, starting the story about the methods of installing dental implants, you need to immediately understand the classification of this very installation. We will put the following factors into separate groups:
- preparation of the bone bed for the implant: flap method, minimally invasive, innovative laser,
- presence/absence of bone tissue atrophy: vertical or inclined installation,
- what type of bone will the structure be implanted into: cancellous, basal and cortical plate, into the zygomatic bone and other parts of the skull,
- the tooth was removed a long time ago or removal is still only in the plans - here the installation of an implant can be combined with this process,
- what implantation method is used.
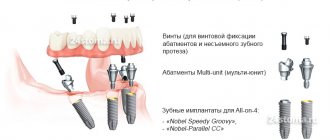
Is it possible to perform All-on-6 simultaneously with tooth extraction?
Undoubtedly. Most “all-on-6” operations in our clinic are performed simultaneously with tooth extraction. There is a certain protocol that we use, and prior to implantation “all on 6”, before implantation begins, the patient undergoes diagnostics with us.
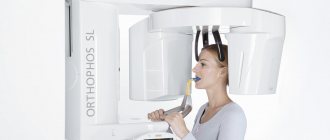
High definition CBCT is performed, see:
and after that the oral cavity is scanned
a special optical scanner. We get a model of the teeth before we even place the teeth.
We make a surgical template
, a virtual plan is created, where we virtually place all the implants at the beginning and see which implant is in which place, what diameter it is. And based on this virtual plan, a template is made and the prosthesis is manufactured. The surgical template looks like the following image, in this case it is intended for the installation of two implants:
Once the surgical template is made, only then does the operation begin. The patient comes, the teeth are removed, a template is installed, fixed, and according to the template, implants are installed in the sockets of the extracted teeth or in those places where the teeth were previously removed. And after that, a temporary prosthesis is fixed to the already installed implants.
Basic methods and methods for installing dental implants
It is in this section that we will consider all the basic techniques for installing dental implants. Regardless of what designs are used.
Patchwork method
The flap method (traditional and most common) involves the following manipulations - directly during the operation, that is, after going through all the preparatory procedures:
- anesthesia is administered,
- the gums are treated with an antiseptic solution,
- the gum is cut - one incision is made along and two across: this creates a flap that peels off, opening access to the bone tissue,
- using metal cutters, a hole is made in the bone tissue - a bed that exactly matches the size of the implant,
- the implant is screwed into the bone tissue and closed with a plug,
- The gum is returned to its place, stitches are applied.
Video showing how implants are installed using the patchwork method for two-stage implantation.
This is a very traumatic method of installing implants, after which the patient will have to recover for about 1-2 weeks. In addition, complications are possible: bleeding from the wound, sutures coming apart, pain, penetration of bacteria through the sutures, and, as a result, tissue inflammation and even rejection of structures. Most often, the flap method is used for single restorations and for classical two-stage implantation.
Surgical templates and guides help reduce complications with this installation. They allow you to avoid massive incisions and make the process of implantation simpler and uncomplicated.
Minimally invasive or transgingival method
The minimally invasive method is used mainly for express implantation using one-piece implant models. This method also has other names: transgingival, sutureless, bloodless, low-traumatic, non-surgical, and so on. All these names reflect its essence: implants are installed quickly and without severe tissue trauma.
%akc54%
The minimally invasive method uses both two-piece classic (but rarely) and one-piece implants (most often), which are literally screwed into the bone tissue through the gum, without massive incisions, without peeling off the gum flap and without creating a full-size bed in the bone tissue.
One-piece structures have a solid structure, so after their installation the tip (abutment) remains above the gum - it can be used for prosthetics almost instantly. In two-piece models from some manufacturers, you can fix the abutment immediately after implantation and install a crown or bridge.
This method, relative to patchwork, has many advantages:
- reduction of operation time,
- relief of the patient's condition,
- reduction in the duration of the rehabilitation period due to minimal tissue trauma.
Patients note that recovery after a mini-surgery occurs in just a couple of days, and there is much less discomfort than after installation using a patchwork method. In addition, since there are no incisions, the risk of infection of the tissues around the implants is reduced - their rejection is almost impossible.
Video of implant installation using a minimally invasive method.
Using laser
Laser technology is not an independent method of implanting implants into bone. This is rather an additional technique that reduces tissue trauma. The laser is used primarily in the conservative flap approach when the gums need to be peeled off. In this case, the laser is an alternative to a surgical scalpel. It allows you to make a very thin incision with minimal trauma to the tissue. In addition, it disinfects the gums, stops (cauterizes) capillaries, which stops bleeding, and the tissues heal 2-3 times faster.
Lateral method
The lateral method is perhaps the most traumatic and risky of all. As a rule, massive plate and disc implants are installed laterally, which are integral with the abutment. To access the bone, a large flap of gum is cut and peeled off, including in the side of the jaw, then the doctor literally cuts out a hole for the implant with a special tool. An important feature: the resulting bed must ideally match the size and shape of the implant, which requires the doctor to carry out jewelry work. The implant is then inserted from the side and the gum is sutured. To stabilize the structure and prevent loosening of the implants, a denture is immediately installed.
This method is practically not used today: there is a high percentage of rejection of such implants due to severe trauma to soft tissues and, as a result, a high risk of inflammatory processes leading to loss of bone tissue around the implants.
One-step installation method
Implantation can be performed not only after a long absence of a tooth. Now there is a method of instantly replacing a removed tooth root with an artificial analogue. That is, the implant is fixed in the same hole (or next to it, if space allows) where there was just a living tooth, immediately after its removal. In this way, you can replace any number of teeth - at least one, at least all at once (which are subject to removal). But you need to understand that if the removal is urgent, and there was no preparation for implantation, then the one-step technique cannot be used.
Depending on the indications, either a classic two-piece or a one-piece implant can be installed. It will also be possible to immediately install a single crown (removed from the bite), a full-fledged extended prosthesis, or you can follow the traditional protocol - suturing the gum and leaving the implant alone. In the latter case, it will take time for the structure to engraft into the bone; it will be possible to switch to permanent prosthetics no earlier than in 3-6 months.
Which clinic to choose
You can get dental implantation in Moscow at one of the ROOTT MCDI clinics. Installation of a two-stage ROOT implant (Switzerland) at the Moscow Center for Dental Implantology will cost 32,000 rubles. (excluding the cost of the crown), express implantation ROOTT – 44,000 rubles. (together with a temporary crown). You can learn more about the implantation technologies used in order to choose the most preferable option and have an idea of what to be prepared for at a free consultation with an implantologist. Appointments can be made by phone or online.
Modern dentistry offers a number of methods that give patients a chance to regain their beautiful smile. Every year, implant treatment becomes more popular and accessible.
In some cases, when it is necessary to remove a patient's own tooth, most often in the case of front teeth, dentists have the option of inserting an implant into the socket immediately after extraction. Then a “temporary” crown can be installed, thanks to which the patient maintains dental aesthetics, speech and chewing function. After about three months, the temporary crown is replaced with a permanent one, made by a technician in a laboratory. Single-stage implants themselves are slightly different in price from those that are loaded with delayed loading.
You can get advice from experienced specialists about dental implantation in the smile zone in the capital’s dental clinics:
| Clinic address | Clinic | Price |
| Dentistry ROOTT |
|
| Moscow, Kolpachny lane, 6, building 4. | Dentistry Sandora |
|
| Dentistry Prosmail.RU |
|
| Moscow, metro station "Butyrskaya", Rustaveli Street, building 15 | Dental Clinic Dention |
|
| Moscow, metro station Barrikadnaya st. Zoologicheskaya, 2, under. 9 | Dentistry DENTAL DREAM |
|
| Moscow, Zvenigorodskoye sh., 7 | Dentistry Implant Expert | Nobel implantation, USA, from 50,000 rubles, Astra Tech implantation, Sweden from 47,200 rubles, OSSTEM Korea - 27,000 rubles |
| Moscow, Bolshoi Sergievsky lane, 5 | Dentistry Viva-dent | Dental implantation depending on complexity: 31,000 - 41,000 rubles per 1 tooth |
| Moscow, st. Molodtsova, 2a | Family discount dentistry | Implantation is carried out using various systems - Astra Tech (Sweden), Ankylos Densply (Germany), Dentium (Korea), the price for 1 restored tooth is from 30,000 rubles. |
| Moscow, Paveletskaya sq., 1 | Dental Clinic Denta VIP | Implantation of the IMPLA system (Germany), OSSTEM (Korea) - from 36,000 rubles. Astra Tech (Sweden) – from 45,000 rubles. |
| Moscow, st. Lyublinskaya, 161 | Dentistry PRESIDENT |
|
Dental implants are the latest technologies that provide exceptional comfort of use. Patients who have lost their front teeth due to an accident, tooth decay, or other diseases can enjoy the ability to function normally and smile without fear, without discomfort, thanks to dental implants. The most modern method of replacing missing teeth is implantation.
Dental implants are placed when we lose our natural teeth. Most often, the decision to replace missing front teeth is made for aesthetic reasons. It's no secret that missing teeth can lead to changes in our appearance, or rather, facial features. You can see the appearance of your cheeks, mouth and nose change. Wrinkles appear faster in the middle part of the face, which makes us feel unattractive.
However, it is worth remembering that from a medical point of view, the replacement of missing teeth, both front and back, is very important. The absence of teeth disrupts the functioning of the chewing system, which over time affects both aesthetics and our health. The absence of molars causes improper grinding of food, which leads to the development of diseases of the digestive system, such as peptic ulcers or increased stomach acidity.
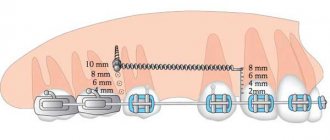
Vertical and inclined installation
Most implants require exclusively vertical installation. And if several of them are placed, then the doctor must observe the principle of parallelism. But in some situations, implants can also be implanted into the bone at an angle of up to 45 degrees. Here, the main indication for inclined installation is a lack of bone height or low density due to atrophy or inflammatory processes. Angled placement allows for a larger area of bone to be used for contact with the implant surface. And also bypass areas of atrophy and anatomical structures (nerves or sinuses), and exclude additional bone grafting surgery[1]. True, not all implants are designed for this – and this must be taken into account.
Caring for bar dentures
In order to extend the life of the beam prosthesis, it must be properly cared for. You will receive aftercare instructions after completing the procedure.
- Bar dentures are classified as conditionally removable. They do not need to be removed every day. Daily hygiene is no different from caring for your own teeth. The denture should be cleaned with a toothbrush twice a day, and your mouth should be rinsed after eating.
- Once a month, you need to do a more thorough cleaning of the prosthesis, bar and top of the implants. To do this, the prosthesis must be removed. Fixation on the beam is highly durable, but the prosthesis can be removed very easily.
It is enough to follow simple rules and regularly visit the dentist for examination so that no problems arise while wearing a denture.
Installation options depending on bone type
Most implants are placed not only vertically, but also exclusively in the spongy – central part of the jawbone. But it is this section that is most susceptible to atrophy or resorption after tooth extraction. Therefore, it is not always possible to use it. Or you have to resort to extension surgery (which is quite traumatic and does not always give results the first time).
Therefore, large manufacturers have developed alternative models for installation in other bone structures (they are not new, but have existed for decades, that is, time-tested):
- basal and compression implants: for placement in deep and very dense areas that are not subject to atrophy - the basal bone and cortical plate. Such models are produced by Oneway Biomed,
- zygomatic (the most striking example is the Zygoma model from Nobel Biocare): these are long models (up to 60 mm), they are installed at an angle and only on the upper jaw. But important organs are not damaged, because In the zygomatic technique, implants are implanted not only into the maxillary bone, but also into the zygomatic bone, passing through the force lines of the skull - therefore they are fixed extremely reliably.
What anesthesia is used for All-on-6 implantation
For implantation of “all on 6” we use local anesthesia, but if the patient has any problems with blood pressure, the patient is very afraid, he has a fear of dental interventions, or the person simply does not want to somehow be present at the operation at this time , in such cases we offer patients sedation.
With sedation, when the patient comes (for surgery), he falls into a medicated sleep, and for him time passes very quickly. Many patients say: “It feels like I just closed my eyes a little, fell asleep and you woke me up - time flew by.” The operation itself takes about 2.5 hours.
Implant rejection due to peri-implantitis
Why might implant failure occur? Peri-implantitis can develop both with “all-on-6” implantation and with a single design. We have a lot of experience using the “all on 6” method, I can’t even say the exact number, because a lot of operations have been performed. And the only thing I can say is that in all time only 1 time
(!!) we lost the implant in the patient’s distal region.
The patient was 78 years old and she was a doctor herself. The loss of the implant was associated with overload specifically in the distal region. She had “everything done to 6” on the upper and lower jaw. And she says: “After 10-15 days, I forgot that the teeth in my mouth were on implants and began to use them in full.” There was an overload on the lower right side and the implant was lost. We reinstalled her implant. Since the structure that was fixed in the mouth is still a temporary structure, not permanent, we reinstalled the implant. And then the rehabilitation proceeded as normal. This was the only case when the implant was lost under an “all-to-6” load.
The patient was happy that despite the fact that he himself was partly to blame, the patient could say: “I didn’t do anything at all and neither did he.” But the patient was adequate, she admitted: “yes, she says, I already forgot about the implant, I felt comfortable.” She was pleased that everything was done under warranty and there were no additional financial burdens on her.
Options for installing alternative implants
All installation methods discussed above are intraosseous – that is, implants are placed inside the bone tissue. The method is considered optimal - and currently all modern implants are installed this way. The metallic root becomes, in the full sense, a replacement for the natural one. The implant has a very similar shape, is located in almost the same place in the bone as the natural root (or affects additional deeper areas - as with basal and zygomatic installation).
But there are other options.
Intramucosal method of implant installation
The installation of intramucosal models does not take place in the bone, but only in the gum and slightly under it (so that the structure does not fall out). These implants are more like buttons rather than analogues of roots - after implantation, a prosthesis will be installed on such a “button”. Now the technique is already a thing of the past due to its low service life and the occurrence of complications (trauma and inflammation of the gums).
Endodontic-endosseous method
Another outdated method is endodontic-endosseous. Here, a thin awl-shaped implant, like a pin, is inserted into the root canal of the tooth, then partially extends beyond the root and is strengthened in the bone. The technique was used to fix a loose or broken tooth. But practice has shown that endodontic-endosseous implantation is difficult to perform, is not suitable for long-term restorations, and is applicable only in a very narrow number of cases (in single-rooted teeth with canals of a certain width).
Mini implantation
Mini-implantation can be classified as an intraosseous technique, but miniature and thin models sink into the bone very shallowly and therefore become loose over time. The fixation of the prosthesis, which also becomes mobile over time due to the wear of the fastenings, does not add comfort. Therefore, the global implantology community considers mini-implantation only as a temporary solution - while a person undergoes treatment. For example, if there are contraindications to more reliable methods of implantation.
Age of patients for the All-on-6 technique
For “all on 6” implantation, this is, of course, the older age group. Mostly people over 45 years of age come to us. When there is talk about implantation “all on 6” - there is practically no upper limit.
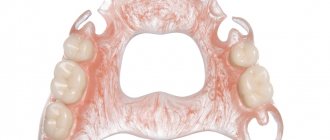
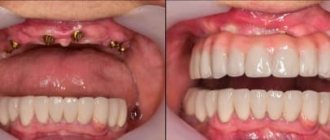
Here is an example of total prosthetics for a 70-year-old patient whose initial situation was as follows:
And the result of his prosthetics is presented in the following picture:
The oldest patient we did this kind of work on was 87 years old, and everything went very well, thank God, both for the patient and for us. Well, in principle, this technique can be used even from the age of 20, if there is a need for it, but often in patients at the age of 20, all teeth are present and everything should be fine.
Recommendations after All-on-6 implantation
After installing the structure on “all-on-6” implants, the patient is usually recommended the same recommendations that we give after any implantation - it is necessary to take either 5 or 7 days of antibiotics, baths with an antiseptic, when the patient holds an antiseptic in his mouth to muffle the flora.
Among the special recommendations is the recommendation not to eat hard or viscous foods. Well, of course, immediately after implantation you should not overload them, try to chew the steak and overload them. Everything should be soft and easy to chew so as not to overload the implants that are installed in the patient.
Are there permanent restrictions after All-on-6 implantation?
There are no restrictions as such. The patient is only not recommended to do what is not recommended to do with his teeth - try to crack nuts, rip off the insulation from wires, although patients “sin” in that due to the fact that the implants are tightly fixed into the bone, they do not have the same teeth as teeth. , no periodontal ligament. And when we create a load, we can develop a much greater force than with our teeth, and some patients forget when they have had these structures in place for a long time.
I had a patient who chewed an olive pit, although I don’t know how this could have occurred to him, but he did it, but he chipped the ceramic that was on the zirconium prosthesis and had to do a restoration.
Main stages of implantation
Implantation is a rather complex procedure, on which a whole team of doctors works (implantologist, orthopedist, gnathologist and sometimes periodontist). Therefore, the whole process is divided into several stages, which must be discussed separately.
Patient examination
To avoid mistakes, a competent doctor always conducts high-quality diagnostics - he refers the patient for tests and a computed tomography scan of the jaw. This will allow you to learn about the characteristics of the patient’s body, the structure and volume of the bone in the lower or upper jaw, and the location of the nerves and air sinuses.
Implantation plan
In accordance with the results of the examination, a treatment plan is drawn up, where the optimal method of dental implantation and installation of implants is selected - their model, number (if a large area of \u200b\u200bthe dentition is restored at once). A 3D model of the jaw is also created, where the virtual placement of implants and their angle of inclination takes place. Additionally, a computer program is used to try on the future prosthesis in order to assess the ability of the implant structure to resist the load of chewing.
Surgical stage
This is the direct installation of implants - it takes place in full accordance with the plan. The operation is performed under local anesthesia, sedation or general anesthesia. In terms of time, implantation lasts from 30-40 minutes (if 1 tooth is missing) to several hours (if you need to restore 1-2 full rows of teeth).
Rehabilitation
Immediately after implantation, the patient goes home, because... Very rarely, a prosthesis is placed immediately on the day of the surgical stage (more on this a little later). The gums and bones need to recover after the intervention. Therefore, a person is provided with a list of recommendations, which includes the following:
- in the first day or two, you should not rinse your mouth: so as not to damage the stitches or introduce microbes into the deep tissues, but it is important to use oral baths with prescribed medications,
- Next, you need to thoroughly hygiene the remaining teeth,
- adhere to recommendations on nutrition and lifestyle: food intake and its consistency will depend on the method of prosthetics. As for lifestyle, at first you need to exclude physical activity, try not to get sick, not visit the sauna or bathhouse, do not fly by plane and take all medications prescribed by the dentist,
- visit an implantologist in a timely manner to assess the condition of the body after implantation and the stage of implantation.
Installation of prostheses
Prosthetics can be immediate, delayed or early. With immediate loading, the prosthesis will be placed a few days after implantation - usually 3-4 days. Most often, this method is used when implanting the entire jaw or a segment of teeth. With delayed loading, a full-fledged prosthesis will be placed 3-6 months after implantation, when the implants have completely taken root. The technique is indicated for the restoration of 1-2 teeth.
Read on the topic: how to properly care for dentures and the oral cavity - advice from implantologists.
Early prosthetics is something between immediate and delayed. This means that the prosthesis will not be installed a few days after the operation, but also not after many months. Early prosthetics 2-6 weeks after implantation are possible with progressive implant models, which integrate very quickly with the bone due to special surface characteristics.
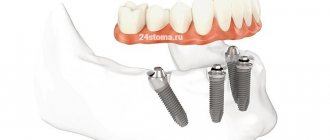
What are the indications for All-on-6 implantation?
Indications are when a person cannot chew, when there are not enough teeth, when it comes to total prosthetics, a person has secondary complete adentia, or the teeth are no longer strong and it is necessary to remove all the teeth of the upper or lower row, as in this clinical case:
Or - both the upper and lower rows simultaneously with implantation.
Contraindications for All-on-6 implantation
What are the contraindications? The same as for conventional implantation: for example, if the patient needs to have 1 implant placed in the frontal or lateral region.
There are temporary or absolute contraindications. Temporary - this is clear from the name. Those that currently do not allow us to install implants that will go away after a certain period of time - this is pregnancy, for example. Or contraindications are those that do not allow easy installation of implants - bone tuberculosis, systemic lupus erythematosus and other diseases. After bisphosphonates, there must be a period of rehabilitation long enough to be able to work on the bone.
Contraindications for implant installation
Currently, the number of contraindications has noticeably decreased than 15-20 years ago and in earlier years. For example, now implants can be placed for diabetes mellitus (in the compensation stage), for periodontitis, and osteoporosis. There are relative (or temporary) contraindications - age under 18-20 years, pregnancy, periods of acute diseases and exacerbations of chronic ones. Absolute contraindications include the following:
- tuberculosis, HIV,
- bleeding disorders,
- pathologies of the endocrine or cardiovascular system,
- oncology,
- decompensated diabetes mellitus,
- intolerance to anesthesia.
Put crowns on teeth: prices in Moscow
How much does it cost to put a crown on a tooth - the price in Moscow for 2022 (in economy-class and mid-price clinics) can have a very wide range. For example, you can easily see that in one clinic you can install a dental crown made of metal ceramics for 5,500 rubles, while in another the price can be 10,000 rubles. And it’s not just a matter of pricing...
The fact is that the same crowns (for example, metal-ceramic) can be made of materials of completely different quality. For example, if a cheap ceramic mass is used, then we can immediately say that the aesthetics of such a crown will be very poor. In addition, in addition to standard metal-ceramics, there is also “metal-ceramics with shoulder mass”, which is much more aesthetically pleasing than the standard version, but at the same time costs 2-2.5 times more.
Installing a crown on a tooth: price 2022
- metal ceramics - from 4,500 to 16,000 rubles.
- ceramics made of zirconium dioxide – from 14,500 to 20,000 rubles.
- from E.max ceramics – from 16,000 to 25,000 rubles.
- all-metal crowns – from 4500 rubles.
Important: if you are planning to install a crown on a tooth, the cost above does not include all possible expense items. Additionally, therapeutic preparation of teeth (if necessary) is paid, as well as the cost of making temporary crowns made of plastic. The latter are necessary to protect the ground teeth while your permanent crowns are being made.
Possible complications after installation of implants
Complications during the first 3 years after implantation in 90% of cases occur through the fault of the implantologist - due to the inexperience of the doctor, poor planning of the procedure, or violation of the surgical technology. On the part of the patient, complications arise when the rules of hygiene and rehabilitation are not followed, and the implantation systems are overloaded with very hard food. The most common complications after implantation are damage to the lining of the maxillary sinus or trigeminal nerve, peri-implantitis and rejection.
[1] Kulakov A.A., “Bone grafting before dental implantation” / GEOTAR-Media, 2022 – 112 p.
Author: Vasiliev A. A. (Thank you for your help in writing the article and the information provided)
Does it hurt to insert teeth?
Typically, patients are interested not only in how a crown is placed on a tooth, but also how painful it is. The most unpleasant stages here, of course, are preparing teeth for prosthetics (i.e., treating them, filling root canals), and sometimes also the process of taking impressions. If already dead teeth are used for crowns, then turning them is completely painless and does not even require anesthesia. If living teeth are ground down, a local anesthetic is first injected.
The only painful moment that I myself (being a dentist) have personally experienced is when, when taking an impression, the doctor performs gum retraction. Retraction refers to the widening and deepening of the gingival sulcus, which is accompanied by a small degree of separation of the soft gum tissue from the tooth. This is done in order to make a more accurate impression of the neck of the tooth, and it is better to do this immediately under anesthesia.