Making a plaster hand with your own hands is available to everyone. A casting made according to all the rules and in compliance with the proportions when mixing the working solution will turn out to be very realistic.
The appearance of the finished product and its strength characteristics will depend on the quality of the gypsum. To achieve maximum similarity, a high-quality form is necessary. Special materials are used for its manufacture.
Idea
For lovers, a plaster cast of a pair of hands clasped together can serve as a gift for a significant date. Often this composition is ordered by newlyweds on their wedding day.
Parents order casts of children's hands and feet as souvenirs in addition to photographs and videos of their children. Such a souvenir, decorated in an elegant frame, can be presented to family and friends as a memory of a memorable date: a first or anniversary birthday, baptism, a child’s first independent step, etc.
You can create a whole collection of such casts, made during different periods of active growth of the child. Later, holding them in their palms, children may remember the happy moments of their childhood.
An elegant plaster hand, made and decorated with your own hands, can also serve as a detail of an original composition. This decoration, for example, can also be used as a mannequin for storing rings.
Gypsum
There are many different materials available for mold casting. These are paraffin, wax, concrete, silicone, metals, even chocolate can be poured into food form. Nowadays plastic compositions and resins have become available. They all have their own specific casting features. To answer the question of how to make a plaster hand, you first need to understand what kind of material it is. It is also important to understand the technology of its casting.
Gypsum powder is a natural material. It is white or grayish in color, finely ground, and quickly absorbs moisture when water is added. It is obtained by firing gypsum stone and is distinguished by purpose: for medical purposes, for molding, for plastering work and for the production of slabs.
Gypsum for construction has a coarser grind, medical gypsum is the purest, and molding gypsum sets more slowly. A useful property for sculptures is an increase (up to 1%) of the working composition in volume. This extension makes it possible to fill in a small drawing of a form. When preparing the solution, within a few minutes it begins to harden and completely sets within 20 minutes.
How to advertise a business
To get started, create an account on Instagram, post a few of your works as examples and set up targeted advertising. You can look for your first clients among young mothers, newlyweds and even dog lovers - the paw print of your beloved pet will please its owner.
To attract attention, you can offer your services in exchange for a post and story to popular bloggers in the region. As offline advertising, you can hand out your business cards at maternity hospitals and the registry office. Try organizing a collaboration with other projects in the gift industry and raffling off a gift certificate.
Features of the technology
Gypsum powder should be stored in a dry place. Wetted or damp material is unsuitable for casting; it does not set. Its characteristics also deteriorate from long-term storage. The gypsum working solution is prepared quickly. Due to prolonged stirring, it “rejuvenates” and sets weaker, which ultimately leads to a loss of strength of the finished product.
If the working solution has hardened before pouring is complete, it is no longer suitable for use. Adding water and stirring it again will not correct the situation. Liquid glue can help slow down the setting of the solution. It (3-4 spoons per bucket of water) is added first and mixed well.
The casting must be dried at temperatures up to 60 degrees. It is not advisable to exceed this limit - the material loses strength and begins to decompose. A do-it-yourself plaster hand is made taking into account all these nuances. To make the finished product stronger, the solution is mixed with lime milk.
Moisture and dampness have a negative effect on gypsum products, so they must be used and stored indoors, especially if they do not have a protective coating.
Preparatory operations
Making a plaster hand on your own is possible at home without the use of any special technologies or special equipment. However, in order for the casting process to go smoothly, you need to carefully prepare. Different batches of gypsum (especially building gypsum) may have different setting times.
To find out for sure, it is best to carry out a test batch and pour a small amount of solution into any simple form. This will allow you to accurately calculate the proportions of gypsum and water and determine the time period within which the solution retains casting properties. Ultimately, this will help save material, time and nerves.
At the preparation stage, they determine the container for the mold, and also select a suitable vessel for mixing the gypsum solution. For one-time pouring, you can take disposable dishes. If you plan to continue casting, it is best to purchase rubber plaster for mixing the working solution.
Half of an old children's ball is suitable for these purposes. Dried plaster from the walls is easily peeled off when the rubber is deformed. The skin of the hand that will be immersed in the molding mass can be lubricated with a thin layer of castor oil or Vaseline.
Reviews
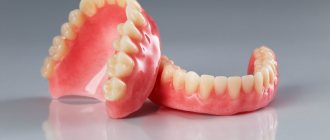
The variety of impression materials used in modern prosthetic dentistry is explained by the wide variety of clinical situations that specialists have to face in the process of treating patients.
Each of the substances has both advantages and disadvantages, so the right to choose a certain mass is the prerogative of the dentist and depends on many nuances.
If you have ever experienced the procedure of making an impression of jaw rows using any material, share your feelings in the comments section.
If you find an error, please select a piece of text and press Ctrl+Enter.
Tags fixed dentures impression materials prosthetics
Did you like the article? stay tuned
Previous article
Suspension “Liquid enamel” from INNOVA
Next article
What factors provoke tooth wear and a competent approach to eliminating the problem?
Simple clay mold
A trial plaster cast of the hand can be successfully cast into a clay mold. This will not be a full-fledged voluminous copy, but it will provide an opportunity to gain first practical experience. Clay is an affordable material, it can be used repeatedly after unsuccessful attempts, which is just right for beginners.
You need two pieces of board or plywood, 5 cm larger than your palm. Lubricate them and your hand with vegetable oil or Vaseline. This is necessary so that the clay does not stick. Place your hand on the board, press it tightly and begin to apply clay moistened with water and kneaded to a thick dough, pressing it well and compacting it.
The total layer should be at least 5 cm. Its top is leveled flat and covered with another board. The entire structure, together with the hand, is carefully turned over. The bottom board is removed and the palm is carefully released. The form for filling is ready. To obtain ideal castings, plastic molding compounds are used.
Alginate for impressions
To make a mold for volumetric casting of complex shapes, special compositions are used. One of the most affordable options is alginate mass. Its main purpose is to make impressions in dental practice. But such material is quite suitable for sculptural castings.
Alginate is a raw material from seaweed. Its dry powder, mixed with water in precise proportions, quickly thickens and acquires the properties of a dense jelly. If you place your hand in such a mass before the setting process begins, and then, after achieving optimal density, carefully remove it, a cavity will form in the mold. If you pour a gypsum solution into it, after hardening it forms an exact copy of the hand.
It will not be possible to remove the casting without destroying the mold. The alginate mass is not in a state of plasticity for long; it begins to lose moisture, becomes brittle and collapses from deformation. Therefore, filling with the working composition should be done immediately after removing the hand. In this case, you can expect a high quality cast copy.
Some brands of alginate masses change color as they harden. When kneading, they have one shade, in the initial setting phase (the optimal moment of immersion of the hand) - another, after reaching density (when the limb can be removed) - a third. The process of making a plaster hand using such a molding material is within the capabilities of anyone.
Preparation
Prepare the necessary material, accessories and tools in advance:
- Alginate mass for impressions;
- Gypsum;
- Stirrer (stirring stick), spoon and, if available, hand mixer;
- Water;
- Bucket or plastic container;
- Measuring cup, scales;
- Primer, protective varnish, sandpaper and acrylic paint for subsequent processing and finishing! (optional).
Prepare all the materials in advance because you will have very little time when you start mixing materials! The alginate mixture must be processed as soon as possible before setting time begins.
Preparation of the solution
A plaster hand is cast with your own hands in a pre-prepared mold. The mixing container is filled with clean cold water in the required quantity. Dry gypsum powder is evenly poured into it. Ideally, it should form a slide above the surface.
The gypsum begins to intensively absorb water. At this time it needs to be stirred well. This should not be done too intensely, as air bubbles will form. They remain in the solution, fall into the mold and, after it hardens, form shells and cavities. Therefore, you can use a drill with a kneading attachment only at low speeds. It's best to do everything by hand using a spoon or wooden stirrer. The goal is to obtain a homogeneous mass without lumps, reminiscent of sour cream in thickness.
The water/gypsum proportions (approximately one to two) are determined experimentally in advance. After mixing is completed, tap the container lightly to release air bubbles to the surface. The resulting foam is collected with a spoon. The prepared working solution is immediately poured into the mold. The time from the start of mixing to pouring is no more than a minute and a half.
Pouring into the mold
A do-it-yourself plaster hand is made by casting into a prepared mold. The solution is added in portions. If you fill a complex form with it all at once, air pockets may form in it. The gypsum solution does not get into such voids; as a result, the finished model will have defects.
To avoid this, the mold is turned in all directions after pouring in the first small part of the working solution. So it spreads over the inner surface and gets into all the recesses. The air inside does not accumulate and is gradually displaced.
With the next portion, the gypsum solution is deposited on the walls more and more, its layer becomes thicker. Once the complex undercuts are completely filled, the remaining plaster can be poured.
Requirements
Making a reliable impression of the patient’s jaw rows directly depends on the quality and physicochemical characteristics of the impression material.
For this reason, a number of requirements are put forward to it, the key ones being the following points:
- High plasticity and viscosity. The material used must fill absolutely all elements located in the contact zone in order to convey the exact relief of the prosthetic bed.
- Elasticity and high resistance - when removing an impression from the oral cavity, it is necessary that it retains the resulting shape, without contraction or deformation.
- Non-toxic. Contact of the impression mass with the tissues of the oral cavity should not cause irritation.
- Allowable curing speed. The duration of hardening of the impression material should be convenient for the specialist and allow him to perform all the required manipulations for making the impression.
- Balanced interaction with water. When in contact with saliva particles, the impression material should spread evenly over the prosthetic bed and displace moisture from its surface, which eliminates the risk of pores forming on the impression.
- No unpleasant taste or smell.
- Preservation of quality characteristics upon contact with elements of the oral cavity. When introducing the material into the oral cavity, its spontaneous spreading or crumbling is not allowed.
- Maintains shape during transportation.
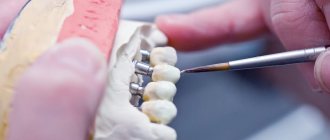
Mandatory types of preparation for dental prosthetics and manipulations prescribed on an individual basis.
Read here about the stages of making porcelain crowns.
At this address https://www.vash-dentist.ru/protezirovanie/nesemnyie-p/voskovoe-modelirovanie-zubov.html you will learn about the purpose of wax modeling of teeth.
Making a plaster hand with your own hands
The technology for making a cast of a child's hand is slightly different from the work process with adults. The fact is that a child, as a rule, cannot keep his hand in a constant position until the molding mass grabs. Moving your fingers while molding ruins everything. Therefore, it is best to carry out this procedure during sleep in its deep phase.
Alginate molding compound is used. It is kneaded in a suitable sized bowl. All components are prepared in advance according to the instructions. Pour alginate powder into the water and stir it with a spoon until smooth for about one minute.
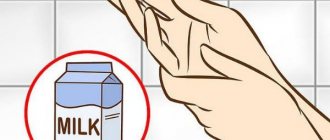
For adults, cold water is used. But to prevent the child from waking up from contact with the cool mass during sleep, it is better to warm it up. Warm water for mixing significantly reduces the time it takes to use the molding compound, so everything needs to be done quickly.
When the mixture is ready, it is poured into a suitable glass, selected according to the child’s hand, and his limb is placed there. The hardening time of the mass is 1-2 minutes. During this period, you need to keep the form at rest in order to get a high-quality print.
After the allotted time, the baby's hand is carefully removed. As a rule, this happens without problems, since the shape is plastic and does not deform under light load.
Immediately after this, the working solution is prepared and poured. Keep the plaster in the mold for no more than 30 minutes. Later, the alginate mass begins to release water, which will negatively affect the casting. The mold is removed from the glass, cut into pieces, and the child's plaster handprint is released. It is cleaned and left to dry.
The same principle is used to cast the hand of an adult or child, who can hold the hand at rest during molding.
Cost and Income Calculations
The initial investment in the business will be in rubles:
- Set for making casts of arms and legs – 5,500.
- Computer and camera – 20,000.
- Material for making impressions and consumables – 1,700.
- Advertising – 3,500.
Total initial costs are 30,700 rubles.
Since the business is highly profitable, this amount will pay off very quickly.
Now let’s calculate the cost of producing one composition and calculate the income:
- The cost of making one impression from reusable material is 10 rubles.
- For the composition you will need a baguette - from 500 rubles, decorative elements, including casts - about 100 rubles, design services - 100 rubles.
- It turns out that the cost of one composition is 700 rubles, its retail price is 2,000 rubles. Income – 1,300 rubles.
- For a small city with a population of 100-200 thousand people. It turns out about twenty orders per month on average. That is, monthly income is 26,000 rubles.
Thus, it turns out that the initial costs are returned within one and a half months.
Kits for making 2D and 3D impressions yourself
Recently, a copied souvenir plaster hand has become popular among ordinary people. How to make it yourself is described in detail in the instructions for ready-made modeling kits. This kit is ideal for those who want to try their hand at volumetric casting, but are unable or unwilling to understand the brands of molding compounds and plaster.
The kit will cost more than separately purchased components. But manufacturers focus on the convenience of this configuration. In addition, they provide a quality guarantee on their materials. The set includes a dry hypoallergenic mass for molds; it is easy to prepare by adding water in the required ratio. High-strength model purified gypsum is also available.
The kit for making casts of simple hand or foot impressions includes a reusable plastic molding compound. Before use, it is kneaded, an impression is made and plaster is poured into it. After solidification, the casting is removed. If re-filling is not expected, the mold is kneaded again until soft and stored in a plastic bag.
Concept and definition
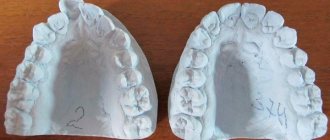
The impression of the jaw row is a reverse image of the tissues of the oral cavity located within the prosthetic bed.
The purpose of this procedure is to obtain an exact copy of the patient’s jaws, on the basis of which, in the future, dental laboratory specialists design a prosthetic product or medical device.
To make impressions of the jaw rows, special materials are used, which are called impression materials.
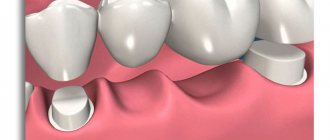
During the development of orthopedic dentistry, beeswax was used as a mass for making impressions. Over time, it was replaced by clay, and even later by gutta-percha and gypsum.
In modern orthopedic dentistry, various types of materials are used to make impressions, differing in their composition, properties and quality characteristics.
The choice of a specific type of substance depends not only on the preferences of the specialist, but also on the method of making the impression.
Finishing
How to make a plaster cast of a hand into a finished composition? To do this, it needs to be painted. For some, the ideal option would be tinting with gold or bronze paint. Another will choose nude or white.
Acrylic emulsion is suitable for decorative coating, but its layer, although thin, can smooth out small lines and folds on the cast. Although, if the copy turned out to be imperfect, then this option is quite suitable. If you need to preserve the smallest details, it is better to use spray paint.
Before finishing, the cast is inspected, all irregularities are polished, and defects are corrected. In order for the paint to lay down in an even layer, the workpiece can be pre-primed, allowed to dry and then sanded again with fine sandpaper.
For installation, select a decorative base at your discretion and mount a copy of the hand or a composition with it on glue. After drying, the souvenir can be varnished for greater effect.
How to make a plaster hand yourself to make copies?
Having mastered the technology of casting and making molds, you can try to expand the range of products. A copied plaster hand, made with your own hands, can serve as a detail of the original composition.
For example, if cast in the position of holding an object, it can serve as a phone stand. In another case, it could be the base of a candlestick or table lamp. You can install a decorative glass in a plaster hand and this composition will turn into a pen holder or an original flower vase.
For mass copying, it is not practical to produce disposable forms. In this case, elastic silicone is better suited. Molds made from this material can be reused many times. To remove the casting, they are cut on one side and the copy is carefully removed.
The silicone is installed in the container in which it was poured during manufacture, and the process is repeated. To make it easier to remove castings, release agents can be used. In such molds you can pour not only plaster, but also paraffin, tin or chocolate. The authors' imagination is limitless - the main thing is not to be afraid to experiment!