If you are thinking about dental implants, where the main requirement is a quick installation with minimal discomfort, then the choice is obvious: use XiVE Friadent implants. Installing such an implant will take no more than an hour, and a wide range of abutments will allow you to choose the most optimal option.
Regardless of the type, any implant in the Friadent Xive line has a porous surface, which is necessary for its strong fixation. The bone grows into the “pores” of the implant, making it stable, so it takes root faster than implants from many other manufacturers.
Types of Friadent Xive
- Regular. Suitable for the classical method of prosthetics.
- Thin. An excellent option for one-stage prosthetics, when the bone is loaded immediately after implantation.
Depending on the type of prosthesis with which the implant is going to be loaded, there are those that are suitable for installing single crowns, and others for large prostheses.
Comparison of cost with analogues
| Implant name | Turnkey installation price in rub. | |
| with metal-ceramic crown | with zirconium crown | |
| Israel | ||
| AlphaBio | from 39000 | from 53000 |
| Mis | from 40000 | from 50000 |
| Germany | ||
| Ankylos | from 40000 | from 50000 |
| Impro | from 42000 | from 60000 |
| South Korea | ||
| Implantium | from 40000 | from 55000 |
| Osstem | from 43000 | from 65000 |
| Switzerland | ||
| Nobel Biocare | from 65000 | from 80000 |
| Straumann | from 77000 | from 90000 |
XIVE Friadent implant range
XiVE S plus Friadent
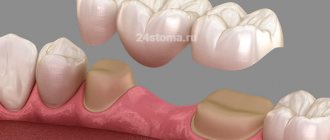
In many cases it is chosen for single restorations or as a retainer for bridges. The implant from Germany is placed using the traditional method in two stages. First, the implant is inserted, and after a few months an abutment and permanent crown are placed on top. The rehabilitation period will be 2-3 months.
Pros:
- high structural strength;
- 100% similar to natural teeth. Provided that the FRIADENT CERCON abutment is used;
- suitable for complex operations;
- a wide selection of abutments allows you to install an implant even after a long absence.
XiVE TG Friadent
Unlike XiVE S plus, the installation of this implant is carried out in one stage using non-surgical implantation. This will save your time and reduce the trauma of the operation.
Installation of XiVE TG is possible if there has been recent tooth loss for no more than 3 months.
Pros:
- installation of the implant will take 10-15 minutes;
- the rehabilitation period will be 1 month;
- high structural strength.
Xive 3.0 Friadent
The designation 3.0 indicates the diameter of the implant. It is recommended to install it in case of problems with bone structures, as well as when installing dentures on the front teeth. Apart from the small diameter, it is no different from older models.
FRIOS opens the way for autogenous bone regeneration
Autogenous bone tissue from patients is still the “gold standard” for augmentation. And we think that's right. Therefore, in the FRIOS range we offer, with the help of the practice-tested operating instruments "FRIOS-OP" (" FRI ADENT O sseous Reconstruction System ") and with the help of the bone substitute "FRIOS Algipore", everything that is necessary for the reliable replacement of bone tissue defects: from bone harvesting through bone tissue transplantation and until successful bone tissue regeneration.
- "FRIOS MicroSaw" (according to Professor Khor) for minimally invasive bone tissue preparation
- "FRIOS BoneCollector" for collecting valuable vital bone chips
- "FRIOS BoneShields" for protective and formative coating of bone defects
- "FRIOS" membrane pins for secure fixation
- "FRIOS Unit S/i" device for augmentation and implantation surgery
- "FRIOS" straight and contra-angle handpieces for maximum freedom of action when preparing bone
- "FRIOS SinusSet" set for all preparation steps during sinus lift surgery using the open technique
The FRIOS product line, like all DENTSPLY Friadent Sirona products (Dentsply official website), are developed together with practicing physicians for practicing physicians. In the development of all these products, the focus is on simple and easy use: always for precise, successful and fast work.
pros
Advantages of the German Friadent Xive implant:
- Porous structure, due to which the implant healing time is reduced by 1.5-2 times.
- Instant loading of the implant is possible immediately after its installation.
- Using computer modeling, it is possible to predict the results of implantation.
- The implant is installed using special tools developed by the same company, so the whole process is quite quick and painless.
- Low risk of implant displacement at the beginning of the rehabilitation period, when it has not yet had time to fuse with the bone.
- A large selection of implants in the line allows you to choose the appropriate option for patients with a wide variety of structural features of the dentofacial apparatus.
In addition, there are no age restrictions for installation. It can be installed for any condition of the jawbone.
Indications for installation
Orthodontic structures from this company are used in many different, and sometimes extremely difficult, clinical situations.
XiVE implants are used for various types of implantations:
- two-stage (classical);
- transgingival (based on a puncture and without tissue incision);
- with pathology of bone tissue;
- with narrowness of the alveolar ridge;
- to restore the 6 front teeth in the “smile zone”;
- if it is necessary to achieve maximum aesthetics of implanted teeth (for people in public professions);
- in complex clinical situations when implants from other companies cannot be used.
Xive designs can be recommended to patients in the following cases:
- in the absence of single teeth (allows you to keep adjacent teeth intact);
- complete absence of teeth (by installing fixed dentures or for subsequent fixation of removable structures);
- absence of end teeth in a row;
- periodontal diseases (periodontal disease);
- elderly patients;
- with insufficient volume or density of jaw bone tissue.
Minuses
However, Friadent Xive implants also have relative disadvantages. All implants in this line are quite expensive. In addition, the cost of a crown or dental bridge must be added to this amount.
For some patients this will be a problem, but it can be solved by taking out an installment plan for implantation, that is, paying the amount in installments.
You may also have difficulty finding a specialist who works with this line, which is problematic precisely because of its high cost. But, nevertheless, finding a clinic that performs implantation using these implants is a feasible task.
Galvanic crowns
Tooth reconstruction in aesthetic dentistry can be carried out using galvanic materials. Electroplated crowns are a ceramic design with a gold cap. This cap is necessary for the formation of the desired shape, and it also closes the space for pathogenic microflora to enter. Despite the presence of gold in such a crown, it fully matches the color of a natural tooth.
Today, galvanic crowns are very popular, and more and more dentists are recommending them to their patients. It is not only aesthetically pleasing, but also safe. This compound does not cause allergic reactions.
If previously it was popular to whiten teeth for their aesthetic appeal, today more and more dental clinic clients are choosing restorations, questioning the safety of in-office whitening. After all, it is reliable, durable and does not entail serious problems.
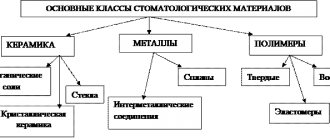
There are many more good examples of aesthetic restoration, but the proposed options have already shown the possibilities of dentistry. Composites, galvanic materials, ceramics are proven and safe materials.
Caring for Xive Friadent implants
Brushing your teeth twice a day and visiting a dental hygienist is the bare minimum to ensure the health of your implant.
As a toothbrush, you need to use an electric brush with pulsation technology. It is also worth considering purchasing an irrigator; it irrigates the interdental spaces and other hard-to-reach places in the oral cavity with a stream, removing plaque. Follow these simple rules to ensure the safety of your XiVE Friadent implant.
Electric brush with pulsation technology
A few words about the guarantee
When installing an Xive Friadent implant from Germany, be sure of its high quality. The manufacturer provides a lifetime warranty on dental implants and components made of titanium. And five years for components using zirconium.
The advantages of a Friadent implant are obvious; implants are as close as possible to natural teeth. In this case, there is no need to grind adjacent teeth. But what is important is that you quickly get used to the implants, there is no feeling of a foreign body in the mouth, food does not stick to the dentures, and the high quality of the materials means you are not afraid of the implant breaking.
Advantages of ceramic inlays and veneers:
- after restoration with ceramics, there are no side effects; this material does not conduct heat and therefore does not change its structure;
- the material is strong enough for restoration (restoration) of both frontal teeth and teeth with high chewing load;
- ceramics are strong enough to replace a significant defect in the contact surface, precisely in the place where low-quality fillings often fall off;
- installing a ceramic structure does not require much sharpening of the tooth, which allows you to maintain its strength and avoid abrasion;
- ceramics interact perfectly with tooth tissues and are not rejected by them.
The greatest value of ceramics in aesthetic dentistry is that this material can take any shape. This suggests that it is ideal for filling, veneering, and creating dentures.
Clinical review of modern materials and techniques
The purpose of this article is to provide the reader with a clinical overview of several modern materials and techniques that allow you to effectively and efficiently perform medical work every day.
Modern trends and materials in adhesive dentistry
A broad but very brief description of current trends in dentistry is the achievement of a reliable adhesive-dentin bond. The emerging evidence from new research challenges previous techniques, creating new questions and controversies. The distinction between full etching and self-etching (without rinsing) is now somewhat blurred, and modern adhesive techniques and new classes of adhesives greatly simplify the work of dentists.
Selective etching technique
It has been argued for a very long time that etching enamel with phosphoric acid allows one to obtain micromechanical foci that promote better penetration of the bond, which in turn ensures the stability of the restoration. However, all full etch products are very technique dependent and tend to cause a lot of error on the part of the clinician. Self-etching products are much easier to use, less likely to cause post-surgical sensitivity, but provide slightly poorer adhesion compared to the full-etch technique. The technique of selectively etching the enamel with a conventional gel and applying a self-etching product to the rest of the cavity is now widely accepted. "Selective etching" is accepted as a third option, occupying an intermediate position between "full etching" and "self-etching" techniques. At the moment, I have been using the selective etching technique for several years, especially when carrying out restorations in the lateral group of teeth.
However, we should all be aware that self-etching adhesives typically contain very weak acids that do not completely remove the smear layer and open the dentinal tubules. Inaccurate application of phosphoric acid to dentin during selective etching has shown a reduction in bond activity and restoration stability. Some phosphoric acid products now available (Premier Etch (Premier Dental Products) and Caulk Tooth Conditioning Gel (DENTSPLY Caulk) are thicker, making selective etching much easier. Some manufacturers have released even more viscous gels, such as Select HV (BISCO Dental Products) and Scotchbond Universal Etchant (3M ESPE).
Modern universal adhesives
The simple concept of a “universal” adhesive immediately caught my attention. In my busy schedule, a truly versatile adhesive that can be easily and effectively applied to every direct and indirect restoration can bring many benefits. From the very beginning, our clinic has always had a number of adhesives based on full etch and self-etch products, which were taken in specific but rather limited situations. Reducing your shopping list to just one product saves money, time and also significantly reduces the huge chance of technical error when applying from multiple containers. Low cost, increased efficiency and low error rates mean high productivity and benefits.
The first universal adhesive was introduced by 3M ESPE with the release of Scotchbond Universal Adhesive. The single-pot, no-rinse, self-etch formula was specifically designed for use in full etch, self-etch and selective etch techniques for direct and indirect application using any RelyX family of composites (3M ESPE). More recently, BISCO Dental Products also released All-Bond Universal. It is also a single bond, no-rinse, self-etching formula that can be applied in any of the three techniques and is compatible with any composite material without a special activator.
Scotchbond Universal Adhesive - I have been using Scotchbond Universal Adhesive on direct and indirect restorations in my practice for about two years now.
While the idea of a universal adhesive may seem suspicious at first glance, the primary chemistry of Scotchbond Universal Adhesive has been used successfully by 3M ESPE for many years in every category of adhesive.
The acid monomer in Scotchbond Universal Adhesive is 10-methacryloxyl dihydrogen phosphate (MDP) which was first introduced by Kuraray in 1981 and has a long successful clinical history. MDP is a hydrophilic, acidic phosphate monomer known for its moisture tolerance and ability to form strong ionic bonds with calcium in hydroxyapatite, as well as zirconium and metal oxides. Additional stability and ionic bonds are also provided by Viterbond copolymer, which, along with ethanol and aqueous solutions, has moisture tolerance and sensitivity reduction Adper Scotchbond Multi-Purpose Total Etch (3M ESPE).
Direct Application - Both in the clinic and in lectures, I base the adhesion option (full etch, self-etch, selective etch) on the clinical presentation when working with direct restorations. If the target area is primarily enamel (eg Minor Class III or Minor Class II), I use Scotchbond Universal Adhesive in the full etch option to achieve better bonding to the enamel edges. In typical grades I, II and V, where there is approximately equal amounts of enamel and dentin, I use selective etching. In general, dentin restorations are more common, so phosphoric acid is often not required.
With the exception of the additional phosphoric acid step in the full etch technique, application procedures for Scotchbond Universal Adhesive are the same for full etch, self etch and selective etch. You just have to remember 20:5:10. The adhesive is applied and left for 20 seconds, then dried with a stream of air for 5 seconds and light-cured for 10 seconds.
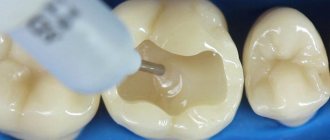
As an example of the use of Scotchbond Universal Adhesive in a direct restoration, Photo 1 shows the pre-treatment view of a tooth that will be restored with composite using the selective etching technique. Scotchbond Universal Etchant was applied to the enamel edge for 15 seconds and rinsed thoroughly with water (Photo 2). The cavity is then thoroughly dried and Scotchbond Universal Adhesive is applied simultaneously to the enamel and dentin and left for 20 seconds (Photo 3). A jet of air was directed at the adhesive layer for 5 seconds (Photo 4) and light-cured Elipar S-10 LED (3M ESPE) for 10 seconds (Photo 5). In this case, Filtek Supreme Ultra (3M ESPE) was applied on a vertical tool, light cured, finished and polished. Photo 6 shows the final appearance of the restoration.
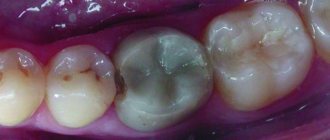
Photo 1: Pit and fissure caries before treatment
Photo 2: Selective enamel etching
Photo 3: Universal adhesive (Scotchbond Universal Adhesive 3M ESPE). Apply for 20 seconds
Photo 4: The adhesive is dried and spread with air for 5 seconds
Photo 5: All Purpose Adhesive light cured for 10 seconds
Photo 6: Postoperative result after 1 week
Indirect application Scotchbond Universal Adhesive can be used as an adhesive with light-curing materials (such as RelyX Veneer Cement) in thin restorations such as porcelain or composite veneers, or in dual-cure or self-cure applications with the newly released RelyX Ultimate Resin Cement. RelyX Ultimate Resin Cement is a catalyzed base material available in two containers and syringe mixed. It contains a dual-cure catalyst for situations where self-curing is necessary. RelyX Ultimate Resin Cement comes in four popular shades as well as a range of spreading caps for application. Excess cement can be easily removed with traditional tools in the gel stage 2 minutes after curing or immediately after rapid light polymerization.
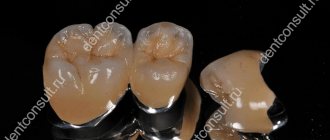
A case of six anterior lithium disilicate ceramic crowns is presented to demonstrate the use of Scotchbond Universal Adhesive with RelyX Ultimate Resin Cement. In Photo 7, the temporary crowns have been removed and the abutment teeth have been thoroughly cleaned with a non-fluoride toothpaste (Premier Dental Products). Lithium disilicate crowns are pre-etched with 5% hydrofluoric acid in a dental laboratory. Scotchbond Universal Adhesive is applied to the inner surface of all restorations, airborne, but not cured (Photo 8). At the same time, the adhesive is applied to each prepared tooth and left for 20 seconds, then aired for 5 seconds (Photo 9). RelyX Ultimate Resin Cement is applied to each crown, which is then seated on the abutment teeth (Photo 11). The remaining cement was removed using a probe and floss (Photo 12), then the restorations were finally light-cured (Elipar S-10). Photo 13 illustrates the final appearance of the restoration after 6 months.
Photo 7: Temporary structures are removed, abutment teeth are thoroughly cleaned
Photo 8: Scotchbond Universal Adhesive applied to the inner surface of the restoration and distributed with a jet of air
Photo 9: Universal adhesive is applied to the tooth core, left for 20 seconds and distributed with air.
Photo 10: Rely X Ultiate Resin Cement (3M ESPE).
Photo 11: RelyX Ultimate Resin Cement is applied inside the frame and seated on the abutment teeth
Photo 12: Initial polymerization is carried out with a short irradiation of light and excess cement is easily removed using a probe.
Photo 13: Final appearance of the restoration
Modern filling materials and application techniques
I have a specific set of favorite composite materials that I have used for years in various restoration situations. At the top of my list of favorites are probably Filtek Supreme Ultra, Esthet-X HD (DENTSPLY Caulk) and KALORE (GC America). While all of these materials have their advantages, I would like to highlight one of the modern composites that greatly simplifies the very complex tasks of my daily practice. Like many practitioners, I typically take a minimally invasive approach. However, placing traditional ductile composites into conservatively formed cavities and pits can be similar to placing a square object into a round shape.
G-aenial Universal Flo (GC America) – A few years ago, GC America released a new material called G-anial Universal Flo. It is quite appropriate to call it “injection composite”. Despite the fact that, in fact, it is a fluid material, it has excellent physical characteristics. It contains 200 nm glass-strontium filler homogeneously distributed in the composite matrix. With its high resistance to tearing and wear, this composite is ideal for forming class I, II, IV and V restorations of any size. It polishes to a high shine with regular polishing heads and comes in 15 shades, including white, 2 cervical and 2 clear enamel, which can be used to add depth and vitality to teeth.
Box Preparation - With modern adhesive dentistry, interproximal box-shaped cavities created to remove caries are the conservative norm. However, small contact cavities present some complications. Poor visibility and high tip speed can be a fatal combination. Even the most steady hand can accidentally hit an adjacent tooth. Traditional viscous composites are very difficult to adapt to such dense spaces, but G-anial Universal Flo provides the adaptability and strength needed when creating box-shaped cavities. However, due to its liquid consistency, the interproximal matrix must be extremely stable, fit tightly apically and provide the required contact contour. The new Composi-Tight 3D XR system (Garrison Dental Solutions) has many options for working with Class II cavities, but it is especially useful for box-shaped cavities and G-anial Universal Flo applications. To demonstrate both benefits, let's demonstrate the following clinical example:
Before creating access to the interproximal lesion, I typically select an appropriately sized Fender wedge (Garrison Dental Solutions) and place it between the teeth (Figure 14). In addition to protecting the adjacent tooth during preparation, the wedge itself protects the gum tissue from trauma and provides initial tooth separation. Composi-Tight 3D XR has the same design as the original Composi-Tight 3D, but has an additional retention tooth to prevent slippage on more rounded teeth, such as the distal canine (Figure 15). I usually use a set of soft wooden wedges that are anatomically shaped and slightly longer than regular wedges. However, in this case I used Wand wedges. They are a plastic version of soft wedges. The delivered structures are shown in photo 16. Pay attention to the tight fit at the neck of the tooth and the repetition of the exact contours. The enamel edge was etched with phosphoric acid (Photo 17) for 15 seconds and rinsed with water. The tooth was then dried and a self-etching adhesive (such as G-anial Bond or Scotchbond Universal Adhesive) was applied according to the manufacturer's instructions (Photo 18). The adhesive is distributed by a stream of air and light-cured. Next, the G0anial Universal Flo is inserted into the prepared cavity (Photo 19), using a unique tip to fill any hard-to-reach areas. In this case, the mesial restoration was restored first, and then, using the same technique, the distal one. Photo 20 shows the result obtained. Note the chameleon-like optical effect, natural shine and anatomical contours.
Photo 14: Fender wedge (Garrison Dental Solutions) in the mouth
Photo 15: Composi-Tight 3D HR Ring (Garrison Dental Solutions)
Photo 16: Composi-Tight 3D HR placed over a wedge (Garrison Dental Solutions)
Photo 17: Selective enamel etching
Photo 18: Self-pressing adhesive (G-aenial Bond GC America) applied and then light cured
Photo 19: G-aenial Universal Flo (GC America) was introduced into the cavity
Photo 20: Final appearance of the composite restoration
Final comment
The modern materials and techniques discussed here have been incorporated into my daily practice. Such materials increase the efficiency and quality of treatment. Although the list of materials is far from exhaustive, it shows how modern materials and techniques can save time and money, and simplify procedures that have historically been considered quite complex.
Posted by Jeff T. Blank, DMD