From this article you will learn:
- before and after photos,
- teeth whitening Zoom – price 2022.
The article was written by a dentist with more than 19 years of experience.
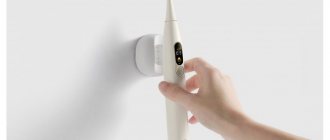
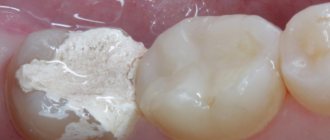
Teeth whitening ZOOM 4 is one of the professional whitening methods that is carried out in a dental office. The active substance used is 25% hydrogen peroxide gel - in combination with a special “Zoom WhiteSpeed” lamp (Fig. 1-2), which, according to the manufacturer, increases the strength and speed of whitening.
Zoom whitening was developed by the American company DISCUS DENTAL, but LED lamps for it are produced by Philips (the Netherlands). Zoom 4 is already the fourth generation of this system, and before that Zoom, Zoom 2 and Zoom 3 were released in turn. At the moment, only the 3rd and 4th generations of this system are used, which (compared to the previous ones) have become much safer for teeth.
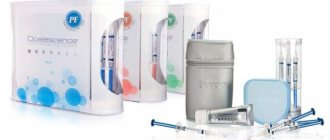
Zoom-4 lamp and whitening kit –
In general, only about 55% of patients have positive reviews of Zoom 4 whitening, and below we will go into detail about the reasons for the negative reviews. For example, the manufacturer’s claimed whitening of teeth by 8 shades in 1 procedure, which lasts for 3-5 years, is more of an advertising ploy. The fact is that the degree of teeth whitening is assessed by the dentist immediately after the whitening procedure, and not a few days later.
But due to exposure to intense light flux, as well as prolonged isolation of teeth from the moist environment of the oral cavity during the procedure, the enamel of the teeth loses moisture, and due to the dryness of the enamel, the teeth initially look much whiter. Within 24 hours, the saturation of the enamel with water will be completely restored, and you will be able to notice that the color of your teeth will no longer be as white as it was immediately after the procedure. But this is not the only problem with the Zoom 3 and 4 systems...
What is photo teeth whitening?
For your information! Photo whitening, or as it is also called “light whitening,” is a fast and safe dental procedure that can whiten tooth enamel by 10-12 shades at a time.
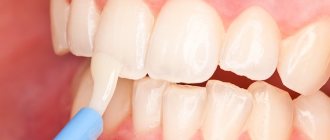
During photo-whitening, a special composition is distributed onto the teeth , the main active ingredients of which are hydrogen peroxide and carmabide.
Activated under the influence of lamp light and penetrating into the deep layers of dentin, they destroy unwanted color pigments.
The type of lamp is selected depending on the condition of the dental bone, soft tissues and natural enamel pigment.
When photobleaching, lamps with the following variations of light radiation are used:
- Ultraviolet lamps - lamps of this type are considered somewhat outdated, since during operation they emit heat and heat tooth enamel.
- Halogen - the light from these lamps is cold, which minimizes tissue trauma.
- LEDs are currently the safest cold-glow lamps.
It is worth noting! The entire lightening procedure takes an average of 1 hour and is carried out in several stages:
- Dental examination. The doctor examines the patient’s teeth and mucous tissues for contraindications. For example, if there is tartar or caries, they will need to be eliminated first and only then proceed to whitening.
- Modeling the desired result . The patient indicates what effect he would like to get from whitening using a special sign. In some clinics, the patient is shown the “before and after” result using computer modeling.
- Protecting fabrics from lamp light . The patient's gums and inner cheeks are covered with a special protective plate. This step is necessary to minimize the likelihood of light or chemical burns.
- Distribution of gel over tooth enamel. As a rule, only the “smile zone” is treated, that is, 10 teeth of the upper and lower jaw that are visible when smiling, laughing and during communication.
- Protect your eyes from lamp light . Both the doctor and the patient wear special protective glasses to prevent retinal burns.
- Applying gel to teeth and whitening . The doctor distributes the gel over the patient’s tooth enamel and turns on the lamp. Exposure time is 10-20 minutes. After this period, the gel is removed with a napkin, and its remnants are removed during rinsing. There can be up to 6 applications in 1 session.
- Checking the result using the Vita scale . After all manipulations with the teeth are completed, the doctor gives the client a mirror and a Vita scale (a strip on which all possible shades of tooth enamel are depicted). This is done so that he can clearly see what results were achieved.
- Consultation on further oral care.
Lightening photos on PC
You can lighten a photo without losing quality. PhotoMASTER will allow you to preserve details and colors, removing unpleasant darkening. In the editor, you can improve not only pictures in popular JPG or PNG formats, but also process RAW photos. You can brighten the entire photo or individual areas. Ready to try?
Step 1. Preparation for processing
Download the distribution package of the PhotoMASTER editor from our website:
When the download is complete, install the software using the Installation Wizard. Double-click on the shortcut located on your desktop. The main program window will appear. You need to click the “Open Photo” button and select a dark photo from a folder on your computer.
Adding a photo for processing
Step 2. Lighten the photo
Let's start with how to lighten a dark photo using the simplest method. It will require just one click from you. We are talking about automatic tuning. In the enhancements tab, go to the right panel, there you will find the “Auto-correction” item. Check the box next to “Lighting”, and the editor will take the necessary steps to improve the photo. Easy, right? The result is obtained instantly and without any effort.
Using automatic lighting correction
Of course, automatic configuration is the most convenient and simplest option. However, she cannot always do the job flawlessly. Therefore, if you are not completely happy with the result, calibrate the lighting yourself. To do this, the editor offers several different tools.
basic settings
In the “Basic” tab you will see a column of sliders with image parameters. Increase the Exposure value by the desired amount by moving the slider to the right. The image will become less dark. Now increase the Highlights and Highlights settings. Adjust the values until the photo quality is optimal.
You shouldn’t get carried away with this, as you can overexpose the photo. If the image appears faded and blurry, increase the clarity and saturation. The picture will take on an even more attractive look. In the screenshot below you can see how much more impressive the photo became after the manipulations we performed.
Lighten your photo using basic settings
Curves
The “Curves” option allows you to work subtly and flexibly with the lighting in your photo. This is a tool that professional retouchers use in their work. You shouldn’t be scared by the word “professional”; you will see that using the function is quite simple - even a beginner can handle it.
Go to the "Tools" tab. Select Curves. You can simply install one of the presets, for example, “Increase brightness,” or manually adjust the RGB arc. Select a point on the line and extend the curve upward. You can set several points for finer calibration.
Lighten a photo using curves
Corrector
Above we discussed the processing of the entire photograph. Now let's look at how to lighten part of the photo. Go to the Retouching tab and select the Corrector tool. Adjust the brush size, feathering and opacity. Now carefully paint over the too dark area of the photo.
In the Basic tab, find the exposure setting and move the slider to the right until the area is light enough. The screenshot below shows how the shadow was successfully removed from the girl's face, hair and neck, while the rest of the image remained completely unchanged.
Brighten your face with corrector
Gradient filter
This tool is best suited for processing landscape photos. In the Retouching tab, select the Gradient Filter tool. Mark the area on the photo that needs to be brightened. Now move the already familiar sliders to remove the darkening. The marked area will change.
Processing a landscape photo with a gradient filter
Step 3. Saving the result
Once you've finished brightening your photo, you'll need to save it. To do this, click on the “Save” button. A window will appear in front of you where you will need to select a save location on your computer. Now just confirm your choice.
After installing PhotoMASTER, you will no longer have the problem of how to lighten a black and white photo or a color photograph. The program will allow you to quickly eliminate this and many other image defects. You can even restore old photographs covered with cracks and stains! Try it now:
What types are there?
Stay up to date! Most dental clinics in the CIS countries offer the following photo-whitening techniques:
- Beyond Polus is a symbiosis of halogen and LED radiation, which makes the procedure safer for enamel. One whitening session usually consists of three cycles of 10 minutes each. The effect lasts up to a year, after which the procedure can be repeated.
- Luma Cool - this technique uses exclusively cold-light LED lamps. This makes it absolutely safe for both teeth and soft tissues. One session consists of three cycles of 8 minutes each. The result lasts for several years.
- Zoom is perhaps the most famous photo-bleaching technique, which is performed using a UV lamp. Ultraviolet radiation produces heat, which is quite detrimental to enamel. But, nevertheless, Zoom gives the most pronounced effect among all the above procedures. Whitened teeth retain their newfound color for up to one and a half years.
After a photo-whitening session, tooth enamel becomes more sensitive, which is why drinking hot and cold drinks is accompanied by unpleasant sensations.
Note! This is a temporary phenomenon that completely disappears in 3-5 days.
The difference between ZOOM and laser whitening –
Whitening Zoom involves the use of the following light lamps... The Zoom-3 uses an “Advanced Power” lamp - with a light wave range from 350 to 400 nanometers, and the Zoom-4 uses a “WhiteSpeed” lamp with light waves in the range of 400-505 nanometers. Thus, the lamp emits light waves not of a specific one wavelength, but a whole beam of waves of different lengths.
The latter, by the way, allows us to call Zoom a technique for photo-whitening teeth. In turn, diode lasers used for laser whitening emit only one strictly defined wavelength, for example, 810 nanometers. At the same time, both methods use a similar whitening gel. We hope that our article on the topic: Zoom-4 teeth whitening was useful to you!
Sources:
1. Add. prof.
, 2. Based on personal experience with whitening, 3. National Library of Medicine (USA), 4. American Academy of Cosmetic Dentistry (USA), 5. https://www.realself.com/, 6. https:// www.usa.philips.com/.
Indications and contraindications
Many things can affect the color of enamel - genetic predisposition, abuse of cigarettes and coloring products, and even treatment with antibiotic drugs.
Indications
You should know! The desire to make your smile more aesthetic is the main indication for the procedure.
Photo whitening will help you if your teeth:
- They have uniform pigmentation without light and dark stripes and other inclusions.
- Well formed and have naturally strong enamel without grooves, chips or cracks.
Contraindications
You will have to refuse the photobleaching procedure if you are limited by one of the following factors:
- Pregnancy and lactation period.
- Age under 18 years.
- Thin and sensitive enamel.
- Caries.
Advantages and disadvantages
The procedure has gained worldwide fame precisely thanks to its extensive list of advantages :
- Quick results - just one hour-long session and teeth become 10-12 shades lighter.
- Durability – the result lasts from 1 to 3 years.
- safety – compared to older enamel lightening methods.
Keep in mind! But it was not without its drawbacks:
- Temporarily makes teeth more sensitive - this causes discomfort during meals.
- Does not lighten fillings, veneers, dentures and crowns - they will need to be changed after whitening.
- It is quite expensive - which for many is a decisive factor for refusal.
How to maintain the result after photobleaching?
After the tooth enamel whitening the doctor conducts a consultation with the patient and gives him a list of recommendations for maintaining a new snow-white smile in its original form.
You should know! To maintain tooth enamel in a clean form, the patient should adhere to the following tips:
- For the first 1-2 weeks, refrain from eating coloring foods and drinks (red and blue berries, tea, coffee, lemonade).
- In the first 3 days, avoid eating excessively hot and cold foods, in order to once again cause yourself discomfort.
- Replace your usual toothbrush with a softer one.
- Buy toothpaste with a high content of fluoride and calcium.
- Buy floss (dental floss) and carry it with you everywhere to get rid of food debris if you are away from home.c
If you cannot deny yourself the pleasure of drinking coffee, juice or lemonade, drink drinks through a straw.
average price
Need to know! The price for the photobleaching service is determined depending on the following factors:
- City – in Moscow and St. Petersburg prices are significantly higher than in the regions.
- The reputation of the clinic - the more highly qualified doctors and better equipment the clinic has, the higher the price tag. This is exactly the case when the price justifies the quality.
- Methodology used. For photo whitening Zoom the price tag varies from 15,000 to 25,000 rubles, for Beyon Polus - from 10,000 to 20,000 rubles, and for Luma Cool - from 6,000 to 14,000 rubles.
How much does a snow-white smile cost?
How much will laser whitening cost? The answer to this question directly depends on the type of equipment used, the pricing policy of the clinic and the region of treatment. On average, the price of one session in Moscow ranges from 20 to 30 thousand rubles. The cost includes treatment of only those teeth that fall within the smile zone.
Overall, this is a safe and effective method that allows you to quickly become the owner of a snow-white Hollywood smile. It is only important to take a responsible approach to finding a good clinic and an experienced specialist, diagnose the condition of hard tissues in advance, and identify possible contraindications and the root cause of tooth darkening.
- Burgonsky V.G. Lasers in dentistry, 2009.
Reviews about the procedure
Below are some reviews. If you have something to say, leave your feedback in the comments below the article, it will be useful to our readers.
Marina, Moscow.
Teeth are my sore subject. They are naturally yellowish, plus I simply cannot imagine myself without coffee. I was thinking about getting veneers or whitening my teeth. In the end, I chose the second one and did not regret it. It’s been 3 months since I became the owner of a Hollywood smile! Despite my enormous fear of dentists, I endured the procedure calmly - I just lay there while the lamp did its job.
Rinata, Novosibirsk.
My daughter had her teeth photobleached - she wanted to look 100% at her prom. My teeth certainly became whiter, but terrible sensitivity of the enamel appeared. For the first week after going to the clinic, my daughter could not eat or drink anything without wincing in pain. She said that she liked the effect, but she was no longer ready to make such sacrifices for the sake of beauty. Now maintains the result with professional cleaning.
How to lighten a photo without losing quality: 3 ways
Often when shooting in low or poor lighting, the photo ends up being too dark. However, this is not a reason to delete it. You can fix a problematic photo using a photo editing program. From the article you will learn how to lighten a photo in the editor on a PC, in a mobile application and online.
- CONTENT:
- Lightening photos on PC
- Lightening photos on your phone
- Lightening photos online
- Conclusion