We are currently participating in the “Healthy Teeth” Marathon for children and especially for this we have prepared an interesting master class - plasticineography “tooth cut”. By completing this master class, we will get acquainted with the structure of the tooth and will be able to easily remember the names without memorizing them!
And of course we chose bright colors and we were very pleased with the final work! For easier work, choose wax plasticine; it is easier to correct and smears better on a plane.
Tip: If you have a hard time rolling out the thin ropes for the blood vessels, you can use a syringe to make them, or alternatively, make them with red thread!
We took the following diagram as a guide (you can practice your English at the same time):
How to do:
- Prepare materials for the master class: form balls of wax plasticine in the required colors.
- On a piece of paper, draw the tooth, gums and dentin outline.
- Let's start by filling in the area of dentin (the second layer of the tooth). To do this, take a piece of pink wax plasticine and, forming an outline, smear it towards the center. You don't have to worry about going beyond the intended edges, since we'll adjust them later with the next layer.
- Now we will make the enamel of our tooth. Form flagella from white plasticine and place the tooth along the contour. Then grease it up to the pink part without going beyond it.
- Form a long flagellum from yellow plasticine and lay it along the sample - this will be the pulp of our tooth.
- Smear the plasticine: note that this layer is not as thick as the previous ones. Using the tip of a stack or a pencil lead, make notches on the layer.
- Form thin flagella from red plasticine. To do this, just roll them with folded fingers on the surface of the table.
- Lay the flagella from the roots to the top of the pulp. Make them branchy. We've got blood vessels. To be precise, there are nerves inside the tooth; the vessels consist of venous and arterial ones. But we have simplified the scheme for children. If you wish, you can also add blue and yellow flagella.
- Trace the outline of the tooth with a black felt-tip pen.
- Form the contour of the gum and bone tissue. We used pink and orange markers.
- Paint over the gums, and we painted the bone tissue as pimply.
Our tooth is ready! It’s so bright, beautiful and we now know what it looks like inside!
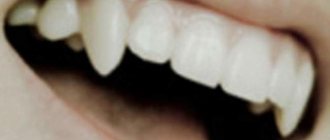
Paper fangs
How to make paper teeth for a vampire or werewolf costume at home, without much expense? All you need is a piece of paper measuring 10x10cm and five minutes of free time. It is folded like origami, quickly and easily, but you should not choose a white color of paper, since the natural color of the teeth will stand out with yellowness against its background. The downside of this method is not durability; the paper jaw will crumple and become saturated with saliva in a couple of minutes. Therefore, it should only be used for a spectacular appearance, in the midst of a party.
Necessary materials:
- paper;
- scissors.
Use of materials for making dental molds Ganoxin Community
Jewelers are always sculpting objects and parts, most often to make wax models for casting. In the jewelry industry, there are many vulcanized rubber and silicone mold materials available for this purpose, but what if you need to make a mold outside of your well-stocked studio?
Here are two unconventional mold materials borrowed from the dental industry that will work in a pinch.
Gypsum
Jewelers have forgotten how useful plasters can be for some problems, especially duplicating bas-reliefs. My favorite serious plaster for sculpting is Vel-Mix, a material that dentists use to make very hard models of your teeth and gums. Vel-Mix works like any plaster, but it is extremely hard, strong and durable, and is so fine-grained that it reproduces the surface almost perfectly.
Gypsum is great for sculpting medallions. First, a plasticine model of the medallion is made with a relief (without undercuts) image. Then you make a wall around it using clay, wax or paper and pour in Vel-Mix. Once it has set, you simply remove the model. Before using it to create wax, soak it in water for 10 minutes to prevent the wax from sticking to it. Melt wax (injectable wax is best), pour it into the impressions and use a metal sheet to remove excess wax. (To make a thinner medallion, 1 to 2 mm thick, simply pour or blow wax into the plaster mold.) The resulting wax model will shrink slightly and can be easily removed from the Vel-Mix mold.
Ganoxin is sponsored by
Alginate
Easy to use and very inexpensive alginate compounds, available from dental, jewelry and sculpture suppliers, allow you to quickly create excellent shapes. You are probably most familiar with alginate from your experience working in the dentist's office. When the dentist puts a tray of sticky material in your mouth that hardens in a minute, he is using alginate. It provides excellent detail, is very quick to set up and is non-toxic. You mix it, pour it or spread it with a spatula onto the mold you want to mold, and wait a minute for it to set. You can then remove it from the object and pour melted injection wax into it. Once the wax has set, remove it and pour another one. You'll get six to 15 waxes out of the alginate mold before it breaks.
The mold can be stored in water for about a week. Also, if you let the mold dry, it will shrink by about 40 percent. If you wet it after it has set, you may end up with a reduced size wax, which can be interesting.
Together with
Award-winning Journal
is published monthly by MJSA, a trade association of professional jewelry manufacturers, designers and other suppliers. It offers design ideas, manufacturing and manufacturing techniques, bench testing tips, business intelligence and marketing information, as well as the latest news on trends and technology—essential information for business success.
“More than other publications,
MJSA Journal caters to people like me: those trying to make a living designing and making jewelry,” says
Jim Binnion of James Binnion Metal Arts.
Click here to read our latest articles Click here for a FREE four-month trial.
Modeling teeth from plasticine
Plasticine is perhaps the most common material; it is easily accessible and does not require special preparation for work. Having taken the required amount, just warm it up, knead it in your hands - and you can start working. Having no experience working with this material, in the first stages it is better to work without tools to feel its properties, and then create shapes using tools. After kneading, the plasticine is ready for modeling, but it does not need to be heated for long, as it becomes too soft, sticky and will not hold its shape well.
Let's consider the main stages of modeling tooth 36 from plasticine. We give the plasticine the shape of a ball (photo 29). Having outlined the main surfaces and tops of the tubercles of the future model, we deepen the first-order fissure of the F-shaped form. As a result, five cusps are formed on the chewing surface (photo 30): (1) anterior lingual, (2) posterior lingual, (3) anterior buccal, (4) posterior buccal, (5) distal. Using the tool (Fig. 31), modeling of the distal ridge (B), longitudinal ridge (A), medial ridge (C), anterior lingual tubercle (1) and modeling (photo 32) of the medial ridge (B), longitudinal ridge (A), distal ridge (C), posterior lingual tubercle (2).
Fangs made of clay or plasticine
How to make fangs from polymer clay or hardening plasticine with your own hands? If you build up teeth sculpted from plasticine or clay, even those made at home
they will look no worse than store-bought ones. Environmentally friendly plasticine can be purchased in any children's goods department. Unlike clay, it hardens on its own within twenty minutes and does not require heating in an oven.
White plasticine should be mixed with a small amount of yellow to obtain a more natural color. From the resulting mass, you need to sculpt two fangs of an elongated, flattened shape, approximately twice as long as your own. It is better to attach it with dental wax or nail glue.
Necessary materials:
- Clay or plasticine;
- Modeling kit;
- Dental wax or glue.
It is important to remember that with any method of growing teeth like a vampire at home, you should follow simple hygiene rules. And also do not forget that fangs are teeth number three, if you count from the center.
Tooth modeling is a revolutionary breakthrough in dentistry
Dentistry does not stand still. New technologies are constantly emerging that contribute to better dental restoration.
Innovative techniques in the field of dentistry include modeling. It allows you to achieve a perfect match between the dentures and the teeth. With the help of modeling, it is possible to reproduce as accurately as possible the anatomical shape and functioning features of the dentition, as well as to ensure a high degree of aesthetics of the oral cavity.
Fangs made of cotton wool
How to make fangs from cotton swabs or swabs with your own hands in a couple of minutes, at home? Growing fangs from cotton wool will not take much time and effort. It is necessary to form two cotton cones, elongated in shape, and carefully attach them to the teeth.
Just like paper, cotton wool is highly susceptible to deformation, so it is not suitable for long-term use as vampire teeth.
Necessary materials:
- Cotton swab or cotton swab;
- Scissors;
- Dental wax or glue.
Missing tooth? Prosthetic options for one tooth
You've lost one tooth and now you need to find a way to replace it. You can simply leave it as is, but you risk developing problems that could affect your health and well-being.
For example, depending on where the gap in your mouth is from a missing tooth, it can affect your smile and appearance.
Or the rupture may lead to problems drinking, eating and speaking. You may have trouble sleeping, and this will generally affect your alertness and your behavior during the day.
However, there are several different single tooth denture options to provide a temporary or permanent solution to a missing tooth. Here we discuss some of the different artificial tooth options available:
FIMO Soft Clay
You can spend as little as $5 on a package of FIMO soft clay and do what Henry Kroll did. He posted a short video on YouTube in which he took clay, shaped it into teeth, baked it until it hardened, and then glued the teeth into place.
He doesn't recommend gluing them yourself like he does, but you can still watch his video here:
Make your own dentures with DVD instructions
Another way to make a single tooth denture is to use about $25 worth of materials that you can find around your house. Gary Rhyne has developed a kit that you can order online that will include DVDs with instructions on how to make your own dentures.
Basically, all you have to do is mold the gums using plaster of paris. You then sculpt wax on top of the plaster mold to get the proper fit. You then fit the teeth into place (which you order online from Rhyne). Using dental wax to hold the teeth in place ensures a good fit in the mouth and holds the acrylic denture teeth in place.
See Gary's YouTube video below:
Cheap Single False Tooth Using Craft Beads
Craft resin beads at an art store will cost you about $12.
If you add them to a glass of hot water, they will become soft enough to be molded into the shape of a tooth or teeth by hand. A warm butter knife helps shape and once you have the desired shape, trim it with scissors. This makes a realistic single artificial tooth that you can use until you see a dentist.
To see how to do this online, watch this video:
Temptooth Temporary Tooth Replacement
Another option for melting beads is a product called Temptooth.
Similar to the bead project above, you melt the beads and hand shape them into a denture shape for one tooth. Once cooled, it turns white and can be colored to match the rest of your teeth.
As the name suggests, it is nothing more than a quick fix to create a “temporary” tooth for a short period of time. But this can give a good result, which may be enough until you see a dentist.
Find out more about Temptooth here.
Which single denture option is better?
Since there is no such thing as a one-size-fits-all denture replacement, you must examine each one to find the best one to replace your missing tooth.
You can easily use one of the DIY options until you can see your dentist for a more permanent replacement, which is why we've included them here. DIY options can be great if you need a single tooth option in a hurry, or you're a little short on funds and need an affordable option to keep you going until you can see your dentist. DIY dentures are generally much less expensive than professional dentures, which is one of the main reasons why they are popular.
It is best to consult your dentist before choosing a replacement. Your dentist will be able to help you weigh the pros and cons, costs, and what will work best for you based on your lifestyle and budget.
More from my site
Wax-up modeling stages
The dental Wax-up modeling process takes place in several stages:
- a plaster or silicone impression of the client’s jaw is taken not only where they will be temporarily placed, but also on the opposite side;
- fixing the jaw from closing by using silicone bite ridges;
- creating jaw samples using a special plate (face bow) attached to the ears;
- Having received the samples, they are transferred directly to the gypsum material;
- fixing the reproduced model on an articulator - a device that simulates jaw functions and allows the technician to establish chewing and articulatory movements;
- modeling a wax cast on plaster models and demonstrating it to the client.
In cases where the mock-up is converted to the Mock-up technique, the resulting sample is transferred into the oral cavity and the following manipulations are carried out:
- receive silicone keys, that is, an impression from new units;
- deposits (plaque, stone) are eliminated without grinding or preparation;
- fix the layout using special glue;
- placing plastic or composite material in impressions and applying it to the teeth;
- removing silicone keys and processing them by grinding and polishing;
- The final point is to evaluate the work performed.
The duration of creating a wax model, depending on the specific structure of the jaw and the location of the procedure, ranges from 20 to 60 minutes.
Fangs from a plastic fork
How to quickly grow fangs from a plastic fork at home? To do this, use scissors to cut out the two middle tines of a regular white or beige plastic fork. Next, cut off the handle to the beginning of the bend, but just above the line of the teeth. Wash the resulting form thoroughly under the tap. We attach the convex side to the upper jaw using dental wax or nail glue.
You can also cut off the two outer tines of a plastic fork and attach them with thin strips of tape.
First, each tooth must be cleaned and wiped dry. Scotch tape, unlike nail glue, is safer and will not harm the enamel.
Necessary materials:
- Plastic fork;
- Knife or scissors;
- Dental wax, nail glue or tape.
Methodological approaches to dental modeling
“Step by step you gradually descend into a world beyond your gaze!”
From Shinto philosophy
“Going there without knowing where and doing that without knowing what” is a difficult task! This applies to almost all areas of our lives, including dentistry. Even if you imagine the future design of the tooth being restored, your hands do not always correctly reproduce its shape and volume. Students of the art and graphics department are taught that “one hundred still lifes must be written in order for the one hundred and first to turn out correctly”! Unfortunately, while receiving higher professional education at universities, students of the Faculty of Dentistry acquire limited knowledge about the shape of teeth. An insufficient number of hours are devoted to reproducing teeth using hand-made materials (clay, plasticine, plastic). But the correctness of the newly created forms is the path to the solution to harmony!
The ability to correctly restore the shape of missing hard dental tissues is of paramount importance in clinical dentistry. The dentist's hands are the main tool for modeling teeth! You can develop this skill through artistic modeling classes. The purpose of the classes is to develop visual memory, manual skills, creative thinking and the ability to perceive shapes in space. Anyone who wants to know the stages of recovery can begin the first exercises with a minimum of conditions - material and simple tools.
Dental modeling is a creative process where, in addition to knowledge of anatomy, there must be freedom in choosing the material from which models can be created. Before you start work, you need to familiarize yourself with the basic properties of materials and choose which one is more suitable for you.
When carving, excising a form from solid materials - wood, stone and others - the sculptor gradually, step by step, cuts off the material, freeing the form enclosed in it. This technique is also widely used in therapeutic dentistry, for example, the stage of contouring the surface of a filling.
Modeling is the making of sculpture from soft materials. For modeling, you can choose any material that has plasticity. It can be plasticine, sculpture clay, plastic, wax.
Tags
Dental laboratory Dental laboratory modeling teeth from reproducing teeth from Fig. Rice. Rice. Rice. Rice. Rice. Rice. Rice. Rice. Rice. Distal tuberclemodeling of the distal ridgeModeling of the distal ridgecenter distal Distal cuspmodeling of the distal ridgeModeling of the distal ridgemodeling of the distal ridge distal contactto modeling teeth
tubercle buccal vestibular time palatal outline fissure contact marking filling giving introductory tests shaped formation possibility of such crowns treatment