Giuseppe Cantatore University of Verona (Italy). Department of Endodontics. Assistant professor.
In a classic study published in 1985, Bystrom et al. compared the sterilizing effectiveness of three different methods of endodontic treatment of infected canals and found that mechanical treatment in combination with irrigation with saline solution ensures canal sterility in 20% of cases, while replacing NaCl with a 5% sodium hypochlorite solution leads to canal sterility in 50% of cases. cases, and the addition of the latter scheme with a single temporary filling of the canal with calcium hydroxide increases the percentage of canal sterilization to 97%. Does this mean that when treating infected root canals, temporary filling with medicated paste is required in all cases? More than 15 years have passed since the Bystrom et Al study; Today we know much more about the properties of microorganisms associated with pulp-periodontal pathology: from virulence to mobility, from the ability to penetrate dentinal tubules to sensitivity to various antiseptics. 15 years of research experience have shown that many irrigation solutions have pronounced bactericidal activity against microorganisms such as enterococcus faecalis or candida, which are resistant to calcium hydroxide or chlorophenol. In this article, we will discuss in 7 points how to improve the root canal irrigation procedure, using the right products in the right sequence, in order to reduce the need for additional medicinal treatment of the canals between visits.
Key Factors for Effective Cleaning and Irrigation of the Root Canal System
1. Careful diagnosis of existing pulp-periodontal pathology
2. Taking into account the condition of the tooth tissues and the complexity of the anatomy of the root canal system 3. Removal of the endodontic smear layer 4. Compliance with indications when choosing means for irrigation 5. Optimization of the active components of the irrigation solution 6. Correct sequence of application of the irrigation solution during root canal treatment 7. Mandatory costs of at least 5 minutes for irrigation before filling
Smear layer. Theoretical considerations and practical recommendations
2009 Summary.
This article is devoted to the consideration of one of the important issues of endodontics - the need to remove the smear layer during endodontic treatment. The structure and composition of the smear layer is described. The possible influence of the smear layer on the prognosis of treatment depending on the clinical situation is considered. An algorithm for making a clinical decision is proposed, and recommendations are given regarding the sequence and exposure time of irrigation solutions.
(.pdf)
Key words: smear layer, root canal irrigation, EDTA, sodium hypochlorite.
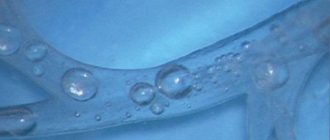
During the work of the endodontist, under the influence of endodontic files, a layer is formed on the walls of the canal(s) consisting of the remains of organic tissue, destroyed hydroxyapatite crystals (dentin filings) and, if the canal was infected, microbial remains. This layer is called smeared, and in some languages also swamp.
The smear layer has 2 zones:
The surface zone, 1-2 microns thick, consists of organic residues and dentinal filings.
The inner layer extending into the dentinal tubules is called smear plugs and can reach a depth of 40 microns (Mader CL et al., 1984).
The influence of the smear layer on the fate of endodontic treatment has been of interest to many researchers and practicing endodontists. To date, most have called for a straightforward approach: smear layer removal (White et al., 1975; Mader et al., 1984; White et al., 1987; Lloyd et al., 1995; Khayat & Jahanbin, 2005).
The most common argument for removing the smear layer is that it interferes with the penetration of the sealer and thermoplasticized gutta-percha into the dentinal tubules, lateral canals and the ramification area (White et al., 1975, 1987; Lloyd et al., 1995). It is also believed that microbes can escape the action of irrigants within the smear layer and thus survive (Berutti et al., 1997).
And, unfortunately, few endodontists paid attention to the paper by Orstavik & Haapasalo (1990). This work demonstrates that the smear layer slows the effect of irrigants and intracanal medications on infection within the dentinal tubules.
Most endodontists call for explicit removal of the smear layer, and it is suggested that this be done before the obturation procedure, that is, the main goal is to get a beautiful picture. However, obtaining a beautiful two-dimensional image does not always equal high-quality endodontic treatment.
There is, as always happens, a second side to the coin. The smear layer dramatically reduces the permeability of dentin! (Pashley et al., 1981). It is therefore not surprising that two independent groups of researchers concluded that the presence of the smear layer inhibits the penetration of microorganisms into the dentinal tubules (Love et al., 1996; Peters et al., 2000).
So, the practitioner is faced with a dilemma: to remove the smear layer or not?
I will present my own view on this problem. Let's divide all cases into 2 groups: vital and non-vital.
1. If we perform endodontic treatment of a vital tooth, then there is no danger that the smear layer can hide microorganisms or interfere with the effectiveness of our drugs on microorganisms inside the dentinal tubules.
Moreover, if the canal becomes infected in the future, for example due to problems with coronal sealing, the smear layer will reduce the penetration of bacteria into the dentinal tubules.
Thus, from my point of view, the conclusion is absolutely clear: in vital cases, removal of the smear layer is not recommended.
2. When working with a non-vital infected tooth, the situation changes. The smear layer may contain microorganisms and will interfere with the effectiveness of our irrigants and intracanal attachments. In such cases, the smear layer must be removed, but the question is when?
The recommendation to remove the smear layer before the filling procedure seems strange, since during the disinfection and irrigation procedures the smear layer hid microbes inside the canals, but right before filling the smear layer is removed and the microbes that survive inside the dentinal tubules have an excellent opportunity to infect the main canal.
More logical is the recommendation to remove the smear layer after completion of instrumentation before the final stage of irrigation, which may include passive ultrasonication or Helling cocktail and, of course, it is necessary to remove the smear layer in cases where the decision is made to treat in two visits, before applying calcium hydroxide.
So what is the most effective way to remove the smear layer? Due to the fact that it consists of 2 components: organic and inorganic, we need 2 active substances: one will destroy the inorganic component (hydroxyapatite crystals), the second will dissolve organic tissue: the remains of pulp, microbes, collagen and dentinal sawdust.
Against the background of these data, statements like: EDTA removes the smear layer do not seem entirely correct. EDTA or citric acid is necessary to destroy the inorganic component; they do not dissolve organic components. Sodium hypochlorite dissolves the organic constituents of the smear layer.
So we will use 2 substances. The next question is, in what order?
And again, in order to come to a competent conclusion, let’s consider the structure of the smear layer; superficial mixed layer and deep single-component layer (destroyed crystals of calcium hydroxyapatite).
Given this structure, we are not surprised by the 1991 evidence that the EDTA-Hypochlorite-EDTA pattern is more effective for smear layer removal than the Hypochlorite-EDTA-Hypochlorite sequence (Abbott et al., 1991).
The last detail is the timing of irrigation. In the literature you can find references to irrigation durations from 30 seconds to 10 minutes! (Abbott et al., 1991; Lloyd et al., 1995; Garberoglio & Becce, 1994).
The starting point for many endodontists was a 2005 paper that compared the effectiveness of smear layer removal using 1, 3, and 5 min irrigations in straight canals. (Teixeira et al., 2005). There was no difference in effectiveness. Therefore, the minimum irrigation time for each solution is one minute.
I hope this post has answered some of the lingering questions in your daily clinical practice.
Return
Further research[edit]
Clark-Holke et al. (2003) focused on determining the effect of the smear layer on the amount of bacterial penetration through the apical foramen around obstructive materials. Thirty extracted teeth were divided into two test groups; in the first group the smear layer was removed by washing with 17% EDTA, and in the second group the smear layer was left intact. All teeth underwent canal preparation and obturation with lateral condensation, gutta-percha and AH 26 sealant. The model systems consisted of an upper chamber attached to the cemento-enamel junction and a lower chamber on the apexes of the teeth. Standardized bacterial suspensions containing Fusobacterium nucleatum
,
Campylobacter rectus
and
Peptostreptococcus
were inoculated into the upper chambers. The models were incubated anaerobically at 37°C. The leakage results were as follows: in the first group, 6 teeth showed bacterial leakage, the second group and the third group showed no bacterial leakage. This study found that removal of the smear layer reduced the leakage of bacteria through the root canal system. [24]
Kokkas et al. (2004) examined the effect of the smear layer on the penetration depth of three different sealants (AH Plus, Apexit and Grossman type-Roth 811) into dentinal tubules. Sixty-four extracted single-rooted human teeth were used and divided into two groups. The smear layer remained intact on all roots of group A. Complete removal of the smear layer in group B was achieved after watering with 3 ml of 17% EDTA for 3 min, then 3 ml of 1% NaOCl solution. Ten roots from each group were obturated with AH Plus and laterally condensed gutta-percha points. The same process was repeated for the remaining roots using Apexit and Roth 811 sealants respectively. After completion of installation, the maximum depth of penetration of sealants into the dentinal tubules at the upper, middle and lower levels was examined. The smear layer prevented sealants from penetrating into the dentinal tubules. In contrast, in root canals without a smear layer, all sealants penetrated the dentinal tubules, although the depth of penetration varied between sealants. [25] In addition, the smear layer negatively affects the sealing ability of sealants in the coronal and apical region.
Obankara et al. (2004) determined the effect of the smear layer on apical and coronal leakage in root canals obturated with AH26 or RoekoSeal sealants. A total of 160 maxillary anterior teeth were used. Eight groups were created based on all possible combinations of three factors: smear layer (present/absent), leak score (apical/coronal), and sealant used (AH26/Roeko-Seal). All teeth are obturated using lateral condensation with gutta-percha. A fluid filtration technique was used to test for apical or coronal leakage. According to the results of this study, smear groups (+) showed higher apical and coronal leakage than smear groups (-) for both root canal sealants. Apical leakage was significantly higher than coronal leakage for both root canal sealants used in this study. Removal of the smear layer was found to have a positive effect on reducing apical and coronal leakage for AH26 and RoekoSeal root canal sealants.[26]
However, Bertacci et al. (2007) evaluated the ability of the Thermafil warm gutta-percha obturation system to fill lateral canals in the presence or absence of a smear layer. Forty extracted single-rooted human teeth were randomly divided into two groups, one of which had a smear layer removed with 5 ml of 5% NaOCl followed by 2.5 ml of 17% EDTA. Obturation was carried out using AH Plus and Thermafil sealant. Samples were cleared with methyl salicylate and analyzed under a stereomicroscope to assess the number, length, and diameter of lateral canals. All side channels were filled in both groups. There were no statistically significant differences in number, length, and diameter between the two groups. It was concluded that the smear layer did not interfere with the sealing of the side channels. [27]
Yildirim et al. (2008) examined the effect of the smear layer on apical microleakage in MTA-obturated teeth. Fifty single-root maxillary central teeth were used in this study. Selected teeth were processed and randomly divided into 2 groups. In the first group (smear [+]), the teeth were irrigated with only 5.25% NaOCl. In the second group (smear [-]), the teeth were washed with EDTA (17%) and NaOCl (5.25%) to remove the smear layer. The teeth were then filled with MTA. A computer-assisted fluid filtration method was used to evaluate apical microleakage. Quantitative apical leakage of each tooth was measured at 2, 30 and 180 days. It was found that there was no difference between groups at 2 days, but removal of the smear layer caused significantly more apical microleakage than when the smear layer was left intact at 30 and 180 days. It was concluded that apical microleakage of MTA is less in the presence of the smear layer than in its absence.[28]
Saleh et al (2008) studied the effect of the smear layer on bacterial penetration of various root canal filling materials. A total of 110 human root segments were processed to size 80 under 1% sodium hypochlorite irrigation. Half of the roots were washed with 5 ml of 17% EDTA solution to remove the smear layer. Roots were filled with gutta-percha (GP) and AH Plus sealant (AH), GP and Apexit sealant (AP), or cones and RealSeal sealant (RS). After storage in humid conditions at 37 °C for 7 days, the samples were placed in a bacterial leak test model for 135 days. Survival analysis was performed to calculate the mean leak time, and the log-rank test was used to compare pairwise groups. Selected samples were sectioned longitudinally and examined by scanning electron microscopy for the presence of bacteria at the interfaces. In the presence of the smear layer, RS and AP leakage occurred significantly more slowly than in the absence of the smear layer. In the absence of the smear layer, AH leaked significantly more slowly than RS. It was concluded that removal of the smear layer had no effect on bacterial penetration of root canal fillings. Comparison of sealants revealed no differences except that AH performed better than RS in the absence of a smear layer.[29]
Fachin et al. (2009) assessed whether smear layer removal affected the filling of the root canal system by examining obstruction of lateral canals, secondary canals, and apical deltas. Eighty dogs were randomly divided into two groups according to irrigation regimen. Both groups were irrigated with 1% NaOCl during canal formation, but only teeth in group II received a final irrigation with 17% EDTA to remove the smear layer. The root canals were obturated with lateral condensation of gutta-percha and the specimens were cleaned to allow microscopic observation. The results showed that in groups I and II, 42.5% and 37.5% of teeth, respectively, had at least one branch with filled canals. In conclusion, smear layer removal under the conditions tested in this study did not affect the obstruction of root canal ramifications when lateral gutta-percha condensation was the method used to fill the root canals.[30]
Description[edit]
Early studies of dentinal walls after cavity preparation by Brännström and Johnson (1974) showed the presence of a thin layer of debris ranging from 2 to 5 micrometers in thickness. [1]
In 1975, McComb and Smith first described the smear layer. They observed an amorphous layer of debris with an uneven and granular surface on the walls of instrumented dentin using a scanning electron microscope (SEM). A thin granular microcrystalline layer of debris was 2-5 micrometers thick and was located on the channel wall. [1] [2] The authors stated that "most standard instrumentation techniques result in the canal wall being smudged and clogged with debris." [3]
In the same year, Mader et al. studied the morphological characteristics of the smear layer on teeth that were endodontically treated with k-type files and irrigated with 5.25% NaOCl. [4] The smear layer was examined from both sides; the first aspect looked "from above" at the smear layer, and the second - from the side. SEM micrographs showed that the smear layer was composed of two merging components. They have been described as a thin superficial layer, 1-2 micrometers thick, covering the densely packed layer, and a second one penetrating the dentinal tubules up to 40 micrometers. The packed material showed finger-like structures protruding into the tubules from the canal wall. [5]
Sandblasting dentin.
This type of treatment involves supplying Al2O3 particles under high pressure to the surface being treated. This is a fairly old method; in dentistry it was used mainly by dental technicians to clean and roughen the surface of the denture. In the clinic, portable sandblasting machines are used, and their main disadvantage is the disposal of aluminum oxide dust. The positive aspects of the method are the absence of vibration and noise during processing, which increases patient comfort.
When colliding with dentin, Al2O3 particles break intertubular dentin and, as it were, fold it over the dentinal tubules, forming an uneven rough surface.
Many manufacturers claim that sandblasting creates a surface that does not require etching and that adhesion will be quite high due to micro-retention. But as many studies have shown, this type of treatment only increases the surface of the dentin, and not the strength of the ligament. Therefore, with this type of treatment, adhesive preparation should be carried out in full.