Fifth generation endodontic treatment technology
Since the advent of modern endodontics, many concepts, strategies and techniques for root canal treatment have been developed. For decades, new files for passing and forming channels have appeared on the market. But, despite the variety of instrument designs and many techniques, the success of endodontic treatment was and remains just a probabilistic event.
Endodontic treatment has evolved from the use of a range of stainless steel hand files and rotary instruments such as Gates Glidden to modern Ni-Ti canal shaping files. Despite the development of modern processing methods, the mechanical aspects of the canal work were excellently described 40 years ago by Dr. Herbert Schilder. With careful execution of mechanical principles, the biological feasibility of treatment, 3D disinfection and successful filling of the root canal system are observed (Photo 1a - 1d).
Photo 1a. CT image of a maxillary central incisor showing a root canal system with multiple branches
Photo 1b. X-ray showing failed endodontic treatment
Photo 1c. Retreated tooth with 3D cleaning of the canal lumen and proper filling
Photo 1d. Follow-up photo showing bone restoration
The purpose of this article is to trace how each generation of Ni-Ti files has led to the development of advanced canal preparation techniques. More importantly, the authors will attempt to identify and describe clinical techniques that combine the most proven concepts of the past with the latest innovative developments.
Nickel-Titanium when working in a channel
In 1988, Walia introduced nitinol, a Ni-Ti alloy, for canal processing because it is 2-3 times more flexible than steel files of the same size. The main difference between Ni-Ti channels was that they were able to machine the most curved channels through repeated rotating movements. In the mid-90s, the first affordable Ni-Ti files hit the market. Next, the classification of each generation of files will be presented. In general, they can be characterized as tools that perform passive rather than active cutting actions.
First generation
To appreciate the entire evolution of Ni-Ti tools, it is useful to know that the first generation of Ni-Ti files had passive radial cutting and a fixed 4% taper and 6% active blades (Photo 2). This generation required the use of a whole set of files for a complete canal preparation. Already in the mid-90s, GT files (Dentsply Tulsa Dental Specialties) became available, providing fixed tapers of 6%, 8%, 10% and 12%. The most distinctive feature of the first generation of Ni-Ti files was passive radial cutting, which forced the file to remain centered when working in curved canals.
Photo 2: Two electron microscope photographs showing a cross-section and side view of a file with radial slicing and passive edges.
Second generation
The second generation of Ni-Ti files appeared on the market in 2001. The main distinguishing feature of this generation of instruments is the presence of active cutting edges and the need for fewer instruments for complete canal preparation (Photo 3). To level out the taper block and screw effect in passive and active Ni-Ti instruments, EndoSequence (Brasseler USA) and BioRaCe (FKG Dentaire) offered a line of files with alternative contact points. Although this feature was added to eliminate the taper block, this line still had taper on the active parts. The industry breakthrough came with the introduction of ProTaper (DENTSPLY Tulsa Dental Specialties), which created different levels of taper on a single file. This revolutionary idea allowed files of different tapers to be applied to a specific area of the root canal and provide safe and deep treatment (Photo 4).
Photo 3: Two electron microscope photographs showing a cross-section and side view of an active file with sharp cutting edges.
Photo 4. ProTaper (DRNTSPLY Tulsa Dental Specialties) cutting surfaces are predominantly located in the upper and middle thirds of the instrument, while the finishing file has a cutting surface in the apical third.
During this period, manufacturers placed a major emphasis on methods that increased the file's resistance to breakage. Some manufacturers have used electropolishing to remove any unevenness from the file surface caused by the normal sanding process. However, this electropolishing has been clinically and scientifically proven to dull the sharp edges of the tool. For this reason, for routine processing, the doctor has to apply excessive pressure on the file. High pressure on the tool leads to jamming of cone files, a screw effect and excessive bending during operation. To compensate for electropolishing, more cross-section options began to appear, and increased rotation speeds began to be recommended, which is also somewhat dangerous.
Third generation
Improvements in Ni-Ti metallurgy became a major development that can be identified with the advent of the third generation of endodontic files. In 2007, manufacturers began to place greater emphasis on heating and cooling techniques to reduce cyclic fatigue and improve safety when working in more curved channels. The third generation of Ni-Ti tools is characterized by less cyclic fatigue and fewer breakdowns. Examples of brands working with this technology: Twisted File (AxislSybronEndo); HyFlex (Coltene), GT, Vortex, WaveOne (DENTSPLY Tulsa Dental Specialties).
Fourth generation
Another advance in canal preparation technology is the advent of the technique of repeated up-down and reciprocating movements. This method was first proposed by the French dentist Blanc in the late 1950s. Currently, the M4 (AxislSybronEndo), Endo-Express (Essential Dental Systems), and Endo-Eze (ultradent Products) are examples of systems where the number of clockwise movements is the same as the counterclockwise movements. Compared to full rotation, reciprocal files require more pressure on the instrument, do not cut dentin as effectively and are somewhat less efficient at removing sawdust from the canal lumen.
Innovations in reciprocal technologies have led to the emergence of the fourth generation of files. This generation has finally realized the dream of using one single file for channel processing. ReDent-Nova (Henry Schein) self-adapting file (SAF). This file is shaped like a compressible hollow tube, which can provide uniform pressure on the canal walls regardless of the cross-sectional shape of the canal. The SAF is installed in a tip that provides short 0.4 mm vertical oscillation and vibration. Irrigation is also constantly carried out through the file cavity. Another single file technique is One Shape (Micro-Mega), which will be mentioned in the fifth generation.
The most popular single file technique is WaveOne and RECIPROC (VDW). WaveOne is a combination of the best qualities of the second and third generation files, coupled with a reciprocal motor that drives the instrument. After three cycles of clockwise and counterclockwise movements, the file rotates 3600 or makes one circle (Photo 5). Such movements allow you to work more efficiently, remove dentin and move it outside the canal.
Photo 5. WaveOne (DENTSPLY Tulsa Dental Specialties) reciprocal file, which has an unequal number of counterclockwise and clockwise angles, allowing more efficient work in the canal and removing dentin filings beyond its boundaries
Fifth generation
The fifth generation of endodontic files are designed in such a way that the center of gravity and the center of rotation are shifted (Photo 6). When rotated, files with a displaced center of gravity produce mechanical movement that extends along the active part of the tool. Just like ProTaper progressive tapered files, these offset file designs minimize binding between the file and the dentin. In addition, this design facilitates removal of dentinal debris from the canal and increases the flexibility of the active portion of the ProTaper Next (PTN) file (DENTSPLY Tulsa Dental Specialties). The benefits of the offset design will also be discussed later in this article.
Figure 6: Cross-section of a ProTaper Next (PTN) file (DENTSPLY Tulsa Dental Specialties). Note the offset shape, which reduces jamming and increases tool flexibility
Examples of commercial brands that offer variations of the technology described are Reco-S (Medidenta), One Shape, and the ProTaper Next (PTN) file system. Today, the safest, most effective and simplest tool, combining the advantages of past and modern developments, can be considered the PTN file system.
Protaper Next
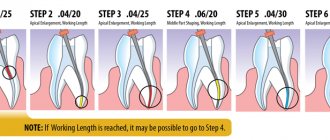
There are 5 types of PTN files of various lengths on the market, labeled X1, X2, X3, X4, X5 (photo 7). The file handles have yellow, red, blue, double black and double yellow marking rings corresponding to sizes 17/04, 25/06, 30/07, 40/06 and 50/06. PTN X1 and X2 have both rising and falling active tapers, while PTN X3, PTN X4 and X5 have fixed tapers D1 to D3.
Photo 7. There are 5 PTN files in the image. Most canals in back teeth can be treated with 2-3 instruments.
PTN files combine 3 important features: progressive taper on one tool, M-wire technology and the main advantage of the fifth generation - a shifted center of gravity. For example, PTN X1 and X2 have both rising and falling tapers, while X3, X4 and X5 are designed with a fixed taper from D1 to D3, and in the D4-D16 range the X1 file has an offset center of rotation. Starting from 4%, the X1 file increases the taper from D1 to D11, and from D12 to D16 the taper decreases to increase flexibility and preserve radicular dentin during processing.
PTN files are used with a rotation of 300 rpm and a slope of 2-5.2 ncm, depending on the technique used. However, the authors prefer a slope of 5.2, since they consider it as safe as possible for vertical operation of the canal and removal of sawdust from the lumen. In the PTN technique, all files are used in the same sequence according to the ISO color markings, regardless of the length, diameter and curvature of the canal.
Root canal technology
The PTN technique is very safe, effective and simple when attention is focused on proper root canal access and gliding technique. As with all other techniques, PTN requires strictly direct access to each orifice. The main focus is on passing, widening and smoothing the inner walls of the root canal. To access the canal, the ProTaper system offers an additional file called SX. The movements of this file are carried out like a brush, and it is able to expand the mouth, remove dentin triangles and, if necessary, give a clearer shape to the canal.
Perhaps the greatest difficulty in endodontic treatment is to find the canal, follow its course and bring it intact to the end of treatment. Processing and saving channels when working with small manual files requires strategy, high skill, patience and desire. Small hand files are typically designed to locate, enlarge and clean out the walls of root canals. Once the canal is prepared manually, a mechanical file can be used to widen the canal and perform other manipulations. To be precise, a canal can be considered ready and processed when it is clean and has strong, smooth walls.
After determining the working length, file No. 10 is inserted into the canal lumen and it is determined whether unimpeded movements with the instrument are possible to the top of the canal. In short, wide and straight channels this operation is much easier. After successful completion of file #10, either file #15 or a designated mechanical file such as PathFiles (DENTSPLY Tulsa Dental Specialties) is used. This file is intended to confirm that there is sufficient space to begin processing with the PTN X1.
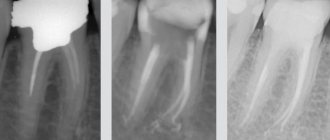
In many other cases, endodontic treatment involves teeth with longer, narrower, and curved canals (Figure 8a). In such a situation, file #10 very often cannot travel the entire length of the canal. In general, there is no need to use hand files No. 8 and No. 6; it is enough to simply work carefully with file No. 10 on each canal segment until the tool begins to fit freely. PTN files can be used to form any section of the channel prepared for passage. Regardless of the technique and all manipulations, the main goal remains to prepare the canal along its entire length, establish the working length and locate the apex (Photo 8b). The canal is considered prepared when file No. 10 passes freely through the canal, including in its apical third.
Figure 8a: This x-ray shows an endodontically involved posterior abutment tooth for a bridge. Pay attention to the position of the prosthesis in relation to the roots.
Figure 8b: Working image shows the exposed crown, isolation and inserted #10 files demonstrating canal curvature.
After working with the canal, the cavity from which access was made is washed with a 6% sodium hypochlorite solution. Channel formation can begin with PTN X1. It should be emphasized that PTN files are never used with a pumping type of movement; on the contrary, with PTN, return movements of the brush type are required. Using this technique, the doctor easily moves along the walls of the canal and forms the required working length. The X1 file is passively inserted into the canal through a pre-expanded orifice. Until a stop is felt, they immediately begin brush-type movements, sweeping towards the inlet (Photo 8c). Such movements help to gain additional space on the side and move the file a few millimeters deeper. Brush movements increase contact with dentin, which is especially important in canals with an asymmetrical cross-section and convex parts.
Photo 8c: PTN X1 file shown in action.
Work with PTN X1 continues. After every few millimeters, the file is removed from the canal for inspection and cleaning of sawdust. Before re-introducing PTN1, it is necessary to irrigate and clean the canal from sawdust. Then the channel is again passed through file No. 10 to remove remaining particles and washed abundantly with the solution. Subsequently, one or more cycles with PTN X1 cover the entire working length. To improve quality, it is necessary to constantly flush the canal and inspect the instrument.
After the first stage, they begin to work with PTN X2. Before the instrument rests in the canal, cleaning movements are carried out along the walls, which allows the file to advance to its maximum depth. X2 follows the path created by PTN X1, forming the canal walls and extending to working length. If the tool does not go deep, it should be removed, cleaned of chips and checked for integrity. The canal should then be rinsed and the instrument reinserted. Depending on the initial data of the canal, its shape, curvature and length, one or more cycles of file insertion are required before passing along the entire working length (Photo 9a).
Figure 9a: The mesial buccal canal contains PTNX2.
After reaching the apex, PTN X2 is removed from the canal. A sign of completion of canal treatment is the filling of the instrument teeth in the apical part with dentinal filings. An alternative is to measure the hole using a 25/02 Ni-Ti hand file. If No. 25 runs tightly along the entire length, then the formation of the channel is completed. When 25/02 enters too freely, the hole is larger than 0.25 mm. In this case, use file 30/02, which, if tightly fitted, also indicates the completion of canal processing. If file 30/02 is short in length, then PTN X3 is used according to the method described above.
The main number of channels is optimally formed when using either PTN X2 or X3 (Photo 9b). PTN X4 and X5 are usually used for large diameter channels. When the apical foramen is larger than PTN 50/06 X5, other techniques are used to complete the treatment of these larger, usually less curved canals. Each canal must be carefully navigated, 3D cleaned and filled for a successful result (Photo 9c).
Figure 9b: In the distal canal of PTN X3.
Photo 9c: X-ray after treatment. A bridge was placed. The anatomical shape of the canals is not disturbed.
Discussion
From a clinical point of view, the PTN system is the most advanced and combines all the advantages of previous generations of instruments and the latest developments. A little discussion will help to understand how the design of a tool affects its performance.
The most successful generation of tools are those that use progressive taper on a single file. The patented ProTaper Universal Ni-Ti system combines ascending and descending taper on one tool. This design reduces the likelihood of tool jamming in the canal, the screw effect, and works more efficiently. Compared to files with a fixed taper, the presented instruments are highly flexible, limit dentin removal and preserve tissue in the coronal 2/3 of the canal. The resulting design allows ProTaper to become the #1 selling file worldwide, the choice of endodontists and a technique taught in all dental institutes.
Another advantage is the material used. Although Ni-Ti files show 2-3 times more flexibility than stainless steel files, the metallurgical industry has realized some more benefits when heating. Research has focused on heating and cooling of traditional Ni-Ti alloys, both before and after processing. Heating allows you to create an optimal phase between the components of the alloy. Research has shown that M-wire, a metallurgically advanced version of Ni-Ti, reduces cyclic fatigue by 400% compared to a file of the same diameter, section and taper.
This development is also a strategic enhancement to the clinical safety of the PTN file system.
The third design feature is the shifted center of gravity. There are 3 main advantages associated with such a device:
- When rotated, files with a displaced center of gravity produce mechanical movement that extends along the active part of the tool. The rocking effect minimizes the adhesion of the file to the dentin, compared to files with a fixed taper and a non-displaced center of rotation (Photo 10). Reduced grip reduces the likelihood of tool jamming, screw effect and bending.
- The off-center file design adds additional cross-sectional space, allowing for better removal and removal of dentinal debris from the canal (Figure 10). Breakage of many instruments often occurs precisely because the teeth of the instrument are filled with sawdust from hard tissues. This design also minimizes the likelihood of obstruction of the canal by sawdust and disruption of its anatomy (Photo 6).
- A file with an offset center of gravity produces a wave that resembles a sine wave (Photo 11). As a result, PTN can perform more action than other files with similar input data (Photo 6). There is a clinical benefit to using a smaller, more flexible PTN file in areas that previously required larger, more rigid instruments (Figure 10).
Photo 10: PTN files have a progressive taper and offset design. These features reduce jamming, maximize dentinal debris removal, and increase flexibility. For comparison, the figure below shows a file with a fixed taper, center of gravity and axis of rotation.
Photo 11. Similar to a sine wave, PTNs form a wave when moving and provide a “swinging” effect throughout the working part.
Conclusion
Each new generation of endodontic files offers something useful, innovative, thereby trying to surpass the previous generation. PTN, now in its fifth generation, has become a unique example of combining the success of previous experience with new technological improvements. The created system is designed to simplify the process of endodontic canal treatment by reducing the number of instruments required for use.
Clinically, PTN fulfills the three pillars of canal treatment: safety, effectiveness and simplicity. From a scientific point of view, continued research is needed to confirm the effectiveness and identify all the important points when working with these tools.
Authors: Clifford J. Ruddle, DDS, MSD; Pierre Machtou, DDS, MS, PhD; and John D. West, D.D.S.
Endodontic materials
An ideal root canal filling material must meet the following parameters: 1. Provide a reliable seal throughout the entire root canal system. 2. Be non-toxic and have good biocompatibility. 3. Do not irritate the periodontium. 4. Do not shrink in the canal. It is desirable that it expands slightly when introduced into the canal or during the curing process. 5. Have a bacteriostatic effect or at least not support the growth of bacteria. 6. Easy to sterilize before use. 7. Be radiopaque. 8. Do not change the color of the tooth. 9. If necessary, it can be easily removed from the canal. 10. Have a curing time sufficient for comfortable work. 11. Do not dissolve in tissue fluid. 12. Have good adhesion to dentin and filling material.
Such an ideal material does not exist today. However, these requirements are best met by the methods of filling root canals with gutta-percha and sealer. The vast majority of root canals around the world today are filled using gutta-percha.
Filling root canals with gutta-percha
Gutta-percha is a hard, but at the same time elastic and flexible coagulation product of the latex of tropical gutta-percha plants. Gutta-percha is divided into two types - alpha and beta - which differ greatly in physical properties.
For the production of gutta-percha points, beta-gutta-percha is traditionally used, which has greater hardness and spatial stability and less stickiness. Beta gutta percha requires higher temperatures to soften. However, recently, more fluid and sticky alpha gutta-percha has become increasingly popular, providing, when used in a heated state, a more homogeneous filling of the entire branched root canal system.
Alpha gutta-percha is used for techniques that involve working with thermoplasticized (heated) gutta-percha: vertical condensation and thermoplastic injection techniques. In addition, there is a special type of gutta-percha used to produce Thermafil obturators. This patented type of gutta-percha is similar in chemical properties to beta-gutta-percha, but at the same time has the physical characteristics of alpha-gutta-percha.
The production of gutta-percha points is mainly concentrated in Southeast Asia. One of the largest suppliers of gutta-percha is Korea. However, recently gutta-percha points have begun to be produced in Brazil.
Pins are divided into standard pins, which have a 2% taper and ISO sizes from 10 to 140, and tapered pins, which have a 2% to 12% taper and sizes from 20 to 30.
Gutta-percha points are made either manually (“hand-rolled”) or by machine. It is believed that the manual method provides higher precision in making pins. Machine-made pins often do not guarantee accurate calibration. It should be especially noted that all pins made in Brazil are machine-made.
The commercial name “gutta-percha pins” has taken root well and is used everywhere, although the content of gutta-percha itself in these pins is about 20%. The main component of the pins (60-70%) is zinc oxide. The remaining 10% consists of barium sulfate, wax, dyes and other additives.
The main advantage of gutta-percha is the predictability of root canal obturation. Its advantages also include good biocompatibility and low toxicity, the ability to condense, ensuring dense and uniform filling of the root canal, softening when heated, which allows for three-dimensional obturation of the root canal system, spatial stability (in the hardened state it practically does not change its volume) and ease of its removal from the root canal if re-treatment is necessary.
Despite all the obvious advantages, gutta-percha also has a number of disadvantages associated with the peculiarities of its physical and chemical properties and the technology of application. The disadvantages of gutta-percha are as follows: 1. It cannot be used without a sealer, since it does not have adhesion to dentin. 2. Gutta-percha does not have a bactericidal or bacteriostatic effect. 3. Thin pins have very high flexibility and softness, which requires high qualifications and experience of the doctor, especially when filling narrow canals, and can also lead to deformation of the pins during their fitting. 4. Thermoplasticized gutta-percha shrinks when cooled. To compensate for this shrinkage, it is necessary to continue the condensation process until it cools.
Filling root canals with cold gutta-percha
Single pin method
This method consists in the fact that after appropriate treatment of the canal, which means giving it a taper of 4, 6 or 8%, a sealer is applied to its walls using a paper point. After this, a pre-selected pin with an appropriate taper and tip size is inserted into the canal. The pin should fit snugly against the canal walls. Some authors recommend shortening the tip of the pin by 0.5 mm. Using a heated tool, the pin is cut at the level of the mouth and its condensation is carried out in the vertical direction.
This technique can be a good alternative for doctors who prefer to fill canals with monopaste, but this only ensures filling the lumen of the main canal, and not three-dimensional obturation of the entire root canal system.
Thermo-mechanical condensation (or filling root canals with a rotating condenser)
This method is currently practically not used. With this technique, a tool that has in its design elements of an H-file (but with a reverse thread) and a channel filler is used to soften the gutta-percha and move it in the apical direction. This instrument is called a condenser or gutta condenser. To soften the gutta-percha and condense it, the instrument must be rotated clockwise at a speed of at least 8000 rpm.
A standard gutta-percha pin should be 1–2 sizes larger than the last instrument used to process the canal, that is, 1–2 mm shorter than the working length. Control of the level of gutta-percha filling is ensured by inserting the instrument, 1.5 mm short of the apical constriction.
The disadvantages of the method are the unpredictability of the level of filling, the high risk of breaking off the instrument in the canal, and the likelihood of voids forming in the gutta-percha due to its gluing to the instrument. In addition, this technique also does not provide reliable obturation of the lateral branches of the canal.