Indications and contraindications Advantages Disadvantages Types of sinus lifting Preparation for surgery How the operation is performed Is it painful Restrictions after surgery Bone material and membranes Is sinus lifting dangerous Price in Moscow Where is the best place to do it?
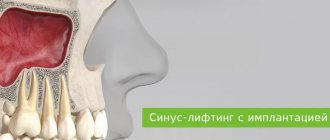
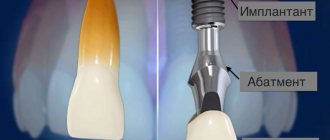
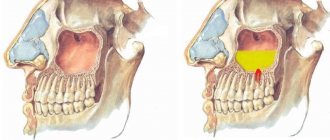
Almost the entire body of the maxillary bone is occupied by the maxillary sinus - a large cavity, the lower wall of which is adjacent to the roots of the teeth. The inside is lined with a thin mucous membrane. When assessing the prospects for implantation, the implant surgeon measures the height of the bone from the lower border of the jaw to the bottom of the maxillary cavity in order to understand whether an implant of the correct length will fit there and whether this bone will withstand the implant under active chewing load. If the bone volume is insufficient, the doctor must carefully restore the lost bone along the border of the maxillary sinus before implantation. This microsurgical operation is called sinus lift.
Important! Due to the anatomical structure of the skull bones, the operation is performed only on the upper jaw from 4 to 7 teeth. In the lower jaw, only classical bone reconstruction is performed.
What is a sinus lift in dentistry?
Indications and contraindications
The absolute indication is a lack of bone tissue in the upper jaw, bone atrophy after traumatic tooth extraction in the past, and the impossibility of implantation with root-shaped implants according to the classical protocol.
This treatment is also indicated for patients at risk for osteoporosis of the jaw bones and patients with metabolic disorders in menopause or its excessive fragility.
Contraindications as for any surgical operations:
- Acute immune diseases;
- Oncological diseases in the stage of decompensation or earlier than 6 months after chemotherapy;
- Uncontrolled bleeding disorders;
If the patient has ARVI, sinusitis, sinusitis or other diseases of the ENT organs, then the procedure should be postponed until complete recovery. Previously performed sinus lifting, trauma to the maxillary sinus, surgery in the area of the maxillary sinuses in the past are not contraindications; after consultation, we will select the optimal treatment algorithm for you.
Doctor's recommendations
During the recovery period after sinus lift, the first 8-10 days should follow the recommendations to prevent complications and speed up the healing process:
- Treat the area around the wound on the gum with a cotton swab or cotton swab dipped in an antiseptic solution
- Brush your teeth only from the second day, using a soft brush and without touching the surgical area
- Do not bite with teeth that have undergone surgery.
- Limit food to food at a comfortable temperature that does not require heavy chewing (should be finely chopped or semi-liquid)
- Remove fluid from the nose with a cotton swab, do not blow your nose
You will find detailed instructions with rules of conduct in the post-operative medicine package.
Types of sinus lift
Open
It is performed to build up a large amount of lost bone. Requires serious training of the surgeon. The waiting period between surgery and implantation is several months.
More details
Closed
If the patient’s bone is high and does not require volumetric augmentation, then a closed technique is used (soft or BIO sinus lift). Also carried out through a small hole.
More details
Modified
The balloon method allows you to combine augmentation and implantation, including on thin bone. The formation of a cavity in the maxillary sinus occurs using a special disposable balloon.
More details
Differences between open and closed techniques
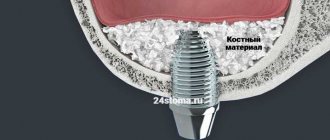
Objectively, these are two similar operations, the purpose of which is to form new bone tissue in the patient’s upper jaw by filling the defect in the lower border of the maxillary sinus with a special bone material or a bone growth stimulator. They differ in the volume and time of surgical intervention.
When open, manipulations are carried out quickly through a standard 5 mm hole in the bone. For a closed, rather narrow channel, which is formed not by ultrasound, but by osteotomes, and into which the implant is then inserted.
Simultaneous implantation is another pseudo-difference between closed lifting; often with open sinus lifting, implants are also installed simultaneously; the timing of regeneration does not depend on the name of the operation and depends only on the complexity and size of the bone defect being restored. You still have to wait several months for the bone to mature.
Sign up for dental implantation at a discount:
— Can there be complications after an open sinus lift?
Yes. First of all, this is the appearance of sinusitis. If perforation of the mucosa occurs, sinusitis (inflammation of the maxillary sinus) will develop: the mucosa becomes inflamed, swells, begins to produce fluid, and accordingly, what was implanted under it enters the sinus through this hole. In another flora, the material introduced by the implantologist begins to become inflamed. Frontitis (inflammation of the frontal sinus) is the next complication that can occur after open sinus lift surgery. In the specialized literature, otitis media is also described as a complication.
— How do complications happen?
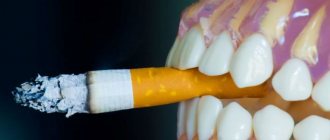
Not often today. Modern diagnostic methods make it possible to prevent troubles even before the procedure. For example, to diagnose a patient with chronic sinusitis, a thin mucous membrane in the sinus or its almost complete absence due to work in hazardous work or due to bad habits (heavy smokers). Also at the diagnostic stage, the degree of elasticity and thickness of the membrane is recorded so that it can be lifted and material placed under it.
— What does diagnostics include before sinus lifts?
A computed tomography scan of the jaws is required. It shows all the signs of chronic sinusitis, polyps, cysts or fluid in the sinus, the thickness of the mucous membrane (for a resident of any metropolis, moderate hypertrophy of the mucous membrane of 4 to 4 mm is normal. Products of dirty city air settle on the mucous membrane as a protective mechanism, and additional fluid begins to be released , to remove all settled harmful substances), polypous growths.
Computed tomography of the jaws before sinus lift is mandatory!
— What do you do after receiving this information?
If there are contraindications, the phase must first be sanitized.
— Do you do this on your own or together with the ENT?
Either independently or together with an ENT doctor. As a rule, patients with chronic sinusitis have ENT doctors whom they visit regularly. After sanitization of the sinuses by an ENT doctor, sinus lifting for the purpose of further restoration of lost teeth can be carried out after at least 5 months.
— What therapy is necessary after sinus lift?
Antibacterial therapy, vasoconstrictor nasal drops, antiseptic anti-inflammatory therapy (oral treatment) are required.
— What class of antibacterial drugs are used?
At the discretion of the doctor. Basically, these are drugs of the fourth generation of penicillin groups. They are most suitable for diseases of the nose and mouth area.
— What kind of rehabilitation is necessary after a sinus lift?
You cannot play sports, including dynamic sports, for at least three weeks. You can’t visit baths or saunas for three to four weeks. Nutrition in the postoperative period should be gentle. Smoking should be reduced to a minimum. Alcohol is also prohibited during this period. After a sinus lift, you should not go diving or fly in an airplane for the first month after surgery. Due to the pressure difference, the implanted material can move along the sinus, interfering with osseointegration.
— Do these restrictions apply equally to patients who have undergone open or closed sinus lift?
Yes. If the mass of the embedded material is more than 1.5 grams (this is a fairly large amount). I recommend not flying or playing sports for up to two months, because 1.5-2 grams of bone tissue is a lot. The larger the volume of embedded material, the more time is needed for its integration.
— What symptoms should alert a patient after a sinus lift? What is normal and what should alert the patient?
In the first week - ten days, the norm includes swelling (in any case, it will appear and will last about five to six days), bruising on the skin, minor nasal discharge (especially in the morning after sleep), minor bloody discharge from the nose, temperature up to 38C within 3-4 days after surgery. The degree of swelling depends on the volume of intervention, on the skill of the dental surgeon: the smaller the incision, the area of intervention, the less swelling. Also, in women, swelling is greater due to the larger volume of subcutaneous adipose tissue. Signs of inflammation (fever after 4 days from surgery), aching, unpleasant pain, and suppuration from the nose are not normal. If these signs appear, you should immediately consult your doctor.
— What does a doctor do when a patient presents with similar symptoms after a sinus lift?
Sometimes you have to prescribe antiseptic drugs, antibiotic drops, and observe for several days. If there are no serious ruptures of the mucous membrane, then everything will return to normal. Not often, but it happens that you have to sanitize and wash everything. But such cases are extremely rare.
— Does sinus lift always involve simultaneous implantation?
This operation is performed for the further installation of a dental implant. There are cases when this happens in one operation (most often), but it happens that the installation of the implantation system is carried out as a second stage after some time.
Open bilateral SINUS lift. Video
— In what cases are procedures performed separately?
This depends on the extent of the bone tissue defect. First, you can do a sinus lift, wait until the bone tissue volume reaches the required level, and then carry out implantation.
— How long can the wait take?
Six to nine months. But, I repeat, in most cases it is possible to immediately install implants after a sinus lift. I think that for every 10 operations there are 2 where it is impossible to install implants at once.
Thank you very much!
Preparing for surgery
Before the operation, the surgeon carefully examines the bones of the upper jaw on a CT scan and the location of the maxillary sinus on an X-ray. Before the operation, dental plaque is cleaned and sometimes, if chronic sinusitis is suspected, antibiotics are prescribed two days in advance to avoid cross-infection during the procedure. Smokers are given replacement therapy (the operation does not require a temporary cessation of smoking, but life is more comfortable with replacement therapy).
Read more about preparation here.
Clinical case
A 38-year-old man with no significant medical history presented with missing chewing teeth on the left side of the upper jaw. Preliminary radiographic assessment showed bone thickness of 3–4 mm in the corono-apical and 6–7 mm in the bucco-palatal direction. After a preliminary assessment, planning for the operation began. It was decided to carry out rehabilitation using an orthopedic structure supported by three implants with simultaneous sinus lift without the use of a graft.
In this case, three 3.75 x 11.5 implants (MIS Seven; MIS, Barlev, Israel) were placed for immediate loading. Preoperative cone beam computed tomography determined the diameter and location of the AAA in the anterolateral sinus wall (Fig. 1). The course of the vessel was determined to be intraosseous, and CT images made it possible to correctly plan the bone windows. The course of the vessel was marked with a surgical pencil on the side wall of the sinus after making an incision and folding back the mucoperiosteal flap.
Rice. 1. Preoperative CBCT scanning allowed us to study the location of the AAA in the anterolateral wall of the sinus and the variability of its diameter.
Is it painful to do?
The procedure in most Russian clinics is performed under local anesthesia.
In our Center we use short-term combo sedation
This is not anesthesia and does not require tests or long preparation. This is a modern and safe sleep treatment, but without complete immersion.
Levin Dmitry Valerievich
Founder and Chief Doctor of the Center
The use of drug sedation is the best option - the patient is in a calm, half-asleep state and can easily tolerate treatment procedures. The operation is not accompanied by unpleasant sensations, and to relieve pain during rehabilitation, the doctor prescribes analgesics; all medications will be given to you immediately after the operation; you do not need to go to the pharmacy. If recovery proceeds without complications, long-term use of painkillers will not be required, usually no more than three days.
How to take care of your mouth
Maintaining a clean mouth is important to prevent infectious complications after surgery.
- Gently brush your teeth on the evening of the day of surgery (avoiding areas near the wound).
- Do not rinse your mouth forcefully or spit so that the stitches on the wound do not come apart.
- From the second day after the sinus lift procedure and for a week, carefully rinse your mouth with slightly warm salt water (your doctor will tell you how to prepare the solution correctly). Do this after every meal.
- In addition, rinse your mouth with chlorhexidine solution 2 times a day: in the morning and at night after brushing your teeth.
- To brush your teeth, use only a soft toothbrush.
Restrictions after surgery
- You can't blow your nose;
- It is forbidden to drink through a straw;
- It is worth refraining from air travel;
- Food should be soft or semi-liquid; cold, hot, and spicy foods are prohibited;
- You cannot chew on the side where the operation was performed;
- During the first nights, it is recommended to sleep on high pillows with your head elevated so as not to provoke swelling;
- You cannot visit the bathhouse, swim, dive, you should exclude any physical activity, you need to rest;
- You need to take the medications prescribed by your doctor.
Read more about restrictions and recommendations here.
Reviews from doctors and patients
Sinus lifting is often the only solution for people with bone atrophy - a statement that most doctors agree with. But professionals also consider alternative methods (discussed above) to be an excellent solution. A lot here depends on the individual characteristics of the body. Patient reviews of maxillary augmentation vary greatly - this is mainly due to their well-being during the rehabilitation period. The fastest recovery occurs after a closed sinus lift with the additional use of a membrane.
Bone material and membranes for sinus lift
Own bone
In the first case, the donor of the bone material is the patient himself - bone chips are taken from the chin or lower jaw area. Previously, it was believed that such a graft survives with minimal risk of rejection. However, the 30% risk of proven self-dissolution of the transplanted block forced us to abandon block transplantation many years ago. The second reason why we do not use this is that autogenous transplantation is more traumatic for the patient, since it involves surgical intervention in two places at once; rehabilitation is very memorable, especially in older patients.
Donor and artificial bone
An alternative material is donor bone taken from another person or animal, as well as artificial substances. In this case, the risk of rejection is higher, although the materials are always processed to improve survival rate. There are observations that prove that when using donor blocks it is impossible to guarantee the ideal biological purity of samples. Difficult choice for hygienic and ethical reasons.
Osteoplastic stimulators of bone regeneration
The best option, but the most expensive. There is no need to transplant a bone from a leg, and there is no need to transplant foreign bones either. A very quiet and honest bone growing technology. Genuine American growth stimulants cost from 22,000 rubles per mini bottle. Such stimulants are not found in network clinics or “promotional implantation” clinics. There are a lot of Russian and Asian analogues, I can’t comment on the results of their use, I haven’t tried them.
Membranes
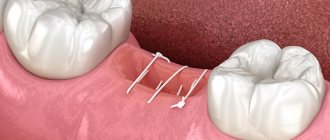
Resorbable membranes during sinus lifting perform an important barrier function - they separate the space in which new bone is formed from the rest of the cavity of the maxillary sinus. Over time, the membrane dissolves. The membrane is necessary to keep the osteoplastic material stationary.
How to avoid consequences
For our part, we took all measures to avoid complications:
- Diagnosis is carried out on a modern SIRONA computed tomograph with GALILEOS software in ENT mode . It allows you to evaluate the anatomical features of the maxillary bone, the location and condition of the maxillary sinuses.
- Before a sinus lift, we must perform oral sanitation and professional hygiene to avoid infection in the surgical area.
- We perform operations using gentle protocols— ultrasonic access protocol and Lift-Control technology ensure the most gentle operation possible.
- We use only biocompatible materials and BMP bone growth stimulators without the risk of rejection and allergies.
On your part, it is enough to follow the recommendations, then the risk of unpleasant consequences will be minimal.
Is sinus lift dangerous?
If the operation is performed efficiently, the doctor is competent and mentally healthy, and the patient follows the recommendations, then sinus lifting is not dangerous and this adventure will quickly be forgotten. After surgery, the most common complications are damage to the sinuses and perforation of the mucous membrane of the maxillary sinus, which can lead to severe inflammation and chronic rhinitis. Another complication is perforation of the installed implant into the maxillary sinuses. This happens if the young surgeon has not sufficiently studied their structure, and will definitely require removal of the implant and a new operation.
In the case where the operation was performed in a specialized clean surgical department, these are impossible, fantastic situations.
Sinus lifting is a frequent and effective operation for increasing the bone tissue of the upper jaw.
There are no real alternatives to it. Sometimes instead, as an alternative, they resort to basal implantation - a technique in which non-root-shaped implants are installed in deeper and denser bone layers that are not suitable for axial biomechanical overloads. A basal implant never “grows” into the bone, like a root-shaped implant, but is held in it by a special shape and thread. Therefore, over time, it loosens and becomes unstable, which has a bad effect on dental health, not to mention what a living person experiences when he finds out that all the suffering was in vain, he will have to remove the dental crowns and everything again for the second round. The use of short implants to avoid a sinus lift is considered unacceptable by reputable doctors. There is no guarantee of the quality of the implantation performed, the patient runs the risk of complications, but if the clinics have good lawyers, then in Russia they do whatever they want.
Levin Dmitry Valerievich
Founder and Chief Doctor of the Center
Sinus lift using osteotomy technique: possibilities for subsequent implantation
The increasing prevalence of dental implant use can potentially be associated with five factors: the growing demographic of older people, the trend from removable to fixed structures, improvements in the design of prosthetic components, micro- and nanomodifications of the surface of intraosseous screws, and the introduction of less traumatic methods into clinical practice. treatment.
Minimally invasive and minimally traumatic iatrogenic interventions reduce healing time, reduce the level of postoperative discomfort, and are more acceptable to patients. All this contributes to the increase in the total number of patients agreeing to undergo surgical interventions. The use of minimally invasive surgical techniques also makes it possible to preserve the maximum amount of bone tissue in physiologically deficient areas of the jaws, such as in the distal region of the upper jaw. This area is characterized not only by insufficient bone supply due to progressive resorption of the bone crest and pneumatization of the maxillary sinus, but also by low bone density (quality). The use of removable dentures to replace such defects in the dentition provokes even greater resorption of bone tissue, compromising the possibilities for achieving predictable treatment results.
Sinus lift procedure using osteotomy technique
The sinus lift osteotomy procedure was originally developed as a less invasive approach to subantral augmentation and an analogue to the traditional bone window technique (Caldwell-Luc). This method makes it possible to create anatomical conditions suitable for the installation of intraosseous titanium supports. Summers first described the sinus lift procedure using the osteotomy technique as a method of raising the bottom of the maxillary sinus and filling the formed space with bone substitute material to a height of 6 or more millimeters. At the same time, dental implants were immediately installed in the augmented area, thus minimizing the number of required clinical visits. Over time, many modifications to this operational approach have been proposed and demonstrated in published articles. The method described in this article is a modification of the classic sinus lift procedure with an osteotomy technique that can augment an area with an initial ridge height of less than 5 mm in the least invasive way.
To perform the above-mentioned intervention, the harvesting of an autologous graft is not required, and the reconstruction procedure involves the use of bone substitutes with calcium sulfate. The subsequent implantation process used bone-level conical implants with platform switching functionality. Objectification of all initial parameters and obtained results was ensured by cone beam computed tomography (CBCT).
Clinical procedure
Exposure of Schneiderian membrane
At the very first stage, a comprehensive diagnosis of the patient is provided in order to identify factors that could potentially affect the outcome of implantation or the sinus lift procedure (for example, the presence of chronic periodontitis or any systemic diseases). The initial assessment of the intervention area is carried out using targeted radiography, although orthopantomography or computed tomography can also be used to obtain additional diagnostic information. The initial height of residual bone volume in the sinus region may be about 2-3 mm, which is sufficient to predict a positive outcome using the technique described below.
On the day of surgery, the patient should start taking antibiotics in a loading dose of 1 g of amoxicillin, and after surgery continue taking them for another 7-10 days, reducing the dose to 500 mg. If the patient is allergic to amoxicillin, an alternative can be prescribed clindamycin 300 mg on the day of surgery, and 150 mg per day for the next 7-10 days. To achieve the required position of the implants, it is advisable to use a guide template, especially in cases of unlimited distal defects in the dentition. Surgical access can be created in two possible ways: by separating a full-tissue flap after making an incision along the top of the residual ridge, or by removing the mucosa using a mucotome. To correctly position the mucotome, you can first make a small incision and install a gutta-percha pin in it: in this way, the doctor will be able to focus on the pin as the center of the area where a portion of the mucosa is removed. After working with a mucotome, a manual scaler or curette can be used to remove the treated mucosa to achieve visualization of the bone surface. To install an implant with a diameter of 3.75 mm, a bone crest width of 5.75 mm is required. As with the classic implantation protocol, the intervention area is first treated with a round bur, after which a portion of gutta-percha is placed in the formed recess and the positioning accuracy is assessed using the resulting radiograph (photo 1).
Photo 1. X-ray with gutta-percha installed in the area of the future osteotomy after marking the area with a round bur.
The gutta-percha is then removed and a 2-mm twist drill is used to dissect the bone at 250 rpm. Since the quality of bone tissue in this area is usually quite low, the doctor easily passes through the thickness of the cancellous bone and reaches the area of the inner cortical plate. The thickness of the cortical plate should be previously measured using targeted radiography, but is typically approximately 1 mm.
The stage of preparation of the internal bone plate is the most sensitive during osteotomy, since the risk of damage to the Schneiderian membrane directly depends on the correctness of its execution. To avoid such a complication, it is necessary to ensure sufficient control over the movement of the drill, minimal pressure on the working tool, sufficient irrigation of the intervention area and a reduction in the preparation speed to the minimum acceptable. The working drill should not dissect the entire width of the bone plate, since in this case the risk of rupture of the sinus mucosa significantly increases. If the doctor cannot determine whether he has managed to maintain the integrity of the Schneiderian membrane, he can use a special implantological probe with a blunt tip (photo 2), which allows him to feel the presence of the phenomenon of “compliance” of the membrane. If a membrane rupture is suspected, no radiological markers should be used under any circumstances, since they may enter directly into the sinus space. In cases of using superficial radiological markers, they should be fixed with floss, while warning the patient about the need to keep his mouth open during and after the control radiography, so as not to provoke excessive pressure of the marker on the thin mucous membrane of the bottom of the maxillary sinus. Once the clinician has partially exposed the Schneiderian membrane, the osteotomy area is widened to 2.8 mm under very light pressure, not exceeding a preparation speed of 250 rpm. The integrity of the membrane is again checked using a blunt probe (eg, MT-BTI10 depth probe from MIS Implants Technologies Inc.) (Figure 2) and a piece of collagen sponge or collagen membrane, which is positioned apical to the osteotomy site.
Photo 2. Implanotology probe with a blunt tip.
The next step is the actual bone tissue augmentation. But before this, it is extremely important to assess the integrity of the Schneiderian membrane using a blunt probe. If the doctor has established a violation of the integrity of the mucous membrane of the bottom of the maxillary sinus, then he can:
1. Proceed to the sinus lift procedure, but according to the standard protocol, providing full access to the Schneiderian membrane (Caldwell-Luc approach); In this way, it is possible to close a small perforation with a mucous collagen membrane, and only then perform bone tissue augmentation.
2. Suture the flap into place and inform the patient that the procedure will need to be performed in 6-8 weeks. In this case, part of the soft tissue of the flap can later be used to lift the bottom of the maxillary sinus, covering the area of perforation, which will help prevent re-injury of the mucosa. If during the primary operation an surgical approach was used without flap separation, then this should still be separated in order to ensure reliable coverage of the osteotomy area and avoid the formation of an oroantral anastomosis.
Bone augmentation
The use of a combined bone substitute has two main advantages compared to the use of an autogenous graft. Firstly, no additional intervention is required to harvest bone tissue, and secondly, there is unlimited access to the required volume of graft. To maximize osteogenesis outcome, we used calcium sulfate (eg, BondBone, MIS Implants Technologies Inc.) added to demineralized freeze-dried bone allograft (DFDBA) and mineralized bone (lyophilized, deproteinized bovine bone). It was previously established that calcium sulfate increases the rate of angiogenesis in the structure of the graft used, and also stimulates the maturation of DFDBA when augmenting post-extraction sockets with it. The meta-analysis confirmed that DFDBA in combination with hydroxyapatite during sinus lift with standard access contributed to the achievement of the highest survival rates of installed implants, while there were no publications in the literature describing the use of a combination of materials together with calcium sulfate during the procedure subantral augmentation. However, calcium sulfate, used as the main sinus lift material, has shown fairly good postoperative results. In addition, the advantages of calcium sulfate are its granular form, which allows it to be easily mixed with other grafts, as well as its biodegradation rate of 3-4 weeks. Bone substitutes used in the sinus lift process must have a sufficient level of physical stability during the healing period to maintain the volume of space under the elevated Schneiderian membrane. When using only demineralized analogues, there is a significant risk of shrinkage of these materials during healing, therefore, in such cases, the authors recommend the use of a mixture of calcium phosphate, DFDBA and mineralized bone. First, the mineralized bone graft is mixed with DFDBA in a 50:50 ratio, after which 40% calcium sulfate by volume is added to the resulting mixture. Such a large portion of calcium sulfate is used because some of it will simply be washed away during packaging. Another advantage of calcium sulfate is that it is not as radiopaque as pure mineralized graft, therefore providing better conditions for monitoring the process of bone formation around the implant. The dynamics of changes in the X-ray picture of the augmentation area is presented in photos 4 and 5 (x-rays taken on the day of surgery) and in photo 6 (x-rays taken 5 months after surgery and after fixation of the abutments). Radiologically, the appearance of the bone floor of the maxillary sinus is practically indistinguishable from the formed volume of new bone tissue. Photo 7 shows CBCT scans (Carestream Dental) obtained 4 months after the intervention.
Photo 3. X-ray marker to control the distance to the sinus.
Photo 4. Raising the floor of the maxillary sinus by approximately 8 mm and augmenting the intervention area.
Photo 5. X-ray of the implant installed in the area of the augmentation at the site of the 14th tooth.
Figure 6: X-ray obtained after 5 months indicating good integration of the augment.
Photo 7. CBCT sections obtained 4 months after surgery.
Optical magnification and illumination are critical to the success of the operation. In this case report, the authors used an operating microscope to ensure proper visualization of the intervention area. The amount of combined graft used should be sufficient to fill at least two-thirds of the volume of the space, after which the augment is compacted. After this, an osteotome with a diameter of 2.8 mm with a vertical stopper is used (photo 8), which avoids iatrogenic penetration into the maxillary sinus.
Photo 8. Osteotome with stopper.
The osteotome is positioned at a distance of about 1 mm from the membrane, after which the bone substitute is advanced with light movements towards the mucous membrane of the bottom of the maxillary sinus. If an excessive initial amount of bone substitute is used or if compaction is performed too aggressively, the risk of damage to the Schneiderian membrane increases. This procedure is repeated several times, and after each approach a blunt probe is used to check the integrity of the mucosa and manually evenly distribute the bone substitute. After approximately seven or eight cycles of this manipulation, control radiography is performed to determine the position of the Schneiderian membrane (photo 4). If the mucosa can be raised by 3-4 mm, a spiral drill with a diameter of 2.8 mm is used to remove the remaining bone in the area of the base of the osteotomy bed. This ensures expansion of the osteotomy area. The level of elevation of the mucous membrane of the bottom of the maxillary sinus should be such as to ensure the presence of at least 1-2 mm of bone tissue over the apical part of the installed implant. In this case, we used a 10 mm long implant. The implant surface design with fine threads in the neck area provides better primary anchorage stability. When installing conical implants, the final drill during the osteotomy is a profile drill. The length of this drill is slightly longer than the length of the implant itself, so the risk of damage to the Schneiderian membrane increases. To avoid such a complication, the tip of the drill can be leveled by 1.5 mm using a round bur (photo 9).
Photo 9. Profile drills shortened by approximately 1.5 mm to prevent damage to the Schneiderian membrane.
The operating speed of the profile drill should not exceed 200 rpm. The marks on the drill indicate the level of bone relative to which the implant is being installed. Considering that the support is fixed not into the native bone, but into the augmentation, the level of drill recess should be significantly less than the existing mark in order to avoid associated iatrogenic complications. The installed implant must be well stabilized in the bone. If there is slight mobility of the implant, it can be installed somewhat deeper (if there is a sufficient volume of native bone), or installed after the graft has fully matured, that is, not immediately after augmentation, but after some time.
In cases of using cone implants, the need for such delays is observed quite rarely. It is important to use a design with a platform switching function, taking into account the specifics of the formation of biological width. When placing implants with an external hex and a bone level shoulder, the expected loss of ridge height is between 1.5 mm and 2 mm. Photo 10 demonstrates the optimal depth of implant installation with the platform switching function. A 3 mm height healing abutment was immediately fixed onto the implant. In the described clinical case, it was possible to achieve elevation of the maxillary sinus mucosa by 8-9 mm. When comparing radiographs obtained on the day of surgery (photo 10) and 6 months later (photo 11), no loss of native bone tissue was detected, and the area of augmentation was characterized by the presence of signs of graft maturation. On CBCT sections 3.5 months after surgery (photo 12), it was also not possible to identify signs of resorption of the coronal level of bone tissue.
Photo 10. X-ray of the implant installed in the area of subantral augmentation. The amount of native bone tissue was about 2-3 mm, and the level of elevation of the sinus floor was 8-9 mm.
Photo 11. X-ray obtained 7 months after surgery.
Photo 12. CBCT sections obtained 3.5 months after surgery.
In this clinical case, the use of an implant without platform switching or a non-bone-level design would have increased the risk of associated problems. With 1.5–2 mm of coronal bone loss, the external hex implant could potentially become destabilized, leading to eventual loss. Cylindrical implants with loss of surrounding bone tissue are characterized by the risk of developing migration of supports into the sinus space. Closing screws or gum formers can be used to close the implant. In cases where the patient uses removable dentures, of course, it is best to close the installed support with a locking screw instead of a former. Primary wound healing is not necessary, but the area is still sutured with monofilament sutures to prevent bacterial invasion into the augmented space. The patient is also provided with standard postoperative instructions; he is not allowed to blow his nose for 2 weeks, and always open his mouth when sneezing.
Clinical case 1
A 74-year-old patient sought dental care, and the height of the bone tissue in the projection of the maxillary sinus area at the site of the 14th tooth was 2-3 mm (photo 13). For the purpose of augmentation, a complex bone graft with a 50:50 ratio of DFDBA components (Bio-Oss, Geistlich Biomaterials) was used, to which approximately 40% calcium sulfate was added by volume (Figure 14). The floor of the maxillary sinus was raised by approximately 8 mm, which made it possible to install a 10 mm long implant with a platform switching function. An x-ray obtained after 4 months (Figure 16) showed signs of slight shrinkage of the augmentation, but there was no significant demarcation of the graft in the intervention area.
Photo 13. Clinical case 1. The initial radiograph demonstrates 2-3 mm of bone crest height in the area of the 14th tooth.
Photo 14. X-ray after the sinus lift procedure.
Photo 15. X-ray after implant installation. Raising the sinus floor area by 7-8 mm.
Photo 16. X-ray of the intervention area after 4 months with the abutment installed.
Clinical case 2
A 74-year-old patient sought dental care with a 4-5 mm height of residual ridge in the area of the 4th tooth (photo 17). For the purpose of augmentation, a complex bone graft was used, similar to that used in clinical case 1. An 11.5 mm conical implant with diameter variations from 5 to 4.2 mm was installed as a support. 16 months after treatment, the level of elevation of the maxillary sinus floor was approximately 7-8 mm (Figure 18). CBCT scans did not reveal any pathological changes in the intervention area (Figure 19). Despite endodontic damage, the 15th tooth was not removed, which was contrary to surgical recommendations. As can be seen in photo 18, the implant serves as a support for the bridge structure.
Photo 17. Clinical case No. 2. The residual height of the bone ridge in the area of the 14th tooth is about 4-5 mm.
Photo 18. X-ray obtained after 16 months. The patient refused endodontic treatment of the 15th tooth.
Photo 19. CBCT sections of the area of augmentation and implantation.
Clinical case 3
In a 73-year-old patient, the height of the bone crest in the area of the 3rd tooth was about 3.5 mm (photo 20). The graft described in Cases 1 and 2 and a mixture of deproteinized mineralized bone graft (Osteohealth) supplemented with approximately 40% calcium sulfate were used for augmentation. The implant design was similar to that described in Case 1. Figure 1 shows a radiograph obtained on the day of surgery. On CBCT sections obtained on the day of the intervention, the boundary between the native bone tissue and the augmentation was clearly visualized (photo 22). After 6.5 months, radiographs showed no significant bone loss, and the augmentation area was noticeably denser compared to the initial situation (Figure 23). The bottom of the sinus was raised by approximately 7-8 mm. The final radiological control was carried out after the removal of the 2nd and 4th teeth and the immediate installation of implants.
Figure 20: Preoperative radiograph demonstrates 3.5 mm of residual ridge height.
Photo 21. View after subantral augmentation and implantation: raising the sinus floor by 7-8 mm.
Photo 22. CBCT sections of the intervention area obtained directly on the day of surgery.
Photo 23. X-ray obtained after 6.5 months. Teeth 2 and 4 were removed and the resulting defect was immediately restored with implants.
Discussion
The benefits of performing a sinus lift procedure via osteotomy include decreased postoperative morbidity, the ability to perform orthopedic procedures earlier, and increased patient acceptance of the procedure. The osteotomy technique allows for effective subantral augmentation even in conditions of severe bone tissue deficiency. The results of preliminary studies indicate a significant risk of rupture of Schneiderian membrane when the level of the maxillary sinus floor is raised by more than 4 mm. In turn, in cases where it was necessary to increase the height of the bone crest by more than 4 mm in order to minimize the risk of damage to the mucosa and ensure sufficient visualization of the working field, doctors resorted to the technique of forming a lateral bone window. The sinus lift procedure through osteotomy was performed only if it was necessary to increase the height of the ridge in the projection of the sinus by no more than 2-4 mm. In this article, we described the sinus lift technique through osteotomy, which allows for significant effectiveness of the intervention even in the presence of only 2-3 mm of native bone tissue.
Also in this article we described the advantages of using complex grafts with the addition of calcium sulfate. Histological data confirming the faster “maturation” of demineralized lyophilized bone allograft when calcium sulfate is added to it during the sinus lift procedure using the osteotomy technique have not yet been obtained, but such a result has been reported in cases where a similar mixture of bone substitutes was used for other dental purposes . The installation of the abutment is carried out, as a rule, after 4-6 months, based on X-ray data, the volume of residual bone tissue and the patient’s age. When performing subantral augmentation through a bone lateral approach, installation of an abutment is possible only 6-9 months after the intervention, which is necessary for the healing of the surgical site. Of course, in order to minimize the “maturation” of the graft, you can use material with a lower level of mineral content, but, as a rule, such analogues are characterized by fairly high shrinkage rates. It is important to remember that when performing a sinus lift procedure using the osteotomy technique, it is important to ensure a one-stage approach to implantation or installation of the implant at bone level. When implementing a two-stage approach, the tip of the implant should be positioned at the level of the bone crest. When implementing a two-stage approach without the use of a support with a platform switching function in cases of implant exposure, a loss of at least 2 mm of bone tissue can be predicted to form the biological width parameter. Such bone loss can cause implant migration or destabilization. Even in cases where there is no effect of implant exposure, during the second stage of implantation and fixation of the transgingival healing abutment, bone height loss of up to 2 mm can still be expected during peri-implant tissue remodeling. And if in some cases the initial height of the native bone tissue is only 2 mm, this means that the support will consist entirely only of the augmentation structure. In such situations, it is necessary to ensure a longer healing period for the intervention area before loading the intraosseous structure. The ability to use a platform-switching implant can minimize the effect of biological width shaping by moving the interface transition more coronally. The conical design of implants allows to maximize the level of their primary stability during installation.
Conclusion
The widespread use of dental implants stimulates the development of minimally invasive approaches aimed at optimizing the initial conditions for their installation. In this article, we discussed modifications in the use of operative techniques and biomaterials during the sinus lift osteotomy procedure. This approach allows the implantation procedure to be carried out even in conditions of a minimal amount of native bone tissue in the projection of the maxillary sinus. The level of patient acceptance of this manipulation is quite high due to minimizing the period of postoperative discomfort and reducing the overall duration of rehabilitation. Of course, to provide more evidence for the widespread use of this method in clinical practice, it is necessary to conduct a number of additional studies to assess the level of long-term success of such iatrogenic interventions.
Authors: David Anson, DDS Robert Horowitz, DDS
Price in Moscow
The cost of a sinus lift depends on several factors:
- sinus lift techniques;
- type, volume and authenticity of consumables;
- the number of membranes used, reinforcing pins;
- the presence of a special surgical operating unit;
- disposability of instruments
- qualifications of the anesthesiologist performing sedation;
- additional possibilities (probability of immediate implantation).
It is beneficial in a batch calculation, when implantation is immediately included and combined with a sinus lift operation in one visit. Thus, the complex includes all services for preparation for operations and their implementation, in one visit. Prices for sinus lifting in Moscow in all clinics are approximately the same, the work performed on average costs about 50,000 rubles per side, radical differences are determined only in additional consumables.
The main problem of choosing a comfortable price is that the harmony of cost is always regulated by savings on consumables and at the level of the work performer, the doctor’s competence is the main factor in explaining the price, the pretentiousness of the clinic has nothing to do with it.
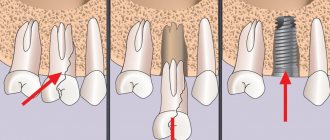
Why does bone deficiency occur?
Not all patients have sufficient knowledge about their body, which sometimes leads to misunderstanding of the importance of certain procedures in dentistry. Here it is worth understanding what happens after tooth extraction. When, for some reason, a person loses a permanent tooth, the resorption of the spongy bone around the place (socket) where the roots were previously located begins almost immediately.
In the process of chewing food, the tooth received a load that extended to the jaw bone, forcing the microscopic blood vessels that penetrate the bone substance and nourish it to “work.” No roots equals no load. That is, in the “toothless” area, the bone is removed from work. The capillaries gradually atrophy, and the spongy substance left without nutrition is resorbed, because resolves, and outwardly it looks like bone subsidence. Already in the first 6 months, serious changes are noticeable, and after a year, resorption actually reaches its “peak”. As for the upper jaw, the bone substance here is more porous and light (compared to the lower jaw). It atrophies faster both from the outside and from the maxillary sinus - the latter case is often found in patients of retirement age.
Statistics show that if 70% of respondents (wearing removable or standard bridges) knew about bone atrophy and the discomfort that constantly shifting dentures bring, then dental implantation would be the preferred replacement for lost teeth. The implant uses the bone in which vital processes are restored, so atrophy practically does not occur.