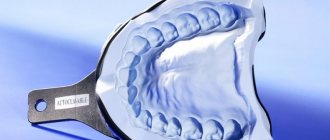
An individual tray is a device used at one stage of prosthetics. This design is needed to take impressions used in making the model and artificial crown. The impression obtained using a spoon repeats the anatomical features of the Patient’s bite and jaw and provides information for the production of an orthopedic device.
Dental individual impression trays are made in the form of a horseshoe-shaped product, which is filled with impression mass. The features of the tool ensure the accuracy of the resulting model, which is necessary for the correct manufacture of the future denture. This spoon is used once, which is necessary to ensure sterility conditions.
Indications
An individual tray in dentistry is used in the following cases:
- complete loss of teeth, partial edentia with the absence of a large sector of lost units;
- it is necessary to obtain high-precision impressions;
- production of crowns installed on implants of various types;
- with jaw deformities, which makes it difficult to use a standard type spoon.
Clinical examination
Before deciding to make a complete denture, you must undergo an examination and consultation with an orthopedic dentist. He examines the oral cavity and collects anamnesis. Diagnostics are carried out to identify the following problems:
- remains ;
- the presence of inflammatory processes, exostoses;
- the presence of other oral diseases
It is necessary to conduct a conversation with the patient to find out previous experience in wearing prostheses. If the answer is positive, it is necessary to find out whether it was comfortable to wear the prosthesis, whether psychological or physiological discomfort was observed.
Then the doctor needs to find out the extent of the disorder in the bone and soft tissue of the jaw; X-rays are used for this.
In rare cases, surgery is used to extract teeth growing in the wrong direction or to remove the alveolus of a tooth.
With the help of a clinical examination, it is possible to achieve the production of a perfectly fitting, high-quality prosthesis.
Manufacturing methods and materials
The production of an individual spoon is carried out in an office or laboratory. Rubber, special types of polymers or wax are used as a base. This ensures the accuracy of the impression and makes the doctor’s work easier. In addition, such spoons are excellent for further use in the laboratory, creating a model for a future crown.
When working with Patients, positioners are used, that is, special limiters. When making a design for projection or anterior third, holes are first made in the material that do not participate in prosthetics. They form support points after the mass hardens. After the tray has hardened, it is crimped with wax to make impressions easier. At the same time, wings, sides, and a handle are made, making it easier to work with the spoon and remove it from the Patient’s mouth. After manufacturing, the finished model is placed in a box, where it undergoes a polymerization procedure.
Making a structure manually has a number of advantages:
- lack of high requirements for the qualifications of a dental technician;
- it is easy to work with materials and devices;
- manufacturing speed increases, which ensures comfort for the Patient;
- inaccuracies can be easily corrected;
- The cost of the device is low.
The technology has practically no disadvantages; a few disadvantages include the following:
- careful selection of material is required, as some options may cause allergic reactions;
- To polish and shape the finished individual spoon, you need a special set of cutters;
- Modeling handles and wings is not always convenient.
To create the installation, volumetric modeling and scanning of the oral cavity are used. This technique increases reliability, but in some cases the use of spoons is more appropriate. CAD technology, which can also be used in spoon manufacturing, eliminates process errors. It automatically reproduces anatomical features, eliminating the need for the technician to model the device manually.
After computer rendering, the model is transferred to the printer, where it is printed in full size. A complete 3D print can take several hours, as the image is divided into separate layers, each 20 microns thick. A laser is used for polymerization; each layer is pre-hardened, forming the required type of spoon with the specified parameters.
Obtaining a functional impression.
After fitting an individual tray, they begin to obtain a functional impression.
Obtaining an impression consists of the following steps:
1) fitting an individual spoon;
2) applying the impression mass to the tray;
3) inserting a spoon with the mass into the oral cavity;
4) forming the edges of the impression and conducting functional tests;
5) making an impression and evaluating it. It should be accepted as a rule that a functional impression that ensures good fixation of the prosthesis can only be obtained if the anatomical impression reflects all the structures of the prosthetic field and some functional features of the tissues surrounding the prosthetic bed. When a functional impression , they are only refined. There are unloading or decompression and compression impressions. Typically, the value of a compression or relief impression is associated with the fixation of the prosthesis and its effect on the mucous membrane of the prosthetic bed. However, the value of a particular impression-taking technique is determined by the influence of the prosthesis on the course of the process of atrophy of the alveolar process. Unloading (decompression) impressions are obtained without pressure or with minimal pressure of the impression mass on the tissue of the prosthetic bed. The disadvantage of the unloading impression is that the buffer zones of the hard palate are not subject to compression, and all the pressure from the prosthesis is transferred to the alveolar process, increasing its atrophy.
When receiving a decompression impression, the impression material must reflect every detail of the oral mucosa without distortion so that the microrelief of the prosthesis base exactly matches the surface structure of the prosthetic bed. Therefore, such impressions can only be obtained using impression compounds that have high fluidity and do not require much effort to remove the impression. Such masses include low-viscosity silicone pastes: exaflex, xanthoprene, alfazil, as well as zinc oxide eugenol pastes. The impression obtained using liquid plaster (according to Brachman) usually provides just such a perception of the surface relief of the tissues of the prosthetic bed. Some authors believe that if several holes are drilled in the impression tray to drain excess impression material, then the pressure of the impression mass on the mucous membrane can be reduced. It is known that the fixation of prostheses made using decompression impressions is weak, but they can be used if there are certain indications.
Such indications include:
1) significant or complete atrophy of the alveolar processes and mucous membrane;
2) increased sensitivity of the mucous membrane;
3) uniformly pliable mucous membrane of the prosthetic bed. Compression impressions are designed to take advantage of the pliability of the mucous membrane, so they are removed under high pressure to compress the buffer zones. When they talk about a compression impression, they primarily mean compression of the vessels of the prosthetic bed. The decrease in tissue volume and its vertical compliance are directly dependent on the degree of filling of the vascular bed. The use of compression impressions is recommended in the presence of loose mucous membranes with good pliability.
A prosthesis made using a compression impression does not load the alveolar ridge; outside of chewing, it rests only on the tissues of the buffer zones, like pillows. When chewing, under the influence of masticatory pressure, the vessels of the buffer zones are emptied of blood, the prosthesis settles somewhat and transfers pressure not only to the buffer zones, but also to the alveolar part. Thus, the alveolar process is unloaded, which prevents its atrophy. A prosthesis made using a compression impression has good fixation, because the pliable mucous membrane of the valve zone is in closer contact with the edge of the prosthesis. The compression impression is taken under continuous pressure , which ensures compression of the vessels of the mucous membrane of the hard palate and their emptying. To obtain such a print, certain conditions must be met:
1) you need a hard spoon;
2) the impression must be taken using a low-flow mass or thermoplastic mass;
3) compression must be continuous, stopping only after the mass hardens. Continuity can be ensured by manual force (voluntary pressure). But it is more convenient and correct to take a compression impression under the chewing pressure of the muscles that elevate the mandible, i.e. under bite pressure, which is created by the patient himself, or with the help of special devices that make it possible to create a strictly defined pressure (dosed) taking into account the individual characteristics of the tissues of the prosthetic bed and masticatory muscles. To obtain a functional impression, thermoplastic materials are used, such as dentofol, otrokor, orthlast, etc.
The convenience of using thermoplastic masses is explained by their following properties: 1) they have an extended plasticity phase, which allows for functional tests necessary to obtain a high-quality impression;
2) during impression taking they always have the same consistency; 3) they do not dissolve in saliva; 4) distribute pressure evenly; 5) allow you to repeatedly insert an impression into the oral cavity and carry out correction, because new portions of the mass merge with old portions without deforming the print. However, thermoplastic masses have certain disadvantages. These include: inaccurate print due to low fluidity; deformation in the presence of retention points. When cooled with water, they harden unevenly and may become deformed when removed from the mouth. It should be recognized that when using the above methods for obtaining an impression, in some cases it is not possible to ensure a complete functional reflection of the prosthetic field. The tissues of the prosthetic field and the active muscles surrounding it are not the same in relief, relative volume, physiological status during chewing or speaking, as well as during the day. The physical and emotional state of a person also has a great influence on the condition of the prosthetic bed and the surrounding muscles. Whatever method of taking an impression is used, further adaptation of the prosthesis base to the tissues of the prosthetic field, the relationship of the dentition and the force of chewing pressure is necessary, as well as adaptation of the patient and fitting of the prosthesis over a certain period of time. The wide variety of clinical conditions encountered for prosthetics necessitates the use of a differentiated impression. We should proceed from the general position that there is no single method shown in all cases. In this regard, the method of obtaining an impression in each specific case must be chosen taking into account the patient’s age, constitutional and individual characteristics of the jaw tissues, i.e. in all cases a differentiated approach is required. In cases where the tissues of the prosthetic bed in different areas are not identical in their relief and structure, the biophysical properties of each element of the prosthetic bed should be taken into account. When taking an impression, tissues with pronounced spring properties should be under greater load, while tissues of unloaded zones (in the area of the torus, incisive papilla, etc.) should not be overly loaded. Selective pressure on the underlying tissues, depending on their anatomical and functional characteristics and biophysical properties, may be important due to the need to prevent premature atrophy of the soft and bone tissues of edentulous jaws by redistributing the chewing pressure of the prosthesis base. Consequently, depending on the anatomical and physiological characteristics of the prosthetic bed, it is possible to obtain images of the mucous membrane in various functional states. At the same time, it is recommended to obtain unloading impressions in case of thin, atrophic and excessively pliable (“dangling” ridge) mucous membrane. Compression casts are indicated for loose, highly pliable mucous membranes. The best effect can be achieved only by using differentiated casts obtained with different degrees of compression of the mucous membrane, taking into account its compliance in different areas of the prosthetic bed.
Installation steps
This tray is a jaw impression, as it is made based on the results of scanning and computer modeling. Therefore, the following steps are performed first:
- preliminary inspection, cleaning from plaque and stone;
- sanitation, treatment of oral diseases;
- removal of destroyed units, removal of damaged parts of the tooth;
- with complete edentia, exostoses are cut out from the jaw.
The working impression is made only after the individual dental tray is ready. To do this you need to complete the following steps:
- the impression mass is mixed and placed in a tray (the time of its use is limited, so the work is completed quickly);
- the design is inserted into the oral cavity, the fitting is careful;
- you need to hold the mass in the oral cavity for about four to six minutes, this forms an impression and fixes the bite;
- the edges are adjusted, then the unit is removed by the handle;
- this should be done in one motion so as not to lubricate the mass and cause deformation;
- the model is removed, washed in running water, and soaked in a special composition for further work.
You can start creating prosthetics thirty minutes after the prints are ready. In order for the resulting model to be accurate, the Patient is required to perform the following simple actions:
- removal of saliva, if swallowing is difficult, the doctor uses special instruments;
- The mouth should be opened wide and held in this position for a couple of minutes;
- During the hardening process, you need to lick your upper lip and touch the inner surface of your cheeks with your tongue.
Such simple steps make the fit complete, which has a positive effect on the quality of the resulting print.
Prices
Taking an impression with an individual tray is inexpensive and depends on the following parameters:
- methods and materials used;
- difficulty in taking an impression;
- features of the work.
Usually the prices are low and are included in the cost of implantation. The doctor will be able to name the cost after the initial examination, so you need to visit the clinic for a consultation, choosing methods for restoring the rad and determining prices.
About the clinic
Magenta Dental offers a wide range of services to restore functionality and aesthetics, including prosthetics. Patients are provided with the following benefits:
- services of dentists specializing in various fields of dentistry;
- an integrated approach, including diagnosis and preparation;
- comfortable reception conditions and attention to everyone;
- use of certified materials and special equipment;
- affordable prices, guarantee for work performed;
- no queues, possibility of making an appointment by phone.
To receive information about the preparation and prosthetics procedure or make an appointment, leave a request on the website. You can also call from 09.00 to 21.00 and consult with our managers on all treatment issues of concern.
Materials and types of diagnostic casts
Materials
To obtain a diagnostic impression, medical plaster and more modern plastic materials (thermoplastic and elastic masses) are used, which are able to acquire the shape of the dentition and maintain it.
All materials from which the impressions are made do not cause allergies. They are divided into several types:
- Hard (gypsum, dentol). They reproduce the texture of fabrics well, are easy to use, but are excessively rigid. Because of this, imprints of areas of the tooth located closer to the gum are not always successful.
- Elastic (silicone, alginate, etc.). To enhance the strength of the impression mass, special fillers are added to it. When heated, such an impression mass becomes softer and recreates the contours of tissues well. Disadvantage: elastic impressions are not suitable for long-term storage, unlike hard ones. For example, silicone impressions shrink within 3 hours after the impression. The model must be manufactured strictly within this period of time.
- Thermoplastic (gutta-percha, Kerr mass). The material becomes plastic when heated and hardens after cooling. Advantages of this type of casts:
- good separation from plaster during model making;
- Possibility of repeated administration into the oral cavity.
Types of casts
Compression . Made for the lower jaw. Purpose - to determine the distribution of load during chewing for the future prosthesis. Requires materials of high viscosity.
Unloading . They are used in the preparation of prosthetics for people whose activities are related to oral speech. When chewing, the load will be distributed unevenly.
Combined . With their help, dentures are made that evenly distribute the load both during eating and when talking.
Custom tray fitting and functional impressions
After making an individual spoon, you need to store it. This procedure refers to the precise fitting of the original structure to the patient's jaw. To do this, the doctor uses the following tests:
- opening the mouth as wide as possible;
- swallowing;
- licking the upper and lower lips;
- the ability to stick out your tongue and reach the tip of your nose;
- trying to suck something;
- the ability to move the tongue along the cheeks and upper palate.
After each test, the location of the spoon is examined. If it rises, it is shortened in a strictly defined area.
Then move on to the next test. Testing is carried out until the initial structure fits snugly to the jaw during any movement. Only after this can you begin to obtain a functional impression.
It has certain requirements:
- clear imprints of jaw tissue and transitional folds;
- same thickness;
- absence of mucus , saliva, voids and pores;
- lack of gaps;
- presence of a rounded edge.
Only after achieving these indicators, trays with impressions can be transferred to the laboratory for the production of wax bases and a functional impression.
Making a working model, adjusting and fixing the central relationship between the jaws
This stage is described in great detail in Tony Johnson's manual, “Methods for making complete removable dentures.”
Occlusion is the correct closure of the teeth of the lower and upper jaw, on which chewing and the correct pronunciation of sounds depend.
The working model is an exact copy of the patient’s jaw. It not only completely restores the dentition, but also restores the correct contour of the patient’s face. For this purpose, special wax bite ridges are manufactured in the laboratory, which must meet the following requirements:
- ensure complete fit to the model;
- coincide with the previously outlined boundaries for prostheses;
- be of the same thickness;
- have a rounded edge.
After achieving this result, they begin to fix the central relationship of the jaws, namely the position of the lower jaw in relation to the upper.
Making a custom spoon
The initial impression of the jaws is made by an orthopedist using a standard tray. Based on the initial impression, the dental technician designs a custom tray. Its production requires the use of various techniques: wax, gypsum, using polystyrene sheets or plexiglass.
For an individual impression, plaster, thermoplastic material or impression elastic substance is used. The selection of mass will depend on the condition of the soft tissues of the patient’s jaw.
To make an individual wax spoon, you need to draw clear boundaries on a plaster model. After this, the heated plate of dental wax is tightly pressed with a plaster mold on both sides. Excess edges are removed with a hot spatula, along the previously measured border. Using a spirit lamp or gas torch, shape the edges of the spoon.
The wax tray does not make it possible to obtain an impression under pressure. For these purposes, a rigid plastic spoon is being developed.
Final stages
After obtaining a clear fixation of the position of the jaws and the formation of a bite, you can begin making acrylic teeth. This is a critical stage, so the final product is obtained. In accordance with the wishes of the patient, a specific color of the teeth is selected, as well as their size and shape. They are installed on a wax layer, which will allow adjustment if the position and size of the model do not satisfy the patient 100 percent.
The doctor evaluates the following clinical picture:
- density of jaw closure;
- occlusal curves and centric relation of the jaws;
- the depth of overhang of the upper jaw over the lower jaw;
- density of jaw closure;
- aesthetic perception of an “artificial” smile;
- shade and shape of teeth;
- amplitude of jaw movement.
Rules for caring for removable dentures made of plastic
If these points are completely satisfactory to the patient and the doctor, the design will be transferred to the laboratory for final completion. The wax layer for attaching the teeth will be replaced with a plastic one. Before being handed over to the patient, the prosthesis is carefully ground and polished.
The final clinical stage is the delivery of the prosthesis. The doctor must examine the structure, treat it with antiseptic drugs and apply it to the patient’s jaws. The orthopedist conducts testing for tight fit, ensuring normal chewing and swallowing processes. It is important how comfortable the patient can talk and smile.
Even the final prosthesis can be adjusted. If the patient feels pain in the area where the structure is attached, the doctor recommends immediately stopping its use. The first meeting to adjust the product is scheduled the next day after the prosthesis is handed over. Next, the patient should visit the doctor at least once or twice a week. The period of getting used to the artificial structure lasts up to two months.
Prosthetics for completely edentulous patients is a very complex and problematic area in orthopedic dentistry. Thanks to Tony Johnson's latest technologies, it was possible to achieve reliable fixation of the structure and ideal occlusion. The main achievement is that a complete removable denture completely compensates for the absence of natural teeth, providing not only a functional component, but also an aesthetic one.
Stages of clinical and laboratory manufacturing
The production of dentures occurs in close cooperation between an orthopedic dentist and a dental technician. Clinical stages are closely intertwined with laboratory ones, that is, after the first degree of clinical study, the laboratory work phase follows. This interaction occurs until the final production of the structure with its application.
Let's figure out which removable dentures are better
The following stages of manufacturing complete removable dentures are distinguished:
- taking anatomical impressions using a standard tray and impression material;
- production of individual spoons for plaster models;
- adjusting an individual tray, taking functional impressions with it;
- making a working model from a wax base with occlusal ridges;
- regulation, fixation of the position of the upper jaw in relation to the lower jaw using rollers;
- production of acrylic teeth on a future prosthesis;
- placing a prosthesis on the jaws to check fit, occlusion, and aesthetic appearance;
- final production of the prosthesis;
- fitting and application of the finished structure. If the patient experiences discomfort or inconvenience, the prosthesis is sent to the laboratory for revision;
- final delivery of the work to the client.
If, after the final delivery of the prosthesis, the patient feels that the prosthesis does not fit him perfectly, then he can always send it to the laboratory for revision. Modern technology for manufacturing removable structures allows for modifications at any stage of formation.
