The new nickel titanium ProTaper represent a revolutionary advancement in the field of root canal treatment. ProTaper files were designed specifically to meet certain criteria - they must have superior flexibility, unparalleled efficiency and high security. The unique design features of ProTaper allow clinicians to more consistently create a smooth, tapered shape in highly curved canals and canals with anatomical challenges.
Protapers are a new version of the world's most popular endodontic nickel titanium instrument system, meeting the requirements of all dentists in all clinical situations.
Protapers are unique, ultra-flexible nickel-titanium files of a new generation that allow high-quality preparation of difficult root canals that are difficult to traditional instrumentation.
Composition: the cutting part of these tools is made of nickel-titanium alloy.
Nickel-titanium instruments should not be used to remove polymer pastes from root canals.
ADVANTAGES OF UNIVERSAL PROTAPERS
+ Easier
- uniform sequence of instruments regardless of the shape of the root canal
- simply remember the application protocol (color coding)
- Root canal drying and obturation products are specially designed to work with the ProTaper system and are color coded
+ Faster
- in most cases only 3 tools are needed
- high cutting efficiency
+ More efficient
- increased apical taper for better root canal preparation
- Better removal of dentinal debris thanks to the unique “multiple taper” of the instruments
+ Safer
- rounded guide tip minimizes the likelihood of deviation from the channel
- There is a manual version of instruments for anatomically complex clinical situations, as well as for clinicians who prefer to use manual instruments due to better tactile control
Selecting Ni-Ti files
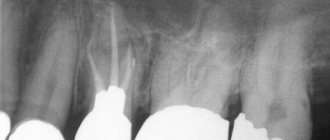
This technique uses specially designed ProTaper files with uneven taper; The set includes 6 tools - 3 for shaping (Shaping, hereinafter S) and 3 finishing (Finishing, hereinafter F), which simultaneously repeats and simplifies the Schilder technique. Each S-file usually has some smoothing of the cutting angle (increasing taper along the length of the cutting part); while the taper of the F-file in the apical part is fixed, and on the coronal 2/3 of the length, on the contrary, it is reduced. When used correctly in a step-by-step manner, ProTaper files (Dentsply Tulsa Dental; Tulsa, Oklahoma) are effective, reliable, and easy to use (Figure 5).
Rice. 5. Root canals of a maxillary molar treated with ProTaper instruments. ProTaper files replicate significant canal curvatures well and produce smooth, streamlined shapes (work courtesy of Dr. John West, Tacoma, Washington).
The ProTaper technique closely replicates Schilder's technology, in which pre-curved reamers sequentially cut dentin in a reciprocating motion. S-files with non-aggressive small tips are held in the center of the canal previously traversed with hand instruments. Thanks to the increasing taper, each successive file selectively cuts dentin with its most effective cutting edges, without affecting the apical region.
PROTAPERS F1 PROTAPERS F2 PROTAPERS F3
Finishers are designed to finalize the apical third of the root canal, as well as to level and widen the middle third of the canals. They, like shapers, include 3 tools: F1, F2, F3.
The tip diameter of the F1 pro taper is 0.20 mm, F2 0.25, F3 0.30. It is characteristic that all 3 tools in the interval D0-D3 have a fixed taper (.07, .08, .09%, respectively). After D3, although the tool diameter continues to increase, the taper decreases to 0.055, thereby increasing the flexibility of the prop taper.
1. Indications for use: Protapers are intended for use only in a clinical setting by specially trained specialists. Scope of application: formation and cleaning of the root canal system.
2. Contraindications: Not known.
3. Warnings: None known.
4. Precautions:
- Repeated disinfection cycles and sterilization increase the risk of file fracture.
- These instruments should not be immersed in sodium hypochlorite solution.
- Cleaning of Instruments: Strictly follow the cleaning instructions recommended by the manufacturer.
- Irrigate generously and frequently.
- Create an adequate carpet runner using hand files up to a minimum of ISO size 15.
- Use the instruments at a constant rotation speed of 150 – 350 rpm with light apical pressure.
- Clean the tool grooves as often as possible and inspect the file for signs of deformation or wear.
- For optimal performance, it is recommended to use torque-controlled devices.
- Use the shaping files (S1, S2 and Sx), working in separate sweeping movements to create a straight-line approach to the root canal.
- Use finishing files (F1, F2, F3, F4 and F5) without using sweeping motions.
- Use appropriate finishing files to “passively” pass the entire working length of the canal and, once reached, immediately remove the instrument.
5. Adverse reactions: To date, no adverse reactions have been reported.
Confirmation of clinical success
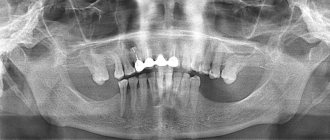
Clinical studies of the ProTaper technique, with an emphasis on the execution procedure, were conducted on the mesial roots of extracted mandibular molars using CT analysis. In this study, horizontal sections of different root levels were examined using CT sections and spatial imaging. Some results are shown in Fig. 9. Green represents the anatomical contours before instrumentation and red represents the resulting preparation shape.
Rice. 9a. Horizontal CT sections of the coronal 1/3 of the root. Pay attention to the successful relocation of channels at this level
Rice. 9b. Horizontal CT sections of the middle 1/3 of the root. Note the rounded, centered preparation of the ProTaper files
Rice. 9c. Horizontal CT sections of the apical 1/3 of the root. ProTaper preparation ideally includes the original canal diameter
Rice. 9d. Condition before and after applying ProTaper S1, S2 and F1 files. Smooth, streamlined and centered preparation shapes follow the internal anatomy of the canal
Results 9a-9d kindly provided by Dr. Lars Bergmans and BIOMAT Research Cluster, Catholic University of Leuven, Belgium
So, ProTaper S-files, thanks to easy lateral sliding and selective cutting of dentin during the reverse movement, demonstrate a number of advantages:
- instruments move freely in the root canal during most of their work;
- the lumens of the canals in the coronal part delicately expand away from the outer concavity of the root;
- The “shaving” method of processing ensures centering of the preparation in the root canal and maximum preservation of dentin;
- instruments are in physical contact with more than 90% of the inner walls of the canal.
PROTAPERS - STEP-BY-STEP INSTRUCTIONS FOR USE
- Create direct access to the root canal orifice.
- Constantly irrigate and check the patency of the carpet with an ISO 15 size hand file.
- Usage protocol:
- Locate the mouth.
- Passively use an ISO size 15 hand file until you feel resistance.
- Use the S1 shaping file, working in a sweeping motion until you reach the penetration depth of an ISO size 15 hand file.
- Repeat this sequence until you have determined the working length using an ISO size 15 hand file and have gone through the entire working length of the canal using the S1 tool.
- Use the S2 shaping file, working in a sweeping motion until you reach working length.
- Confirm the working length.
- Use the F1 finishing file (without sweeping movements), moving it deeper with each insertion until you reach working length.
- Calibrate the apical foramen using hand files.
- Use the appropriate finishing file (F2, F3, F4, F5) without sweeping movements to the full working length if additional expansion is needed or if the apical foramen is larger. If necessary, use Sx sweeping movements to remove ostial dentin and/or to create a wider coronal portion of the canal.
Protaper Universal - video, operating method
6. Disinfection, cleaning and sterilization: Clean the instruments and stand first. Then sterilize the instruments in the bags using an autoclave at 134ºC, 3 bar pressure for 18 minutes.
6.1 General recommendations
- Tools marked "disposable" are not intended to be reused.
- The user is responsible for the sterility of the product upon first use and each subsequent use, as well as for the use of damaged or contaminated instruments.
- For your own safety, please use personal protective equipment (gloves, goggles).
- Use disinfectant solutions with proven effectiveness (listed by the German Society for Hygiene and Microbiology; CE marked; approved by the German Inspectorate for Hygiene and Microbiology).
- quality of food products and medicines).
- Tungsten carbide burs, plastic stand, hand tools and nickel - titanium tools are destroyed by hydrogen peroxide (H2O2) solution.
- Nickel-titanium instruments are destroyed when immersed in a NaOCl solution for more than 5 minutes with a concentration of more than 5%.
- Aluminum instruments are destroyed in a solution of caustic soda with mercury salts.
- Do not use acidic (pH < 6) or alkaline (pH > solutions.
- After 5 processing cycles, markings may be destroyed
Traditional shaping techniques
The step-back technique initially uses hand-held files of small ISO sizes to traverse the full length of the root canal. Larger files are then used to make apical preparations until the selected master file reaches working length. The remaining apical third of the canal is expanded with successively larger files, and as the file size increases, its working part is shortened. Upon completion of the preparation of the apical 1/3 of the canal, the coronal 2/3 is expanded, and the entire internal surface of the treated root canal is smoothed. Unfortunately, this technique has a number of disadvantages, for example: blocking the canal, formation of ledges, perforations, transportation (oval deformations of the apical foramen along the outer curvature of the root - translator's note), often requiring additional procedures, such as re-treatment, surgery and removal.
The crown-down technique uses ISO instruments of varying tapers from larger to smaller sizes until working length is achieved. In general, the root canal is opened in stages - from the coronal to the apical part. Although this technique avoids many of the disadvantages of the step-back technique, a few notes must be made:
- each file aggressively penetrates dentin with its large, hard tip and, when rotated, forms a round profile in the center of the canal, while the cross section of the root canal most often has an irregular configuration; and, as a result, proper cleaning and disinfection of such root systems does not occur;
- the taper of the prepared canal quickly follows the uniform taper of the file, especially in long, narrow and curved canals, which can lead to tight contact of the instrument with the canal walls, blocking and breakage;
- the likelihood of breakage of smaller instruments increases when they become jammed in the apical third of the canal.
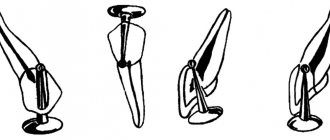
The pre-enlargement technique uses suitably curved ISO instruments of varying tapers from smaller to larger sizes. In cases of narrow and severely curved canals, instruments are initially selected to expand the coronal 2/3 of the canal. Each subsequent larger file is immersed to a shorter length relative to the previous instrument, cutting off dentin and creating a streamlined access in the coronal and middle parts of the canal. And although the instruments are used from smaller to larger, their flexible tips move freely and safely through the treated area of the root canal. It is important to note that depending on the degree of bend, any ISO file will cut a cavity larger than its taper suggests. Each instrument cuts dentin with its larger, stronger, more active cutting threads in an outward motion. Correct step-by-step implementation of the pre-enlargement technique facilitates access to the anatomically more complex apical third of the canal: the finishing files move freely into the root canal cavity and act predictably in the apical region. This technique places emphasis on widening the coronal and mid-portions of the canal and smoothing the transition to the apical third of the preparation. Finishing the channel is a matter of skill (Fig. 4).
Rice. 4. Endodontically treated first maxillary premolar with a branched system ending in three apical foramina
The growing popularity of the pre-expansion technique is understandable due to the predictable success of the result. However, the disadvantages of the method include the use of a large number of tools, several recapitulations with a set of files and examples, significant time costs and a complicated processing procedure. Let us next consider a clinical technique based on the effective principles of pre-enlargement technology with significant time savings.
PROTAPERS - RE-TREATMENT
D1+D2+D3: instruments specially designed for simple filling of root canals:
- the D1 instrument has an active tip, facilitating initial penetration into the root canal
- instruments have different lengths and taper of the working part for working in different parts of the root canal (coronal/middle/apical)
The sequence of using the tools is easy to remember
- From shortest to longest tool: D1 – D2 – D3
Easy identification
- dark gray handles no more than 11 mm long for better visibility
- instruments have one, two or three white rings respectively
PROTAPER D3 – FOR THE APICAAL PART OF THE CANAL
Rules for using ProTaper instruments to remove filling material from root canals
- instruments are inserted into the canal by applying light pressure in the apical direction
- regularly remove the instrument from the canal, check its working part and clean it
- if the instrument does not advance deeper, use a hand instrument to overcome resistance and confirm patency of the canal
Recommended speed:
- for removing gutta-percha or Thermafil/ProTaper® obturators: 500 – 700 rpm
- for removing pastes based on zinc oxide and eugenol: 250 – 300 rpm
You can buy ProTaper (ProTaper) machine S1, 25 mm, Dentsply, for the treatment of complex cases, blister (6 pcs) produced by Dentsply at ExDent.ru at a price of 3,530 rubles.