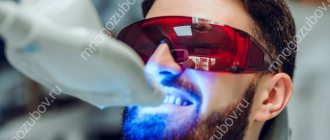
Intra-canal teeth whitening is a modern method of lightening tooth enamel. You will often hear this whitening method referred to as endodontic whitening or endobleaching . These names are equivalent and are synonyms. The essence of the intra-canal whitening method is to place a special whitening gel inside the tooth, under the influence of which the tooth enamel is lightened from the inside.
Intra-canal whitening is indispensable when tooth enamel darkens from the inside. Such darkening may occur due to damage to its internal tissues and their inflammation. The main cause of darkening is the death of the dental nerve (pulp). This can occur due to dental diseases such as pulpitis and periodontitis. First, damage to the pulp occurs, and then its complete death, which entails a gradual darkening of the dental tissues. In such cases, various home whitening methods using pastes and special strips, as well as modern teeth whitening methods such as Zoom whitening, are ineffective.
If you notice that the tooth is darkening from the inside, then whitening should be done from the inside. By applying for endodontic bleaching as early as possible, you will not only save your time, but also reduce treatment costs.
Method of intra-canal teeth whitening
Endodontic teeth whitening is usually performed on pulpless teeth. This means that the dentist must first remove the dental nerve (the pulp of the tooth). If the pulp has already been removed and the dental canals are sealed, then it is necessary to remove the filling material and perform mechanical cleaning of the dental canals.
Before endobleaching, the patient takes an x-ray of the teeth, with which the dentist can evaluate the dental canals. Next, medicinal treatment of the teeth is carried out with a special solution for disinfection, and after obturation of the canal, the intracanal bleaching procedure itself begins.
The entire endobleaching process can be divided into several stages:
1. An X-ray examination is carried out to determine the general condition of the dental canals and establish the causes of tooth darkening. Based on the data obtained, a subsequent treatment regimen is selected;
2. The dental cavity is rinsed with a special antibacterial solution;
3. All old filling material (dental filling) is removed;
4. The condition of the tooth roots is examined and if inflamed areas are detected, they are removed;
5. Next, the cleaned tooth cavity is filled with a special whitening composition;
6. The hole in the tooth is hermetically sealed with a temporary filling;
7. After achieving the desired result, the dentist removes the temporary filling and installs a permanent one in its place.
The entire intracanal bleaching procedure is completely painless for the patient and does not bring any significant inconvenience. The duration of one endobleaching session is about 20 – 30 minutes. To achieve maximum effect, repeated sessions of endodontic bleaching are possible. As a rule, the procedure is repeated 2 more times with an interval of one week.
Preparation for the procedure
The technique can be used exclusively on pulpless units, that is, the canals must be cleaned and treated, and darkened pulp should not remain inside the crown.
If the roots were filled long ago, you have to clean them of material and re-treat them. In this case, special protapers are used, which are ultra-flexible nickel-titanium files. They are inserted into the sealed canal in order to extract the mass located in it.
The doctor then disinfects the walls using a chelating agent and sodium hypochlorite . At the end of the preparatory stage, the treated canal is obturated, that is, its lumen is closed.
Benefits of endobleaching
Intra-canal bleaching is a fairly common and effective method of teeth whitening. In some cases, endo-whitening is the only method that can lighten teeth and restore the beauty of a smile.
Among the main positive advantages of using this particular method for teeth whitening are:
- Affordable price;
- Good result;
— Painless procedure;
- Safety;
— The ability to apply the procedure to only one tooth without affecting others;
— There is no need to grind down the tooth to be whitened;
- Harmless to tooth enamel.
Advantages of treatment at the OneDent clinic
The OneDent clinic does not just whitening, but a comprehensive procedure for restoring the color of teeth. Before treatment, computer diagnostics are always carried out to determine the condition of the oral cavity and the whole body, as well as a free consultation with a doctor.
For intracanal bleaching, only high-quality preparations, solutions and instruments are used, and all specialists have many years of experience in successful work.
More than 90% of our patients recommend the clinic to friends and family! Entrust your health to professionals - make an appointment using the form on the website or by phone.
Indications and contraindications for endodontic bleaching
It should be remembered that the endobleaching procedure is not suitable for all patients. The possibility of intracanal teeth whitening can only be determined by a dentist after examining the patient and performing all diagnostic procedures.
In-canal bleaching is indicated in the following cases:
— The use of filling materials containing silver. Such materials turn the enamel dark gray over time;
— Treatment of dental canals with a resorcinol-formalin mixture – the tooth acquires a pink tint;
— If there are cracks or microcracks in the enamel layer through which substances that cause pigmentation penetrate;
— For whitening a pulpless tooth (that is, there should be no nerve in the element);
— In case of severe mechanical damage to the tooth.
Among the main contraindications are the following:
— Pregnancy and lactation in women;
- Persons under sixteen years of age;
— Patients suffering from diseases such as thyroid dysfunction or diabetes mellitus;
— Allergic reactions to the drugs used during the procedure;
— Multiple dental cracks;
- Presence of dental diseases such as caries.
Dentists on Rimskaya
Gneusheva Elena Viktorovna
Dentist-orthodontist, pediatric orthodontist
Experience: 20 years
★ For more than 13 years she worked at the Moscow State Medical University at the Department of Orthodontics and Children's Prosthetics, Ph.D.
Gorokhova Inga Vitalievna
Dentist-therapist
Experience: 14 years of total experience
★ Expertise in restorative dentistry to make your teeth shine
Konstantinov Oleg Nikolaevich
Dental surgeon
Experience: 25 years
★ Virtuoso of painless treatment. Patients fall asleep in the doctor's chair
Nikolaychuk Anna Vladimirovna
Chief physician, dentist-therapist
Experience: 13 years
★ Chief specialist in the treatment of toothache. Masterfully deals with problems quickly and permanently
Frolova Alexandra Ivanovna
Dentist-therapist
Experience: 25 years
★ A brilliant specialist with many years of experience as a manager in public dentistry
Cost of intra-canal whitening in Krasnodar
One of the advantages of the endodontic teeth whitening method is its cost. But it should be noted that the procedure may require treatment for other dental diseases, which may affect the final price. Therefore, our experts recommend never delaying dental treatment and immediately contact a dentist at the first symptoms. The procedure itself does not require complex manipulations. Also, as a rule, only one tooth is subjected to the procedure.
You can find a complete list of prices for tooth enamel whitening procedures and other dental services offered by our Orthodontics dentistry directly on our website in the price list section.
Return to list of services
Why doesn't classic whitening help?
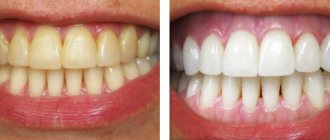
Teeth whitening from the enamel side, which is popular in Moscow, will be ineffective, since the problem lies in the darkening of the internal tissues. They are the ones that shine through the tooth enamel that has retained its shade. External influence will not have any effect on the darkened hard tissue, so the intervention should be carried out specifically in the tooth cavity.
Conservative, simple and affordable internal tooth whitening allows you to preserve the tissues of the crown and root parts of the tooth and provides the desired aesthetic effect.
Correction of the color of pulpless teeth
The current state of scientific developments in the field of dentistry allows us to consider the problem of tooth color correction quite optimistically. However, one should not simplify its solution by reducing it to the use of strong bleaching agents. The decision on the need to choose appropriate bleaching methods should be based on knowledge of the causes of discoloration, as well as taking into account individual characteristics of appearance: coloring of eyes, hair, skin; drug tolerance; quality of oral hygiene. In some cases, financial capabilities and discipline of the patient matter.
Depending on the reasons that caused pigmentation, a variety of methods can be used to correct color, from the simplest measures, such as hygienic dental care (in the presence of white plaque, which gives the enamel a matte tint), to the combined use of intensive whitening (office or home) followed by restoration work (when pigmentation of the enamel is combined with defects in its surface or when there is deep staining of the hard tissues of the tooth). That is why identifying the cause that caused the color change, as well as determining the depth of pigment penetration, the extent of the process, and the presence of defects in hard tissues are important points in performing aesthetic work.
Medical tactics
- The dentist may not carry out correction, recommending leaving the existing color of the teeth if it does not deviate from the idea of normal coloring.
- Tooth discoloration caused by dental plaque can be eliminated by hygienic measures: mechanical removal of plaque and stone, followed by polishing the surface.
- Sometimes it is necessary to first carry out orthodontic treatment to correct the position or location of a tooth, and then prescribe aesthetic therapy.
- When chalky spots appear (for example, due to caries), careful oral hygiene is required in combination with the local use of fluoride and calcium preparations.
- Superficial pigmented spots can be subjected to acid or mechanical abrasion, followed by polishing and remineralization of the enamel surface.
- Multiple pigmentations can be eliminated using home and office (clinical) whitening methods, including the combined use of these methods.
- When whitening pulpless teeth, a combined use of internal and external lightening of enamel and dentin is possible.
- In the presence of deep, persistent staining, especially in combination with enamel destruction, restorative aesthetic structures are used, most often veneer coatings.
- Finally, if it is impossible to correct color with therapeutic effects, orthopedic structures, such as artificial crowns, are made.
Having chosen a treatment method, the dentist describes in the treatment plan specific stages of work, dates of visits, sanitation measures before and after completion of aesthetic manipulations and determines the timing of the patient’s expected visits to assess long-term results.
An obligatory stage is the sanitation of the oral cavity and teaching the patient about rational hygienic dental care.
Sanitation of the oral cavity involves the removal of old, low-quality or discolored fillings, inlays, and outdated orthopedic structures. If necessary, selective grinding of teeth is performed, smoothing sharp edges and protruding areas of enamel.
Mostly temporary (sealed) fillings are placed, since subsequently, against the background of whitened teeth, the filling material can stand out in its color, as demonstrated by the clinical case.
Tooth 22 is pulpless, discolored, and has a filling on the mesial surface (Fig. 1).
Rice. 1. The left lateral incisor is pulpless, discolored, and there is a filling on the mesial surface.
After removing the filling material from the palatal surface of the 22nd tooth, a whitening gel was introduced into the cavity and left under the temporary filling for 3 days (Fig. 2).
Rice. Fig. 2. Scheme of intracoronal bleaching: 1 - material isolating the entrance to the root canal; 2 - bleaching agent; 3 - temporary filling.
The “on-the-go” whitening procedure was repeated 2 times, after which the lateral incisor became lighter and did not differ in color from the central incisor. The filling on the mesial surface is highlighted by a shade, as shown in Figure 3.
Rice. 3. After on-the-go bleaching, tooth 22 became lighter and did not differ in color from the central incisor.
The patient is recommended for aesthetic restoration of tooth 22; no veneer is required; treatment includes replacing the old filling to restore the degree of transparency of the lateral incisor (Fig. 4-6).
Rice. 4. The old filling was removed from the mesial surface of the 22nd tooth, and after preparing the hard tissues, an etching gel was applied.
Rice. 5. The missing dentin is filled with opaque.
Rice. 6. The transparency of the cutting edge, color and optical properties corresponding to adjacent teeth have been restored.
Office (clinical) whitening technique. Whitening in clinical conditions is indicated for pigmentation of various natures, mainly deep and local, more often for pulpless teeth.
Activated whitening lasts from 3 to 15 minutes (chemical, thermal, light activation of the whitening gel).
The procedure can be repeated from 3 to 6 times (no more). If necessary, the whitening session can be repeated after 7 days.
The patient is warned to refrain from smoking, eating food and drinks containing pigments for 24-48 hours.
Controlled whitening (under the supervision of a doctor) involves the introduction into the oral cavity of a protective mouth guard (spoon, plate) filled with a bleaching agent, including high concentration carbamide peroxide (35-40%), for a period of 30 minutes to 2 hours. The patient remains in the dentist's chair or waiting room while the aligner is removed.
Another visit can be scheduled after 6 days, during which the patient continues whitening on his own at home.
Using only the clinical whitening method leads to an average shade change of 4.8 points. The combined use of clinical and home exposure can increase the whitening effect to an average of 7 units.
It should be remembered that drying teeth during in-office whitening with a concentrated composition of hydrogen peroxide can cause tooth hypersensitivity, as well as lead to erroneous reading of the results of tissue lightening. Namely, enamel containing a reduced amount of water acquires pronounced whiteness. Subsequent natural rehydration of the dried bleached tooth gives a slight dark tint and creates an erroneous interpretation of the phenomenon as a return of pigmentation (usually after 1-2 weeks).
The choice of treatment method is discussed in detail with the patient.
It is imperative to clarify whether the patient agrees to a darker color if the dentist convinced him not to achieve a too white shade of his teeth.
Whitening a single tooth. Individual teeth can be effectively whitened in a clinic under medical supervision using 35% hydrogen peroxide, but at-home whitening may be recommended. The combination of these two methods (single clinical exposure for 15 minutes and home lightening for five days) allows achieving high efficiency.
High concentration of peroxide, activation by light provides an immediate (after 5 minutes) aesthetic result. The method of the so-called jump at the start is indicated for high and medium intensity teeth staining, including tetracycline stains. Further exposure to the “safe home method” for 4-6 weeks provides a high and lasting effect.
Whitening of devitalized teeth can be carried out using clinical and home methods. The products used are applied both inside and outside the tooth. The most widely indicated treatment methods are:
- clinical bleaching (internal or external) using 30% (35%) hydrogen peroxide with acceleration of the decomposition reaction of the peroxide by heat or light;
- “on-the-go whitening” with placing a composition of hydrogen peroxide and sodium perborate or a mixture of sodium perborate and water into the tooth cavity under an airtight bandage for 2-4 days;
- home whitening with 10-15% carbamide peroxide with an open tooth cavity (from the inside and outside at the same time);
- “night” tooth whitening only from the outside (10-15% carbamide peroxide);
- combined use of office and then independent exposure.
When choosing and carrying out a treatment method, its advantages and possible complications should be taken into account. Thus, clinical whitening provides a quick effect, but at the same time it can cause chemical trauma to the gums, as well as lead to resorption of cement and dentin of the tooth root. Correcting the color of a tooth with an open cavity at a high rate of external and internal influence causes discomfort in most patients.
When performing internal bleaching, to avoid contact of the active agent with hard tissues, it is recommended to first isolate the bottom of the cavity with a cement lining.
Home whitening methods use low concentrations of hydrogen peroxide, which significantly reduces the risk of side effects, but requires multiple changes in portions of the drug and a long treatment period. In addition, they may require repeated visits to the doctor.
Despite all the negative aspects, whitening the enamel and dentin of pulpless teeth is a good alternative to making veneers and prosthetics, as demonstrated by the following clinical case. Incisors 11 and 22 were previously depulped and discolored (Fig. 7).
Rice. 7. Pulpless teeth 11 and 22 are discolored.
A pronounced cosmetic defect in the area of these teeth requires color correction.
The general treatment plan for a pulpless tooth is as follows. The filling is removed, the root filler is isolated, and the tooth is whitened from the inside with 30% H2O2 with heat activation. If the effect is insufficient, bleaching is carried out with a mixture of hydrogen peroxide and sodium perborate under a sealed bandage (“on the go”).
Endoperox tablets (Septodont) or Belagel 30% (VladMiva) are used in a similar way. After introducing the bleaching agent into the cavity, it is hermetically sealed with a temporary filling (Fig. 8).
Rice. 8. Fillings were removed from the oral side of the incisors, a bleaching agent was added, and the cavities were closed with temporary filling material.
Treatment can be repeated 2-3 times. Figure 9 shows the discoloration of teeth 11 and 22 after intracoronal bleaching alone.
Rice. 9. After whitening, teeth 11 and 22 do not differ in color from adjacent and symmetrical teeth.
Further whitening may include “safe overnight” exposure to 10-15% carbamide peroxide under a special protective plate daily until results are obtained.
Technique for whitening a devitalized tooth
Treatment steps depend on the root filler. Thus, internal bleaching is not effective in the presence of silver pins, so they must be removed. The canal must be refilled and wait a month before using the tooth lightening system. The temporary filling material is then removed from the cavity.
Alveolar bone resorption and dental ligament failure are prevented by using polycarboxylate or zinc phosphate cement as a protective barrier, placed at the canal orifice and the area of the missing pulp chamber wall.
The gums are protected with Vaseline or a special cream (Orabase). A rubber dam is installed.
After this, you need to prepare a homogeneous medium-viscosity mass of whitening gel by placing 3 drops of liquid and 1 full spoon of powder on a special plate, or use a ready-made gel.
Portions of the gel are immediately applied to the vestibular surface and introduced into the tooth cavity. Its activation can be done using a lamp for curing the composite material (3-5 minutes) or occur independently (7-9 minutes). The oxidation reaction ends with the discoloration of the blue-green gel. The inactivated mixture is removed from the tooth surface with a gauze pad and from the pulp chamber using an excavator. If necessary, the whitening procedure can be repeated up to 6 times.
After completing the whitening sessions, the tooth surfaces are thoroughly washed off with water for 1 minute, and the rubber dam is removed.
Figure 10 shows a depulped and discolored central right incisor, covered with a veneer masking the dark shade of the tooth.
Rice. 10. The pulpless and discolored central right incisor is covered with a veneer, masking the dark shade of the tooth. The veneer is characterized by excessive thickness and width, highlighting the incisor from the dentition.
The veneer is characterized by excessive thickness and width, highlighting the incisor from the dentition. Clinical intracoronal bleaching was performed, after which the color shades were restored and the tooth became lighter (Fig. 11).
Rice. 11. Clinical intracoronal bleaching was performed.
The veneer is replaced with a restoration that matches the color, shape and thickness of the symmetrical tooth (Fig. 12).
Rice. 12. The color shades of the 11th tooth have been restored, the tooth has become lighter. The veneer is replaced with a restoration that matches the color and shape of the symmetrical tooth.
To enhance the whitening effect, after rinsing the tooth, a mixture of sodium perborate and water can be placed into the cavity and sealed hermetically for further depigmentation ("walking whitening" or "on-the-go whitening"). After 3-4 days the result is assessed.
Repeated bleaching in combination with heat exposure is possible, then “whitening while walking”, according to the same scheme. The additional use of safe overnight whitening at home cannot be ruled out.
If there are indications for the manufacture of restorative structures (fillings, veneers), you should wait 2 to 6 weeks after completion of whitening, which will avoid the risk of reducing the adhesion of the material to the hard tissues of the tooth. Filling is done with composite materials using a gasket made of glass ionomer, polycarboxylate or zinc phosphate cement.
Color neutralizing technique
In some cases, if there is a defect in the hard tissues of the tooth, it may be impossible to remove pigmented dentin at the bottom of the cavity, since the risk of perforation of the roof of the pulp chamber is too great. The result is intensely colored tissue. The color of the cavity floor may also differ significantly from normal dentin in the presence of an insulating or healing lining, as well as root filler.
In case of pronounced pigmentation of tissues, which cannot be “masked” by the usual application of a composite, one should resort to color-neutralizing methods. Some of them involve a combination of bleaching followed by filling. Others involve covering the pigmented areas with dyes and then restoring the tooth.
Indications for the use of color neutralizing techniques are extensive defects with pronounced dentin pigmentation; the presence of gaskets of intense color; medium-sized cavities of carious and non-carious origin if it is necessary to remove a large volume of stained dentin.
Whitening and veneer coatings. Methods of color neutralization in dentistry include a combination of teeth whitening followed by veneers. Indications are: lifetime age-related pigmentation of teeth, white spots, tetracycline teeth, superficial spotting of enamel due to fluorosis, discoloration due to hypoplasia, discoloration after depulpation or as a result of pulp necrosis.
Figure 13 shows dark teeth of the upper and lower jaws, corresponding to shade C4 on the VITA scale, on the vestibular surface of which there are spots of white and brown hypoplasia.
Rice. 13. The teeth of the upper and lower jaws are dark, on the vestibular surface there are spots of hypoplasia in white and brown colors.
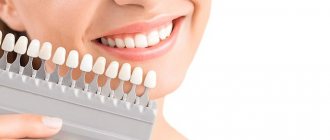
Sanitation of the oral cavity is carried out, including the removal of low-quality fillings, veneers, endodontic treatment, and temporary filling of prepared cavities. The tooth shades are assessed using the VITA scale, a form is filled out and the color of hard tissues expected after bleaching is indicated digitally. Impressions are taken using algenate masses, and models are cast from super plaster. With their help, individual trays with reservoirs in the area of the teeth to be whitened are made (Fig. 14).
Rice. 14. Custom trays for home whitening were made.
A composition for whitening live and pulpless teeth containing 10-17% carbamide peroxide, for example Perfect Bleach (VOCO), is used at home.
For 2-6 weeks, the patient independently carries out bleaching in accordance with the instructions: at least 4 hours during the day or throughout the night. A control color assessment is performed 2 weeks after completion of treatment. In the demonstrated case, after home whitening, the color of the teeth changed to A2 on the VITA scale, but the pigmented spots remained (Fig. 15).
Rice. 15. After home whitening, the teeth became lighter, but the pigmented spots remained.
In cases where pigmentation extends to the entire depth of hard tissues and bleaching does not give the desired effect, the method of opaque covering of intensely colored fabrics can serve the purpose of color neutralization. To do this, optimal preparation of discolored areas of dentin is carried out, and the resulting surface is smoothed with fine-grained burs. After acid etching, using the latest generation “adhesive-bond” system, adhesive preparation of enamel and dentin is carried out in accordance with the instructions (Fig. 16).
Rice. 16. The pigmented areas of the enamel were prepared and an etching gel was applied.
Immediately after photo-curing the bond, the first opaque layer of the composite, previously selected by comparing standards with the natural shades of the tooth, is applied to the pigmented area, as shown in Figure 17.
Rice. 17. Pigmented areas of enamel are masked with opaque.
The opaque neutralizes the color reflected from the pigmented area.
Then layer-by-layer application of the composite is carried out in accordance with the previously filled out color form. The volume of dentin lost by the tooth is replenished with opaque tones, restoring the basic geometric shape, mamelons, modeling the signs of the tooth. Enamel tones are used similarly to the type of transparency of intact teeth, forming elements of surface microrelief, including ridges, grooves, areas, gingival contour, and incisal edge. The surface is processed and polished to a natural shine. The tooth is coated with a fluoride preparation. The completed work is shown in Figure 18.
Rice. 18. The manufactured restorations do not differ in color from natural teeth.
White sheet technique. With some types of deep pigmentation caused by metallic sulfur compounds, the use of resorcinol-formalin paste, the tooth color acquires a rich shade, which cannot be changed by whitening or making a simple veneer (Fig. 19).
Rice. 19. 12, 21 and 22 teeth are depulped, changed in color, covered with veneers.
In such cases, the white sheet technique can be used, which complements the basic steps of working with photopolymers. The plaque is removed, the color of the tooth and the type of transparency of the enamel are determined. If necessary, odontometry is carried out (measurement of height, width, thickness of the crown), future dimensions, relief and shape of the restoration are planned. Old restorations are removed, the hard tissues of the tooth are prepared in accordance with the size of the cavity or the thickness of the veneer, as shown in Fig. 20.
Rice. 20. Old restorations were removed, teeth were prepared to the thickness of the veneer.
After adhesive treatment of hard tissues, the pigmented surface of the tooth being restored is covered with a shade of photopolymer that has an increased degree of opacity (for example, Amaris VOCO) (Fig. 21).
Rice. 21. Opaque is applied to the vestibular surface of the teeth being restored.
Opaque, which strongly scatters light, creates the so-called white sheet effect. Then the main dentin layer of the composite is applied to the gingival area of the tooth, rubbing against the dentin, and cured with halogen light. The next portion of a lighter composite is applied to the previous layer and distributed in the equator area in different directions using a wide trowel or spatula, covering the white opaque. The process of creating new shades ends in the incisal area. The modeled opaque base, which replenishes the lost tooth dentin in shape and volume, is covered in layers with enamel shades of the material in accordance with the previously selected color standards. A dentogingival contour and a cervical convexity are formed, if necessary, vertical enamel ridges are created on the vestibular surface, and an “erased” area is created in the area of the cutting edge.
When processing the restoration, the macrorelief of the surface and the individual features of the structure are emphasized (Fig. 22).
Rice. 22. Color-neutralizing veneers were made on teeth 12, 21 and 22. The color and shape of the restored incisors do not differ from those of symmetrical teeth.
Having various means for chemical teeth whitening, presented by many companies, the dentist must use a differentiated approach to color correction of pulpless, discolored teeth, taking into account the clinical situation, the reasons that caused the color change, the depth of pigment penetration, the extent of the process and existing contraindications, which is the key to successful aesthetic dental treatment for a particular patient.
LITERATURE
- Watte, A. Discoloration and staining of teeth: a review of lit. / A. Vatte, M. Eddy // DentArt. - 2002. - No. 1. - P. 46-55.
- Greenwall, L. Whitening technique in restorative dentistry / L. Greenwall. - M.: Higher. education and science, 2003. - 304 p.
- Lutskaya, I.K. Methods of clinical teeth whitening / I.K. Lutskaya, N.V. Novak // Modern. dentistry. - 2007. - No. 2. - P. 4-9.
- Sakharova, E.B. Analysis of recipes for home teeth whitening / E. B. Sakharova, O. A. Popovkina // Institute of Dentistry. - 2005. - No. 2. - P. 88-89.
- Solovyova, AM Study of the clinical effectiveness and safety of the whitening system for home use Rembrandt / AM Solovyova // Klin. dentistry. - 2001. - No. 3. - P. 20-26; No. 4. - pp. 24-27.
A complete list of references is in the editorial office.
Side effects from the teeth whitening procedure
Manufacturers of gels for endocanal teeth whitening do not hide the fact that the whitening products contain components that have an active destructive effect on the proteins of any dyes contained in filling materials. Meanwhile, even the most modern whitening compositions do not allow achieving the desired results after the first visit to the dentist. As a rule, darkened teeth acquire the required shade only after several sessions of the procedure.
Another disadvantage of intracanal bleaching is the gradual weakening of the strength of the molar, which significantly increases the risk of crown fracture. This is explained by the fact that regenerative processes do not occur in the pulpless tooth, which would allow the elimination of post-procedural defects. For this reason, the endobleaching procedure on one tooth is repeated no more than four times.
Dentists remind you that under no circumstances is it allowed to whiten teeth darkened after carious treatment or pulpitis with pastes, dental strips or gels intended for use at home. The listed means not only do not help remove the dye from the tooth cavity and achieve the desired result, but also have a negative effect on the enamel layer, significantly weakening its protective properties.
Methodology and materials used
Have you ever seen how dried bandages are peeled off from dressings or how traces of blood are removed from clothes? Use hydrogen peroxide H2O2. Usually safe, 3 percent (hydrogen peroxide with a higher concentration can even be explosive). This substance, which is essentially water additionally oxidized by oxygen, has strong antibacterial and bleaching properties - artificial blondes know this very well.
In combination with plasticizers and softeners in one proportion or another, it is part of all teeth whitening gels. Including – for use in endobleaching. So peroxide is the main active ingredient in all bleaches. After introducing them into the dental cavity, a chemical reaction begins, where the main disinfecting and whitening factor becomes atomic oxygen, which is split off as a result of its action on the pulp and interaction with other components of the gel.
Atomic (not molecular) oxygen, that is, O, not O2, is a powerful oxidizing agent and poison for all bacteria. An example is the disinfection of water with chlorine: it is not chlorine that serves as a substance that sterilizes water - under the influence of chlorine, the same atomic oxygen is split off from molecules of ordinary water.
Hence the increased fragility of tooth materials treated with bleaching gels (and essentially oxidizing agents).
Therefore, doctors categorically do not recommend such bleaching more than 4 times.
"Pitfalls" of the technique
The disadvantages of this type of teeth whitening include the fact that at the end of the procedure, a permanent filling is placed, completely adjusted to the color of what happened. But the last gel added does not affect the filling material in any way, therefore, when over time the tooth begins to darken anyway (and this can happen as early as 3-4 years after the procedure), the remaining white filling will stand out sharply against the darkened enamel - which will require bleaching and changing the filling for the second round.
The following reasons can complicate whitening or even make it impossible:
- Insufficient optical density of enamel. After all, if it is translucent, which often happens, then after bleaching the tooth will still look dark.
- Teeth in color, determined according to the Vita scale, have classes A (gray) and D (gray with a reddish tint). Teeth with this enamel color will not be able to undergo intracanal whitening.
Why does a dead tooth turn dark?
Teeth that lack nerves inside are considered dead. The surface of such processes is characterized by a tendency to change color and the appearance of dark spots. The reasons for the darkening of a pulpless tooth are as follows:
- lack of food. After the nerve is removed, the power to the tooth stops. Moisture leaves the enamel, nutrients are not supplied by the nerve endings, which leads to darkening;
- increased vulnerability. Without regular feeding, the tooth becomes very vulnerable. Pores form on the surface of the enamel, through which various coloring substances from the food consumed penetrate into the internal tissues. These dyes change the color of the enamel.
These are the most common reasons why tooth enamel darkens. In such cases, superficial bleaching of the dead tooth will help restore whiteness. But there are also often cases where a tooth has lost its original color due to bleeding during pulp removal. As a result, the enamel becomes reddish or purple. Classic whitening will not provide results in such situations; a more complex procedure will be required.