Carious disease manifests itself in many cases quite unnoticed, very often having a small black dot in the tooth; when visiting the dentist, very deep caries is discovered.
Basically this confuses us and we immediately start thinking about what we should do, what material is better to use and how much it will cost us. We can answer all your questions without difficulty.
We want to tell you and offer the modern nanocomposite material Filtek. Its application is very wide, from the smallest restorations to filling large volumes of voids. In this article we will tell you about what Filtek restoration fillings are. About the areas in which they are used. We will also talk about the undoubted advantages of this light-curing material. And of course we will tell you about the different types of Filtek fillings.
general information
Filtek is a composite material widely used for dental restoration. It was developed by specialists from the famous ZM ESPE corporation at the beginning of this century.
For the first time, specialists used the latest technologies - the introduction of nanoparticles, nanoclusters and their combinations into the composition of the composite. This ensured the material long-term strength and exceptional aesthetics.
A large number of shades of the composite are presented, and this makes it possible to use it on any part of the dentition. At the moment, Filtek is firmly established in the arsenal of modern dentists.
Types of Filtek filling material:
There are three types of Filtek fillings: Filtek Z250, Filtek Supreme and Filtek Ultimate.
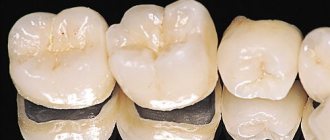
So, the first one: Filtek Z250 - this material has good density, which allows it to adhere well to the edges of the teeth. This material is used in the so-called layer-by-layer technique, which means the moment when the filling is built up and more than one layer is used. This material minimizes the recurrence of caries to almost zero.
Second: Filtek SupremeXT - this material is great for making veneers or inlays. This material has a large number of shades, which makes it an excellent option for the restoration of front teeth.
And finally the third type: Filtek Ultimate - this material is newer, it was developed to improve and improve the Filtek Supreme material. It's essentially the same thing, but it has an improved formula for long-lasting shine. This material is also more convenient for the dentist to use, which will make the procedure faster.
Release form and composition
The basis of the Filtek filling material is acrylic polymer resins of various types. Each type of composite has its own specific composition , depending on the purpose of application.
To impart color to a future filling, fillers are used in the form of silicon and zirconium nanoparticles, and their combinations - nanoclusters. The sizes of these particles range from 0.6 to 20 nm.
The color of the future filling depends on the filler included in the base material. More precisely, it depends on the size and quantitative ratio of nanoparticles and nanoclusters in it. The smaller their size, the denser and more matte the filling will be.
Composite mass of various compositions, placed in syringes, is included in the package of ready-made kits for work. Depending on the goals and objectives, there are several varieties.
Single Shade Set
A set of this type contains syringes with composite material in the amount of 2 pieces. The filling material has colors A2, A3, which have the classification “body” - universal.
The kit comes with instructions for use with technical specifications.
Dual Shade Kit
This kit contains a set of 4 syringes. Available shades - 2 syringes for dentin restoration - A3, A4; 2 syringes for enamel restoration – A2, A3.
Additionally, the set contains an auxiliary scale for selecting the desired color. The kit is supplied with technical instructions.
Composition and properties of glass ionomer cement for filling and indications for its use.
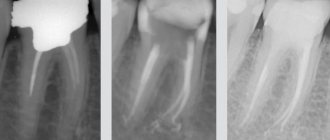
Let's talk here about the tactics of unfilling root canals.
At this address https://www.vash-dentist.ru/lechenie/zubyi/plombyi/idealnyiy-variant-spektrum.html we offer a detailed description of the Spectrum filling.
Professional set
The professional set contains 12 working shades of the material:
- A2, A3, B3 – for restoration of dentin zones;
- A1, A2, A3, W – for work on the enamel layer;
- B2, A2, A3, A3.5 – universal “body” shades;
- AT is a shade with a transparent effect.
As in the previous case, the kit contains an auxiliary color selection scale and instructions for use.
In addition to specially selected kits, separate syringes filled with composites of certain compositions are produced. The most common ones are Filtek Z250 and nanohybrid Z550.
Filtek Z250
Available in separate 4 g syringes. It is a microhybrid material and contains an increased amount of nanoparticles. It has particularly high strength and adheres well to the walls of the tooth.
The range of applications is very wide:
- filling all types of cavities on the front and side teeth;
- performing veneers;
- splinting.
The color range of this type of composite includes 15 shades, which ensures its use in the restoration of any area of the dentition.
A filling made from Z 250 completely eliminates the possibility of recurrent caries.
Nanohybrid Z550
This series of composites is a modification of the Z250 series. It consists of nanoparticles and nanoclusters. Also available in syringes of 4 g.
Presented in 12 types of shades, each of them is radiopaque and fluorescent.
It is mainly used for reconstruction of the frontal and lateral parts of dental groups. It is simple and convenient to use; it does not stick to tools or gloves.
Allows you to perform any tooth modeling and subsequently retains the completed shape well.
Advantages
The filling composite of the Filtek line is one of the latest generation materials. It is logical that it has a number of advantages over previous options:
- shrinkage after polymerization and exposure to light is minimized;
- high strength;
- duration of use as a filling;
- good fit into the required cavity;
- high polishing effect;
- long-lasting shine;
- the ability to create the desired color effect.
All these qualities have made this material indispensable in the work of modern dentists.
What is a cement filling on a tooth and expert reviews about the material.
In this article, read about the indications for dental retreatment.
Follow the link https://www.vash-dentist.ru/lechenie/zubyi/kofferdam-v-stomatologii.html to learn more about the rules for applying a rubber dam in dentistry.
Preparatory activities
Working with the proposed composites requires certain preparatory work.
The first step is standard brushing of teeth using normal hygiene products. Then the dentist performs a complete sanitation of the oral cavity. It includes treatment, inflammation removal and professional cleaning.
The final stage of preparation is the correct selection of the shade of the proposed filling. It is executed in the following order:
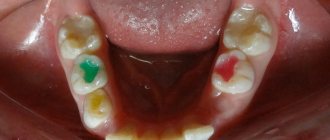
- Dividing the tooth into segments. The body of the tooth has some heterogeneity in color tone in different areas.
To reconstruct it correctly, the entire area is divided into 3 segments. Each of them is filled with a composite that matches the color for the given area.The area near the neck of the tooth is restored with yellow material. For the middle, composites of gray, yellow or brown color are used. The upper (incisal) border is made in grayish or blue shades.
- Selection of shade. The color and its saturation of each of these areas is checked using an auxiliary color scale, corresponding to that part of it that is identical to the thickness and color of the desired area of the tooth.
- Checking the correct selection. To control the correct choice of shade, the composite is applied to the desired location.
After its polymerization, a visual assessment is made using different types of light. If necessary, adjustments are made until the desired effect is achieved. - Isolation and protection of the treated area from other teeth is carried out using a latex napkin (rubber dam). If it is not available, then the use of cotton swabs or a saliva ejector is used.
This concludes the preparatory work before the restoration of damaged surfaces begins. It must go through the full cycle, regardless of which method of tooth reconstruction is chosen.
Filtek Ultimate - instructions for use
Preparation
- Cleaning : To remove plaque, teeth must be cleaned with a water-pumice suspension.
- Shade selection : Before isolating the tooth, using the standard VITAPAN Classic shade scale, select the appropriate shade(s) of the Filtek Ultimate restoration material. The correct choice of shade can be ensured if you follow the recommendations below. 2.1 Shade: Teeth are not uniform in color. The tooth can be divided into three areas, each of which will have its own characteristic color. a) Subgingival area: Restorations in the subgingival area are made from material of a yellow shade of varying intensity. b) Middle part of the tooth: Restorations in the middle part of the tooth are made of material of grey, yellow or brown shades of varying degrees of intensity. c) Incisal region: The incisal edge may have blue or gray tints. It is also necessary to ensure harmony of this translucent area with the middle translucent part of the tooth being restored and the neighboring teeth. 2.2 Restoration depth: The color intensity of the restoration material depends on its thickness. Suitable shades should be selected according to the shade scale from that part of the hint scale that coincides in thickness with the thickness of the proposed restoration. 2.3 Test: Apply the selected shade of restorative material to an unetched tooth. Model the material in such a way as to create a model of approximately the same thickness and area as the restoration. Polymerize. Evaluate the consistency of the shade when illuminated by different light sources. Remove the restorative material from the unetched tooth using an excavator. Repeat this procedure until you achieve an acceptable shade match.
- Insulation : The preferred method of insulation is a rubber dam. You can also use cotton swabs and a saliva ejector.
Direct restorations
- Cavity preparation: 1.1 Filling the anterior teeth: prepare the tooth in the usual way as for any class III, IV and V restoration. 1.2 Filling the posterior teeth: prepare the tooth. The corners formed during preparation should be rounded. Remnants of amalgam or lining material must not be allowed to remain inside the prepared cavity; this will interfere with the passage of light and, accordingly, the hardening of the restoration material.
- Pulp Protection: If pulp exposure has occurred and if the situation requires direct dental pulp protection, a minimal amount of calcium hydroxide should be used at the exposure site followed by a light-curing glass ionomer liner, Vitrebond or Vitrebond Plus from 3M ESPE. Vitrebond liner material can also be used to line deep areas of a cavity.
- Installation of the matrix: 3.1 Filling of the anterior teeth: Plastic strips or crown molds can be used to save the material used. 3.2 Filling posterior teeth: Place thin soft metal or a plastic or metal precontoured matrix of the desired shape and secure the wedges tightly. Polish the matrix strip to reveal the proximal contour and contact area. Shape the strip so that it covers the gingival area to prevent overhanging edges. Note: If desired, the matrix can be installed after etching the enamel and applying the adhesive.
- Adhesive System: Follow manufacturer's instructions for etching, pre-treatment, adhesive application and curing, such as 3M ESPE (Single Bond 2) adhesives.
- Dispensing of composite material: Extract the required amount of Filtek Ultimate restorative material onto the mixing pad by slowly turning the syringe handle clockwise. To prevent material from flowing out after the required amount has been withdrawn, turn the syringe handle half a turn counterclockwise and the flow will stop. Immediately close the syringe with the cap. If the extracted material is not used immediately, it must be protected from light.
- Application: 6.1 Apply Filtek Ultimate restorative material in layers and light cure as indicated in section 7. 6.2 The cavity should be slightly overfilled so that the composite overlaps the edges of the cavity. Shape the restoration with a suitable tool designed for working with composite materials. 6.3 Avoid intense light entering the work area. 6.4 Recommendations for filling the posterior group of teeth: a) To improve the modeling, the first layer 1 mm thick can be added and modeled to the proximal part. b) A plugger (or similar device) can be used to model the material to all sides of the internal cavity.
- Polymerization: Polymerization of Filtek Ultimate is provided under the influence of light from a halogen or LED lamp with a minimum intensity of 400 mW/cm² in the range of 400-500 nm. Cure each layer of material by illuminating its entire surface with high intensity light from a source such as the 3M ESPE Light Curer. During irradiation, keep the light guide as close to the material to be cured as possible.
- Shaping: Contour the surfaces of the filling by grinding with diamond or carbide finishes, burs or stones. Shape proximal surfaces using Sof-Lex sanding strips made for 3M ESPE materials.
- Correction of occlusion: Check occlusion with articulation paper. Check the center and side contacts while driving. Carefully adjust the occlusion, removing excess material with a fine-grit diamond bur or stone.
- Sanding and Polishing: Polish using the Sof-Lex Sanding and Polishing System.
Indirect restorations (inlays, onlays or veneers)
- Medical step 1.1 Shade selection: Before insulation, select the appropriate shade(s) of the universal Filtek Ultimate restorative material. If the restoration has sufficient depth, it is recommended to use a dentin shade. The use of a transparent shade on the occlusal surface will help achieve an aesthetically pleasing restoration. 1.2 Preparation: Prepare the tooth. 1.3 Taking an impression: After completing the preparation, take an impression of the prepared tooth following the manufacturer's instructions for the selected impression material.
- Laboratory step 2.1 Fill the prepared impression with plaster. If the impression is obtained using the one-step “triple tray” method, then pins must be installed in the prepared area at this time. 2.2 Separate the model from the impression after 45-60 minutes. Place the pins in the model and position it as you would for a standard crown or bridge installation. Place the model with the model of the opposite jaw in a suitable articulator. 2.3 If the second impression is not obtained, cast a second model using the same impression. This model should be used as a working model. 2.4 Cut the model of the prepared tooth with a laboratory saw and remove excess or open the edges so that they can be easily processed. If necessary, mark the edges with a red pencil. If required, coat with insulating varnish at this point. 2.5 Saturate the die with water, then use a brush to apply a very thin layer of separator to the prepared tooth model, dry it somehow, and then apply another thin layer. 2.6 Apply the first portion of Filtek Ultimate to the bottom of the prepared tooth model, staying close to the edges, and then cure as recommended in the Direct Restoration section (Step 7). 2.7 Apply and polymerize the following portions of the Filtek Ultimate composite. Apply the last portion (incisal), capturing the contact areas. 2.8 Place the die back into the articulation arch. Add the final portion of composite to the occlusal surface. Provide slight overfill on the mesial, distal and occlusal sides. This will ensure the creation of mesiodistal contacts and proper occlusal contact when closing the opposite jaw with an uncured layer of translucent material. Cure with light for ten seconds only and then remove the model to prevent adjoining surfaces from sticking together. Complete the curing process, following the processing times specified in the Direct Restoration section (Step 7). 2.9 Once the occlusal contacts have been created, begin removing excess composite around the contact areas. Shape the cusps and ridges in accordance with the anatomy of the remaining occlusal surfaces. 2.10 Care must be taken when removing the prosthesis from the model. Break off small fragments of the model around the restoration; The plaster must be carefully removed from the cured restoration until the restoration is completely exposed. 2.11 Using the original model, check the design for shine, undercuts and fit. Adjust as necessary and then polish as described above in steps 8-10 of the direct restoration section.
- Clinical step 3.1 Roughen the inner surface of the denture. 3.2 Clean the denture with soapy water in an ultrasonic bath and rinse thoroughly. 3.3 Cementing: Cement the structure using a 3M ESPE Composite Cement System in accordance with the manufacturer's instructions.
Restoration methods
After all the preparatory work has been completed, a method for restoring lost teeth or dental surfaces is selected. Two main methods are used .
Direct recovery
In this case, restoration is carried out in the following order:
- The required cavity is processed.
- A pad with medicine is placed inside (if necessary).
- A matrix is inserted to ensure interaction between adjacent teeth.
- Dentin and enamel are etched.
- The adhesive is applied and time is given for its polymerization.
- The required amount of composite is placed in a block protected from light. The syringe with the remaining material should be immediately closed with a cap.
- The composite is applied in layers similar to tiles into the finished hole.
- Each layer should be illuminated in turn with a lamp containing halogen or LEDs.
- The filling is given the required contours using burs and finishers.
- It is necessary to ensure contact between the teeth - the filling is adjusted if it is insufficient. In this case, articulating paper is used.
- Final grinding and polishing of the restored area is carried out.
Indirect technique
Obviously, this method is much more labor-intensive. But in some cases there is no choice, and restoration of a lost tooth is only possible using the indirect restoration method.
This method includes the preparatory stage described above and the following operations:
- The doctor selects the type of structure and performs a complete treatment of the tooth.
- An impression is taken from the processed unit.
- In the laboratory, plaster models are made from a cast.
- The finished model is covered with a separating layer.
- The composite is applied to the tooth in layers, each layer is processed with a special light lamp.
- Formation of the desired contours and polymerization.
- The structure is adjusted, finished and polished, followed by testing on a tooth model.
- The doctor checks the stability of the structure in the treated cavity. If defects are found, they are eliminated at the place of manufacture.
- A rough texture is created on the internal surfaces.
- The prosthesis is treated with a soap solution by placing it in a bath with ultrasound. After this, it is thoroughly washed with water and dried.
- The finished product is fixed in the desired place with special cement.
Indirect restoration technique
Stages of indirect dental restoration:
- selection of shade using the method described above;
- tooth processing for the selected type of structure;
- taking an impression and sending it to the laboratory;
- production of plaster models;
- preparing a model of the processed tooth, a layer of separator is applied to it so that at the end the finished structure can be removed;
- layer-by-layer application of the composite to the tooth, formation of its anatomy, contact points and polymerization (the technique is the same as for direct restoration);
- polishing the structure and testing it on a model;
- in the clinic, the doctor checks the prosthesis in the patient’s oral cavity and, if everything is satisfactory, then fixes it; in case of defects in color, shape and size, the structure is returned to the laboratory for correction;
- creating roughness on the inner surface of the product;
- cleaning the prosthesis using a soap solution in ultrasound;
- then it is washed under running water and dried;
- Finally, the restoration is fixed with composite cement.
Recommendations and warnings
Working with Filtek composite paste requires compliance with certain precautions.
Acrylic resins (especially uncured ones) included in its composition can cause an allergic reaction if it comes into contact with the skin or mucous membranes.
There are rules that, if followed, will help avoid unpleasant moments:
- When working with composites, it is necessary to use non-contact techniques and protective gloves.
- If contact of the material with the skin does occur, the area should be thoroughly washed with running water and soap.
- If the composite gets on gloves, they should be thrown away and your hands should be sanitized. For further work, use a new set of gloves.
- Syringes should be stored in tightly closed boxes, away from light (to preserve the properties of the material). Syringes are stored at room temperature.
- Contact time with the material should be reduced to a minimum.
Caution when using the Filtek composite should be exercised not only by staff, but also by patients.
You need to make sure in advance that you are not allergic to this material, and if you have one, notify your doctor.
What are Filtek fillings?
Filtek fillings are the word quality in the highest form of restoration materials from the American manufacturer - 3M ESPE. Similar nanocomposite materials for filling are used all over the world. With their use, it is possible to restore dental aesthetics, excellent anatomical shape and chewing function.
In what areas are Filtek materials used?
Filtek material is a nanocomposite material, its use is very extensive. Unlike many other materials, Filtek is used not only in the restoration of chewing teeth, but also in cases where it is necessary to restore the aesthetics of the front teeth. This material is universal!
Let's now list the undoubted advantages of this material!
Price
The cost of both sets and individual Filtek syringes varies quite widely. It depends on the configuration of the kits and the type of composite.
The average price level in Moscow looks like this:
- Set of maximum content – 22,000-29,000 rubles.
- Sets Single Shade and Dual Shade – 10,000-15,000 rubles.
- Syringes – from 2300 rub. (depending on the type).
More accurate information can be found on the seller’s website and by calling reference numbers.
From the video, learn about the new filling material Filtek Bulk Fill Posterior.
Reviews
Filtek brand filling materials are used in almost every clinic. The vast majority note the complete compliance of expectations with the results obtained.
We invite readers who have experience in restoring teeth using this material to share their opinions about it in the comments to this article.
If you find an error, please select a piece of text and press Ctrl+Enter.
Tags treatment filling material Filtek fillings
Did you like the article? stay tuned
Previous article
Provocateurs of alveolar bleeding and ways to combat complications
Next article
Review of traditional and innovative gingivotomy method