This video demonstrates a variant of the crown down root canal treatment technique (from the crown down), called the simplified anatomic technique by the author. The technique was developed by Professor Andre Machado, Brazil; the performer is one of his students.
The technique involves the absence of pressure (pressureless) and is recommended for curved canals. According to the author of the video, one of the advantages of this technique is the successful combination of low cost of its use and high efficiency.
The technique includes five steps.
- Pulp removal (with a “carpet path”).
- Formation of the coronal and middle thirds.
- Snapshot to determine the full working depth of the tool.
- Formation of the apical third of the canal.
- Final irrigation (not shown in this video).
The video shows all 27 steps and is almost 11 minutes long. If desired, you can “skip” a step when its essence becomes clear. Below is the protocol in text, and at the very end of the article is a short English-Russian glossary of terms used in the video. For those who want to improve their “dental English”.
Subscribe to the YouTube channel Stomanet.ru!
[yuzo_related]
Techniques for Using Endodontic Instrumentation
This article is a continuation of the topic of endodontic instrumentation and methods of its use.
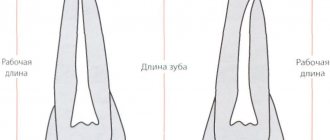
Determination of the working length of the root canal
Determining the working length of the root canal can be considered a key point in endodontic treatment. Being an integral stage, it does not take much time, however, it should not be neglected.
The working length can be defined as the distance between a conventional point on the tooth crown (for example, any preserved cusp), which we remember throughout the treatment, and the physiological apex.
There is a difference between certain types of constrictions in the apical third that must be remembered.
Physiological narrowing is the point of transition between endodont and periodontium; the walls of the canal in this place are made of cement.
Anatomical apex is the anatomical tip of the tooth root.
X-ray apex – image of the anatomical apex on the Rh-gram.
Methods for determining the working length of the canal include the use of an apex locator, X-ray, tactile, tabular, paper pins and the sensitivity method.
Apex locator
It is impossible to imagine modern endodontics without an apex locator. Its action is based on determining the location of the enamel-dentin border.
The hard tissues of the tooth and the mucous membrane have different resistance indicators (higher for hard tissues). When the instrument is inserted into the canal, the resistance on the metal part of the mouthpiece increases sharply.
An open electrical circuit is created. When the constriction is reached, the circuit closes.
Modern apex locators work equally well in dry or wet canals. The method has an accuracy of 90% or more, provided that the canal is not blocked by sawdust from infected dentin.
Tabular method for determining working length
The tabular method for determining the working length is based on the use of the average long-studied lengths of the root canals of each tooth. But no one has canceled the individual parameters of each person.
X-ray method
The radiographic method is suitable for filling the canal up to the radiographic apex. On the plus side, the method is objective; in most cases, it is easy to recognize the top with a correctly taken picture.
The disadvantages are that the structures may overlap each other in the image, there is a high probability of poor visualization of curved canals, difficulties in performing in some patients (increased gag reflex, radiation exposure).
Paper point method
The paper pin method is based on moistening the tip of the pin while bringing it to the top. It can be wetted with blood, serum, pus.
Tactile method
The tactile method is the determination of the working length of the canal based on one’s tactile sensations. The result depends on the doctor’s experience, since the technique is complex and is not effective if the apex is unformed.
The patient's pain can also help in determining the working length at the moment the instrument penetrates the apex and comes into contact with the tissues of the apical periodontium.
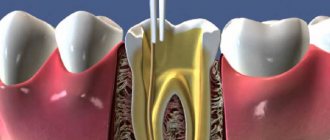
After determining the working length, preparation or mechanical treatment of the root canal begins. Today, many methods have been invented, each of them has a specific purpose, and also has advantages and disadvantages. To understand the specifics of creating a root canal shape and subsequent filling, you should start with the basic techniques.
Step back technique (step back)
The Step back technique is considered basic in the study of the art of endodontics. It, being the most popular, is easy to learn and perform.
Stage 1 – passage of the root canal and determination of its working length
Root canal passage is performed using K-reamers. After passing the canal to the apical foramen, the working length is established using a targeted Rh-gram with the instrument inserted into the root canal. The established working length is fixed with a stopper.
Stage 2 – formation of the apical stop
The purpose of this stage is to create an apical stop for the subsequent gutta-percha pin and endosealant to prevent protrusion beyond the apical foramen into the periodontal tissue.
We begin this stage by processing the root canal with a K-file of the same number, which managed to reach the apical foramen and with which we felt it jammed in the apex area. The instrument is inserted into the root canal and processed with sawing movements up and down. After this, the canal is washed with an antiseptic solution.
Next, use the tool of the next number with the same length set by the stopper. Mechanical and medicinal treatment of the canal is repeated. Use tools 3-4 numbers larger than the original (but not less than No. 25 - for adequate preparation and rinsing of the canal). The last tool is called Master file.
After these manipulations, the root canal acquires a conical shape, which corresponds to the taper of the instrumentation and standard gutta-percha pins.
Stage 3 – treatment of the apical third of the root canal
Continue processing the canal with the next instrument number, but reduce the length by 1 mm. The next tool will be 2 mm smaller, then 3 mm smaller, and so on. Between tools we return to the Master file each time to smooth out the steps in the apical third. Do not forget about antiseptic treatment of the channel between all instruments.
Stage 4 – formation of the middle and upper thirds of the root canal
The goal is to create a funnel-shaped canal mouth for subsequent adequate rinsing with an antiseptic and filling.
It is recommended to use Gates Glidden sequentially from number 1 to number 3. We use it in the straight part of the channel. This stage is completed by passing the Master file over the entire length of the channel.
Stage 5 – final alignment of the canal walls
To give the final conical shape to the canal, its walls are passed and smoothed using a Master file.
In addition to the apical-coronal methods, which include the standard technique (canal preparation with K-reamers from smaller to larger sizes) and the “step back” technique, there are coronal-apical methods, including Step Down and Crown Down.
The difference between them is that they first start with preparing the upper and middle third of the canal, then determine the working length and, at the very end, form the apical stop.
The advantage of coronal-apical methods is to simplify the antiseptic treatment of the canal, facilitate access to the apical third of the canal, prevent jamming of the instrument and the creation of a dentinal plug in the lower third of the canal, prevent the pushing of infected tissues beyond the apex, maintain the anatomical shape of the canal and there is no “loss of working length.” The disadvantage is the difficulty in determining the working length and patency of the root canal.
Step Down technique
Stage 1 – preliminary assessment of working length
The instrument is not inserted to the top. The radiograph determines the number of root canals, their curvature and estimated length.
Stage 2 – expansion of the mouth, formation of the upper and middle third of the canal, creating access to the apical third
A thin K-file (No. 8 or 10) is inserted into the root canal 4-5 mm or until the beginning of the curvature. Processing of this part of the canal begins with K or H-files, thus not reaching the apex. The stage is completed by using Gates Glidden from 1 to 3 numbers, inserting it into the canal only 1-2 mm.
Stage 3 – passing the apical part and determining the length of the root canal
They pass with a K-rimmer until it jams and determine the working length as in the “step back” technique.
Stage 4 – treatment of the apical third with an instrument and formation of the apical stop
The treatment is carried out in the same way as in the Step back technique. The channel takes the shape of a cone.
Stage 5 – final alignment of the walls
The final alignment is carried out with the same instrument used for processing the apical third of the canal.
Crown Down technique
The Crown Down technique is successfully used in case of significant infection of the root canal, to prevent the removal of dentinal filings beyond the apex, for comfortable medicinal treatment of the canal and in the treatment of periodontitis in children.
Stage 1 – insertion of K-file No. 35 to a depth of 16 mm.
If difficulties arise, the causes may be curvature of the root canal or its narrowing. If the cause is curvature, then we process part of the root canal until the curvature occurs. If the reason is narrowing, we take a smaller file and try to go 16 mm. The goal is to freely pass the K-file No. 35 to a length of 16 mm.
Stage 2 – determination of the “temporary” working length
On the Rh-gram we determine the intermediate working length with the instrument in the canal not brought to the apex by 3 mm.
Stage 3 – processing the canal to a “temporary” working length
Begin by introducing and scrolling K-file No. 35. Then file No. 30, No. 25, etc. until reaching working length.
Stage 4 – determining the final working length
As in stage 2, we use a photograph to determine the working length with the instrument inserted into the root canal.
Stage 5 – root canal expansion
The expansion of the canal is initially carried out with K-file No. 40, then No. 35, etc. until working length is reached. The instrument is inserted into the root canal, without pressure, rotated two turns clockwise and withdrawn. With each subsequent tool they try to move deeper, scrolling it clockwise.
After this, the cycle is repeated again, but starting with file No. 45. The next cycle is from file No. 50. Continue until the apical third is expanded to the desired size, but not less than No. 25.
In the next article we will get acquainted with the options for medical treatment of root canals. Their features, pros and cons of each antiseptic.
The article was written by O. Vishnyak specifically for the OHI-S.COM website. Please, when copying material, do not forget to provide a link to the current page.
Advantages and disadvantages of the technique
With a large number of advantages of coronal-apical processing methods, the inability to determine the length of the canal is a significant drawback.
Coronal-apical processing methods have the following advantages:
- Allows you to reach the farthest part of the tubule
- Gradual removal of waste particles reduces the risk of intracanal infection
- It is easy to inject medicine into the resulting depression
- The risk of the tool getting stuck inside the tooth is minimized
- The risk of blocking the far part of the canal with dentin particles and destroyed soft tissues is minimal
- The method allows not to reduce the working depth
- The natural shape of the root canal is not disturbed
The main disadvantage of the technique is that the doctor cannot determine in advance how long the canal is and how clogged it is. Therefore, it takes him quite a lot of time and effort to process the withdrawal.
Coronal-apical methods for root canal treatment
The achievements of modern dentistry make it possible to treat various diseases of the oral cavity and save teeth that previously would have definitely had to be removed. Complex procedures require not only special expensive equipment and instruments, but also high medical qualifications.
Let's look at the coronal-apical methods for treating the measles canals, which are successfully used in modern dentistry.
Features of the technique
After processing the base of the canal, the dentist evaluates its working length and begins cleaning the internal area
The essence of this method is that the doctor uses special instruments to expand the root canal towards the apical foramen. First of all, the dentist treats the base of the canal, then moves on to the intermediate third, and after that evaluates its working length and begins cleaning the inner area.
At the very beginning of processing, it is impossible to accurately calculate the working length of the canal. This becomes possible only after the doctor reaches the last third of the recess, gradually reducing the size of the instruments.
This technique is the least traumatic and at the same time quite labor-intensive, since the dentist has to constantly evaluate the length of the canal, selecting instruments by size.
Indications
Dentists usually use this technique in the following cases:
- The tooth cavity is severely affected by infection and there is a high risk of its spreading beyond the root apex
- There is a filling in the dental canal that needs to be removed
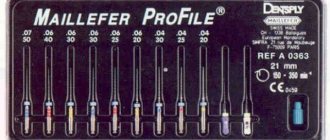
- Automated nickel-titanium profiles or GT files are used for work
Advantages and disadvantages of the technique
With a large number of advantages of coronal-apical processing methods, the inability to determine the length of the canal is a significant drawback
Coronal-apical treatment methods have the following advantages:
- Allows you to reach the farthest part of the tubule
- Gradual removal of waste particles reduces the risk of intracanal infection
- It is easy to inject medicine into the resulting depression
- The risk of the tool getting stuck inside the tooth is minimized
- The risk of blocking the far part of the canal with dentin particles and destroyed soft tissues is minimal
- The method allows not to reduce the working depth
- The natural shape of the root canal is not disturbed
The main disadvantage of the technique is that the doctor cannot determine in advance how long the canal is and how clogged it is. Therefore, it takes him quite a lot of time and effort to process the withdrawal.
Step Down Technology
The essence of this technique is to form a cone-shaped working tubule. This shape allows you to conveniently work with apical constriction and efficiently fill gaps.
Processing stages
- Determination of the working length of the tubule. To do this, the patient needs to take an x-ray of the tooth. From this image, the doctor determines how many root canals are in the tooth, how they are located and what their length is.
- Expansion of the mouth. The orifice is expanded using a set of K-files. First, the doctor works with K-files No. 8 and No. 10, depending on the extent of the damage. They pass almost the entire depression, not reaching approximately 0.4 - 0.5 cm to its end or to the place where it bends. To widen the canal, the dentist uses H-files or K-files. First he works with the thinnest tool, gradually changing it to a thicker one. Usually the following files are used: No. 15, then No. 20, No. 25, No. 30 and so on. As processing progresses, the canal increases in diameter, becoming more passable. The expansion does not reach the apical foramen by about 0.5 cm. After manual processing, the doctor proceeds to use a drill and uses Gates Glidden burs to form the orifice. At the same time, he also starts work with a small tool, moving on to a larger one.
- Establishing the working length of the recess. First, the doctor passes the pathfinder or K-reamer along the entire canal, and then sends the patient for a repeat x-ray to see the length and width of the treated cavity in the image.
- Cleaning the apical zone. It is carried out using the Step-back technique. Work begins with a large tool, gradually reaching the smallest one - No. 25. At the bottom, the recess takes on a cone-shaped shape, it has an apical stop in the area of the natural apex
- If the treatment proceeds easily, then it is advisable for the doctor to avoid filing movements. In this case, it is necessary to repeatedly advance the main apical file until the lumen is complete. This will avoid clogging. A smooth transition between the inner and intermediate parts of the tubule will make it passable and facilitate filling and penetration of filling material into all recesses. It is very important to seal the canal tightly, leaving no gaps. Otherwise, an infection may develop in it, and the procedure will have to be repeated.
Titanium-nickel profiles allow you to create a smooth intra-canal surface
This method can effectively clean and expand the root canals. For work, nickel-titanium profiles are used, which help to form a smooth intra-canal surface without notches or sharp transitions. These profiles are durable and chemical resistant.
One of the advantages of the method is that the waste material is immediately removed and does not fall deep into the tubule. This reduces the risk of infection to a minimum.
Crown Down Technology
The essence of this technique is that the doctor treats the depression in the direction from the crown to the gum. Work begins with large tools, gradually moving to small ones. Waste material is removed in parts. The parietal layer of dentin is scraped off with a thin part of the file to avoid its fracture or jamming.
The Crown Down technique is relevant in cases where it is necessary to give the mouth the shape of a funnel.
This is often done on difficult-to-pass streamers, as well as in the treatment of exacerbation of chronic apical periodontitis, when there is a need to prevent the spread of infection beyond the apical foramen. With this method, the natural shape and direction of the tubule is not disturbed, and healthy areas are not affected.
The technique involves the use of the following tools:
- Gates Glidden
- Profile series 04
- K-File
- GT-Rotary
Stages of root canal treatment using Profiles
The Crown-Down technique using Profiles is similar to the previous technique and includes the following steps:
- The dentist locates the canalicular orifice using Pathfinder, K-File
- Then he widens the mouth, working Profile No. 40
- After this, it is necessary to determine the working length of the recess and the initial file, which should be 2 - 3 sizes smaller than the initial profile; it is inserted half the depth of the tubule
- The recess is expanded with a larger profile
- The middle part of the outlet is cleaned with a profile with a diameter smaller than the first for a length of up to three quarters
- The inner area of the tubule is cleaned with an even smaller instrument.
- The last couple of millimeters of the recess are processed manually
Stages of root canal treatment with Gates Glidden
Using Gates-gildden tools of different numbers, almost the entire length of the tooth canal is processed
- The doctor finds the opening of the duct using K-File or Pathfinder
- Enlarges the hole with Gates Glidden tools No. 5 and No. 6
- Moves a couple of millimeters below the mouth with the same tool, but No. 4
- Advances another couple of millimeters using Gates Glidden #3
- Introduces Gates Glidden No. 2 to machine the recess to one-half to two-thirds of its length
- Sends the patient for an x-ray and then checks the working length of the hole on the image
- Manually processes the apical region of the root
The Crown Down technique is quite labor-intensive, so doctors prefer to use machine tools to make the work easier. The dentist's task is to expand the tubule to such a diameter that it can be easily injected with medicine and then sealed.
When expanding the canal, it is important not to overdo it, otherwise the strength of the dental tissues will significantly decrease. An experienced doctor knows how deep the instrument can be inserted, and x-rays help him correctly determine the length of the canal.
Modern methods of dental canal treatment make it possible to preserve a damaged tooth and significantly extend its lifespan.
Features of the technique
After processing the base of the canal, the dentist evaluates its working length and begins cleaning the internal area
The essence of this method is that the doctor uses special instruments to expand the root canal towards the apical foramen. First of all, the dentist treats the base of the canal, then moves on to the intermediate third, and after that evaluates its working length and begins cleaning the inner area.
At the very beginning of processing, it is impossible to accurately calculate the working length of the canal. This becomes possible only after the doctor reaches the last third of the recess, gradually reducing the size of the instruments.
This technique is the least traumatic and at the same time quite labor-intensive, since the dentist has to constantly evaluate the length of the canal, selecting instruments by size.
Simplified anatomical Crown Down technique: demonstration (video) and protocol
This video demonstrates a variant of the crown down root canal treatment technique (from the crown down), called the simplified anatomic technique by the author. The technique was developed by Professor Andre Machado, Brazil; the performer is one of his students.
The technique involves the absence of pressure (pressureless) and is recommended for curved canals. According to the author of the video, one of the advantages of this technique is the successful combination of low cost of its use and high efficiency.
The technique includes five steps.
- Pulp removal (with a “carpet path”).
- Formation of the coronal and middle thirds.
- Snapshot to determine the full working depth of the tool.
- Formation of the apical third of the canal.
- Final irrigation (not shown in this video).
The video shows all 27 steps and is almost 11 minutes long. If desired, you can “skip” a step when its essence becomes clear. Below is the protocol in text, and at the very end of the article is a short English-Russian glossary of terms used in the video. For those who want to improve their “dental English”.
Subscribe to the Stomanet.ru channel!
[yuzo_related]
Pulp removal
- Pulp removal. File No. 15 H, 16 mm, filling motion.
- Irrigation.
- Pulp removal. File No. 10 K 18 mm, reciprocating twisting movements (as when winding a watch), alternating with pulling.
- Irrigation.
- Pulp removal.
File No. 10 K 20 mm, reciprocating twisting movements (as when winding a watch), alternating with pulling. - Irrigation.
- Pulp removal. File No. 08 K 22 mm, reciprocating twisting movements (as when winding a watch), alternating with pulling.
- Irrigation.
- Pulp removal.
File No. 06 K 24 mm, reciprocating twisting movements (as when winding a watch), alternating with pulling. - Irrigation.
- "Carpet". File No. 08 K 24, vertical reciprocating movements (up and down)
- "Carpet".
File No. 10 K 24, reciprocating movements vertically (up and down) - Irrigation.
- "Carpet". File No. 15 FF 24, reciprocating movements vertically (up and down).
Formation of the coronal and middle thirds
- Formation of the coronal and middle thirds. Drill GG (Gates-Glidden) #04, 12 mm.
- Irrigation. Passing with 10 K file.
- Formation of the coronal and middle thirds. Drill GG (Gates-Glidden) #03, 15 mm.
- Irrigation.
Passing the file 10 K, movements - as when removing pulp. - Formation of the coronal and middle thirds. Drill GG (Gates-Glidden) #02, 18 mm.
- Irrigation. Passing the file 10 K, movements - as when removing pulp.
Formation of the apical third of the canal
- Irrigation.
- Formation of the apical third of the canal. File No. 35 FF, 20 mm, reciprocating twisting movements (as when winding a watch), alternating with pulling.
- Irrigation. Passing the file 10 K, movements - as when removing pulp.
- Formation of the apical third of the canal.
File No. 30 FF, 22 mm, reciprocating twisting movements (as when winding a watch), alternating with pulling. - Irrigation. Passing the file 10 K, movements - as when removing pulp.
- Formation of the apical third of the canal.
File No. 25 FF, 24 mm (passing), reciprocating twisting movements (as when winding a watch), alternating with pulling. - Irrigation. Passing the file 10 K, movements - as when removing pulp.
Show your patients how their teeth work.
This will help them understand you better and appreciate the treatment you provide more. The posters “Anatomy of a tooth blueprint”, “Anatomy of a tooth light” and “How a tooth works” will help you in this matter:
Stylish, light and bright. Choose:
https://laa.stomanet.ru/product/stomatologicheskie-plakaty-anatomiya-zuba-blyuprint-a2/
https://laa.stomanet.ru/product/stomatologicheskie-plakaty-anatomiya-zuba-lajt-a2/
https://laa.stomanet.ru/product/stomatologicheskij-plakat-kak-ustroen-zub-a2/
Learning Dental English
Coronal third, middle third, apical third
– coronal third, middle third, apical third (tooth root).
Glide path
– “carpet path”, a processed section of the canal that makes it easier.
Working length
– working length (for example, endotool).
Mesiobuccal
– medial buccal (about the root); mesial - medial, buccal - buccal.
GG drill
– Gates-Glidden drill
Patency
– channel passage
Advantages
The active use of this group of methods is explained by a number of their advantages:
- providing excellent access to the deep part;
- reducing the possibility of tissue damage by infection inside the tooth due to the gradual elimination of damaged material;
- facilitating drug treatment;
- reducing the risk of tool getting stuck in the internal structure of the tooth;
- reducing the risk of blocking deep parts with dentin filings and soft tissues;
- the ability not to reduce the “working length” of the mine;
- maintaining the natural shape of the channels.
The technique also has disadvantages associated with the inability to immediately determine the entire length of the canal and the degree of its passability. As a result, the specialist has to spend a lot of time and effort on processing the tap, especially in comparison with apical-coronal methods of root canal processing.
Presentation on the topic: Methods of instrumental treatment of root canals (Step Back, Crown Down,
Baibulova K.K.candidate of medical sciences, associate professor
2
Slide 2: Tasks of instrumental (mechanical) processing of channels:
cleaning the root canal (RC) from pulp residues or its decay, softened infected dentin, foreign particles (microorganisms, food debris, etc.)
);passing obliterated areas;expanding the canal, straightening the curvatures and giving a shape convenient for filling;smoothing the canal walls to improve the contact of medications with the infected surface of the parietal dentin and ensure a tight fit of the filling material
3
Slide 5: Rules for performing instrumental processing (IO):
high-quality implementation of the stage is possible only if the preliminary stages are correctly completed: isolation from saliva, expansion of the mouths of the CC and formation of access, determination of the working length; AI is carried out with the obligatory preliminary introduction of preparations into the channels for lubrication and chemical expansion of the channels. This speeds up work and reduces the risk of tool jamming and breakage.
6
Slide 8: Apical-coronal methods
Stage 1 - passing the CC: following the irrigation protocol, the CCs are passed to the physiological apex with thin K-reamers, for example size 10, or passfinders. The main technique for performing a root canal is rimming. The K-reamer is inserted into the root canal, turned a quarter or half turn, like winding a watch, then removed and cleaned.
9
Slide 13: Step Back technique (“step back”)
Passing the CC to the physiological apex with a K-reamer or a small-size pathfinder to the working length using back-and-forth movements with careful irrigation; Repeating these actions without much resistance until the K-reamer No. 25 according to ISO or two sizes larger than the first reaches working length (for example 20 mm)
14
Slide 18
Sealing the apical portion of the canal with dentine chips can lead to file straightening and even perforation
19
Slide 19: Crown Down Technique
The coronal-apical “Crown-D own” technique involves the sequential use of endodontic instruments from larger to smaller sizes, starting from the mouth to the top of the CC. First of all, the primary passage of the CC is carried out to a working length of up to 20 instrument sizes according to ISO (carpet path).
20
Slide 21: Advantages of the method:
Less risk of microflora and putrid masses being released into the periodontium; Reduced risk of instrument fracture in the canal, improved control over its progress; By following the irrigation protocol, maximum cleaning and disinfection of the root canal system can be achieved
22
Slide 22: Crown Down technique modified for machine tools
Basic principles of operation: - progression from crown to apex; - sequence of use of instruments - from large to smaller sizes; - sequence of use of instruments - from larger taper to smaller
23
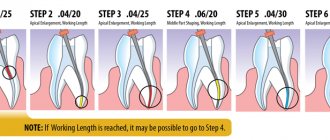
Slide 23: Algorithm for canal preparation using the “Crown Down” technique with GTI files:
Rinse the canal mouth and the tooth cavity with sodium hypochlorite, using it as a reservoir for the drug; Go through the canal with a K-file of at least size 15 and determine the working length; Prepare the canal mouth with a 10/20 file at a speed of 300 rpm, moving slowly, without pressure file inside for 3-5 seconds;
24
Slide 24: continuation
Change file to 08/20 to continue processing the canal in the middle third; Change file to 06/20 to continue preparation to the apical narrowing; Make the final determination of the working length.
If necessary, expand the apical part of the canal to the desired size - most often to 04/20.
There are other methods in which preparation is performed with instruments of the same taper, but of decreasing sizes.
25
Slide 26: Balanced Strength Technique
After determining the working length of the canal and selecting the K-file by diameter, it is inserted into the canal until it stops.
Then, with little effort, the instrument is turned clockwise by 120-180 0 (no more than 1 turn!) and, pressing on the file in the apical direction to fix it at a given depth, it is turned 360 0 counterclockwise. It is important to press on the file so that it is not removed from the canal, but rotates at the same level.
27
Slide 31: Quality criteria for instrumental treatment of root canals
Expansion of the canal to the working length Optimal conical shape along the entire length of the canal Preservation of the spatial topography of the canal lumen Countershape in the apical part of the canal Preservation of the size and location of the apical foramen.
33
| Khomenko L.A., Bidenko N.V. Practical endodontics. Tools, materials and methods M.: Book Plus, 2002. - 216 p. ISBN 5-93268-006-7 PDF 10.2 MB Russian language good quality The manual describes the instruments, devices and materials used in endodontic treatment, and also describes the most used techniques for instrumentation and obturation of root canals. The features of epdodontics in children are considered. For dentists, teachers, students, masters, clinical residents, students of medical universities in the specialty "Dentistry" Introduction Endodontics is the branch of dentistry that studies the morphology, physiology and pathology of the pulp of human teeth and the tissues surrounding the root of the tooth (JL Gutmann). Treatment of pulp and periodontal diseases and endodontic preparation of teeth to restore their structure and function are an essential part of practical dentistry. Modern technologies make it possible to restore even significantly damaged tooth roots. They make it possible to preserve a unique anatomical structure - the psriodontal ligament of the tooth. The purpose of this textbook is to present modern endodontic equipment, treatment techniques and obliteration of root canals of teeth that can ensure the success of endodontic treatment. We did not set ourselves the goal of considering the etiology, clinical picture, pathogenesis of painful teeth, or the choice of treatment method for their various forms. The manual presents practical aspects of endodontic treatment using modern instruments and techniques accepted in world dental practice. Due to the insufficient development of Russian-language terminology in endodontics, the manual uses the English names of instruments and techniques. In some cases, the names of developers and manufacturers of certain tools and techniques are indicated in brackets. Standards and classificationInstruments for opening the tooth cavity and searching for canal orificesExploratory or diagnostic instrumentsInstruments for removing soft tissue from the root canalInstruments for enlarging the canal orificeInstruments for passing, enlarging and shaping root canals -Instruments of type K -Modifications of K-instruments -Instruments of type H -Modifications of H- files -Other types of instruments -Handpieces for working in root canals -Vibration systems for root canal treatment -Laser technology for root canal treatment Devices for irrigation and drying of root canalsInstruments used for canal obturation Providing access to the root canals and primary cleaning of the canal. Irrigation of the root canals. Determination of the working length of the tooth. Instrumental treatment of the root canal of a tooth Step-back technique ("step back") - Conditions necessary for the implementation of the step-back technique - Treatment technique Step-down or crown down technique ("step forward" or "from the crown down") Step-down root canal treatment technique ( modified) Coronal-apical root canal treatment technique with double flaring (double-flared) Concept of balanced forces (balanced forces) Technique options based on machine rotation - Preparation using profiles (Profiles, Maillefer) - Preparation using GTRotary files (GTRotary) files, Maillefer) - Preparation using ProTaper instruments (ProTaper, Maillefer) - Preparation using the Lightspeed system - Preparation using the FlexMaster system (VDW, Antaeos) - Preparation using the Ouantec series 2000 system (Analytic) - Preparation using the HERO 642 system ( High Elasticity in Rotation, Micro-Mega) - Preparation using the KZ system (Kerr) Temporary obturation of root canals Permanent obturation of root canals Obturating materials for root canalsPlastic hardening materialsMaterials based on phenol-formalinMaterials based on zinc oxide and eugenolCalcium-containing materialsMaterials based on polymers and resinsGlass ionomer cementsSolid materials (fillers) Methods of obturation of the root canal of a tooth -Single pin method -Method of lateral condensation of gutta-percha -Obturation of the canal with using an automatic plugger -Obturation of canals with chemically plasticized cold gutta-percha -Vertical condensation of heated gutta-percha -Obturation of warm fragmented gutta-percha -Lateral-vertical condensation of heated gutta-percha -Thermomechanical compaction of gutta-percha using a gutta-condenser -Thermomechanical compaction of gutta-percha using the Quickfill system -Use of ultrasonic plasticization of gutta-percha -Obturation of thermoplastic injection gutta-percha -Obturation of the root canal with two-phase gutta-percha -Obturation of the canal using the Thermafil and Soft-Core systems -Obturation of the canal using the SuccessFil system -Filling the apical third of the canal with dentine chips (dentinoplasty)Unsealing canals obturated using gutta-percha Features of endodontic technology in children
Complications of prosthetic treatment, their prevention and treatment Literature |